Page History
| Anchor | ||||
|---|---|---|---|---|
|
| Table of Contents | ||
|---|---|---|
|
Overview
| Styleclass | ||
|---|---|---|
| ||
| HTML |
|---|
<iframe width="700" height="394" src="https://www.youtube.com/embed/ScHi5y1VI2k?color=white" frameborder="0" allowfullscreen></iframe> |
...
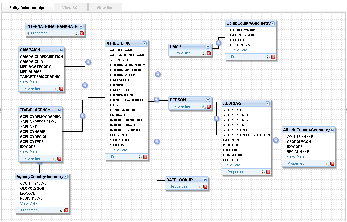
This section describes how to use the view builder to create views of your database that end users can access for reporting purposes. These views are built by first creating an entity relationship diagram which joins all required tables together.
...
By using the Yellowfin view builder you can optimise the SQL that will be generated by the query. For example if you create a view where multiple tables are joined - – Yellowfin will only select data from the tables necessary to return data required for the report. This means that you can create relatively complex views without compromising on performance.
...
You build your relationship diagram on the canvas by selecting tables from the source database using table list. You create joins to link the tables. When you have built the relationship diagram for your view, you can test the view using integrity and impact analysis checks.
Drag and Drop Builder
| Styleclass | ||
|---|---|---|
| ||
...
- The process wizard assists you to move between the various steps in building your view.
- The search and expand option allows you to search for tables in your data base
- The virtual table allows you to create your own tables using freehand SQL.
- The data base tables allow you to view all the available tables in your data source.
- Drag the table to resize the table list and expand the size of your canvas.
- The canvas - – it is on this section that you drop your tables and create joins between them.
- Create Joins that link your tables together
- View options - – manage the view details and table properties.
...
| Database table |
| Database View |
| Virtual Table |


Note: the number of default tables shown is a configuration item - – 50 is the default
Drag Table onto Canvas
...
See Table Properties for more information.
| horizontalrule |
|---|
| Styleclass | ||
|---|---|---|
| ||