Page History
| Anchor | ||||
|---|---|---|---|---|
|
| Anchor | ||||
|---|---|---|---|---|
|
| Table of Contents | ||
|---|---|---|
|
...
The installer will provide a the following series of prompts for information and confirmations. These are:
- Welcome screen
- Installer installer language selection;
- welcome screen;
- terms Terms & conditions confirmation;
- components Components to install (see table below);
- License license file location;
- general General configuration settings (see table below);
- database selection;
- database details (see table below); and,
- Database selection
- Database details
- Installation pathinstallation path (see section below).
Once you've provided the required information, the installer will indicate the progress of the installation until completion.
| Info |
|---|
If you are looking for instructions on how to upgrade your Yellowfin instance, click here. |
| Anchor | ||||
|---|---|---|---|---|
|
Additional content pack details
...
Installing the Optional Tutorial Content
| Pack | Description |
|---|---|
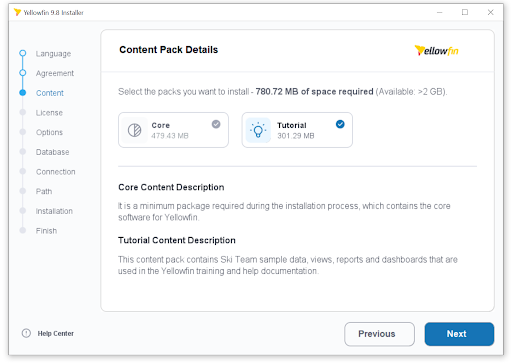
Core |
Software for Yellowfin that must be installed |
, the minimum package required during installation. |
Tutorial Content |
The content pack contains Ski Team sample data, views, reports and dashboards that are used in the Yellowfin training and help documentation. This is particularly useful if you haven't used Yellowfin before. |
World Countries Pack
This GeoPack provides selected geographic data for every country on Earth. It includes a metric for country population estimates as of 2005.
Note: Several of the national borders contained in this pack are disputed.
US ZIP Code Pack
This GeoPack provides selected geographic data for states, counties and zip codes in the United States. It includes census-derived demographics for population by age, as well as various demographics for area income, labour force and unemployment.
Note: Due to the US Census Bureau's method of converting zip codes to areas there is not 100% correlation of postal zip codes to census collected data. As a result, there are zip code level land areas for which no data is available.
| Anchor | ||||
|---|---|---|---|---|
|
General configuration details
| Configuration | Description |
|---|---|
| Web Server Port | Set the port number for Yellowfin to listen for web browser requests. By default, all web browsers send requests using port 80. If there are no other web servers on the machine that Yellowfin is being installed on, you can accept the default port number of 8080. If there are |
web servers installed on the machine that Yellowfin is being installed |
, |
there may be port clashes and Yellowfin will fail to function correctly. |
Therefore, the port number must not |
be in use by any other application on the machine. Port numbers like 8080, 8081 and so on are typically good candidate port numbers. | |
| Windows Service | Check this box to install Windows Service on the server |
, it will automatically start up whenever the Windows Server is booted |
. Note: this option will only appear during installation on a Windows platform. | |
| Application Memory | Specify a memory size (in MB) that should be used by Yellowfin. Yellowfin should be configured to use at least 2GB of memory. By default, the installer will allocate 75% of the system's memory to the Yellowfin application, but this size can be changed here. |
| Anchor | ||||
|---|---|---|---|---|
|
Database details
The database details required during installation are for the database that stores all the Yellowfin content definitions, configuration information, and event details (ie, i.e. not your report data). This database can be created before the installation or the Yellowfin installer can create it for you.
Database Server Location | |
|---|---|
Server Host | Enter the network address of the database server hosting the Yellowfin database. If the Yellowfin database is on the same computer as the Yellowfin application, enter localhost. |
Server Port | Enter the network port number of the database hosting the Yellowfin database. |
Database Name | Enter the name of the Yellowfin database. If one doesn't exist, enter a new name. |
Create New Database | If the above database does not exist on the database server, |
select this option to allow the Yellowfin installer to create a new database to host the Yellowfin database using the database name entered above. When you check this checkbox, the Administrator User section will appear on the screen for you to add these existing details so that Yellowfin is granted access to create the new database. | |
Authentication Details | |
|---|---|
Authentication | This configuration is specific to Microsoft SQL server. Choose how the database users should be authenticated. Options include:
|
Logon Domain | If Windows authentication is selected, specify a logon domain. |
Database User | |
Username | Enter the name of the database server user account that has access to the Yellowfin database. This database user must have full read and write permissions to the Yellowfin database. |
Password | Enter the password of the database server user account that has access to the Yellowfin database. |
Confirm Password | Re-enter the password of the database server user account that has access to the Yellowfin database. (This is only required if creating a new user.) |
Create New User | If the above database user does not exist on the database server, |
select this option to allow the Yellowfin installer to create a new database user account to access the Yellowfin database. When |
selected, the Administrator User section will appear on the screen for you to add |
the existing details so |
Yellowfin is granted access to create a new user. | |
Administrator User | |
|---|---|
| This section appears if you check the checkbox for Create New Database and/or Create New User. | |
Username | Enter the name of the existing database server user account that has administrator-level access to the database server hosting the Yellowfin database. |
Password | Enter the password of the existing database server user account that has administrator-level access to the database server hosting the Yellowfin database. |
| Anchor | ||||
|---|---|---|---|---|
|
Installation path
...
- If the installation path does not exist just , enter the required installation path and the installer will create the directory.
- On Windows, if you select an installation directory in the path C:\Program Files, the Yellowfin application must always be run Run as an administratorAdministrator.
- On Windows 64bit version, ensure you choose a path outside of the Program Files directory.
- Choosing an installation path without spaces or punctuation characters will make future advanced configuration easier.
| Styleclass | ||
|---|---|---|
| ||
Install Yellowfin
The steps below cover the full installation process.
- Open the application installer file (the .jar file for MacOS or Linux, or the .exe file for Windows : see (see Install And Deploy Yellowfin for further details.)
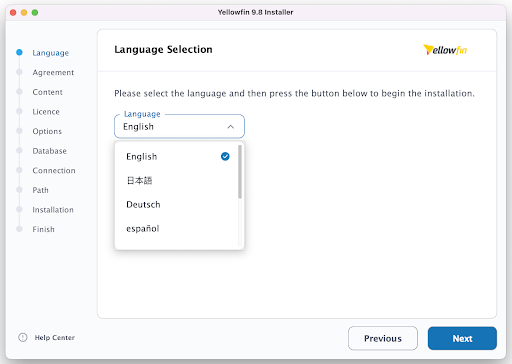
The Language Selection prompt for the installation process will be displayed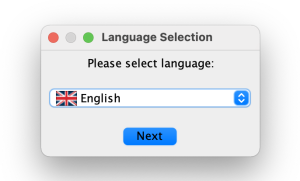
- Select your preferred installer language from the dropdown, then click on the Next button to display the Yellowfin Installer, with a list of environment tools required before installation
The icons on the left indicate where you are in the installation process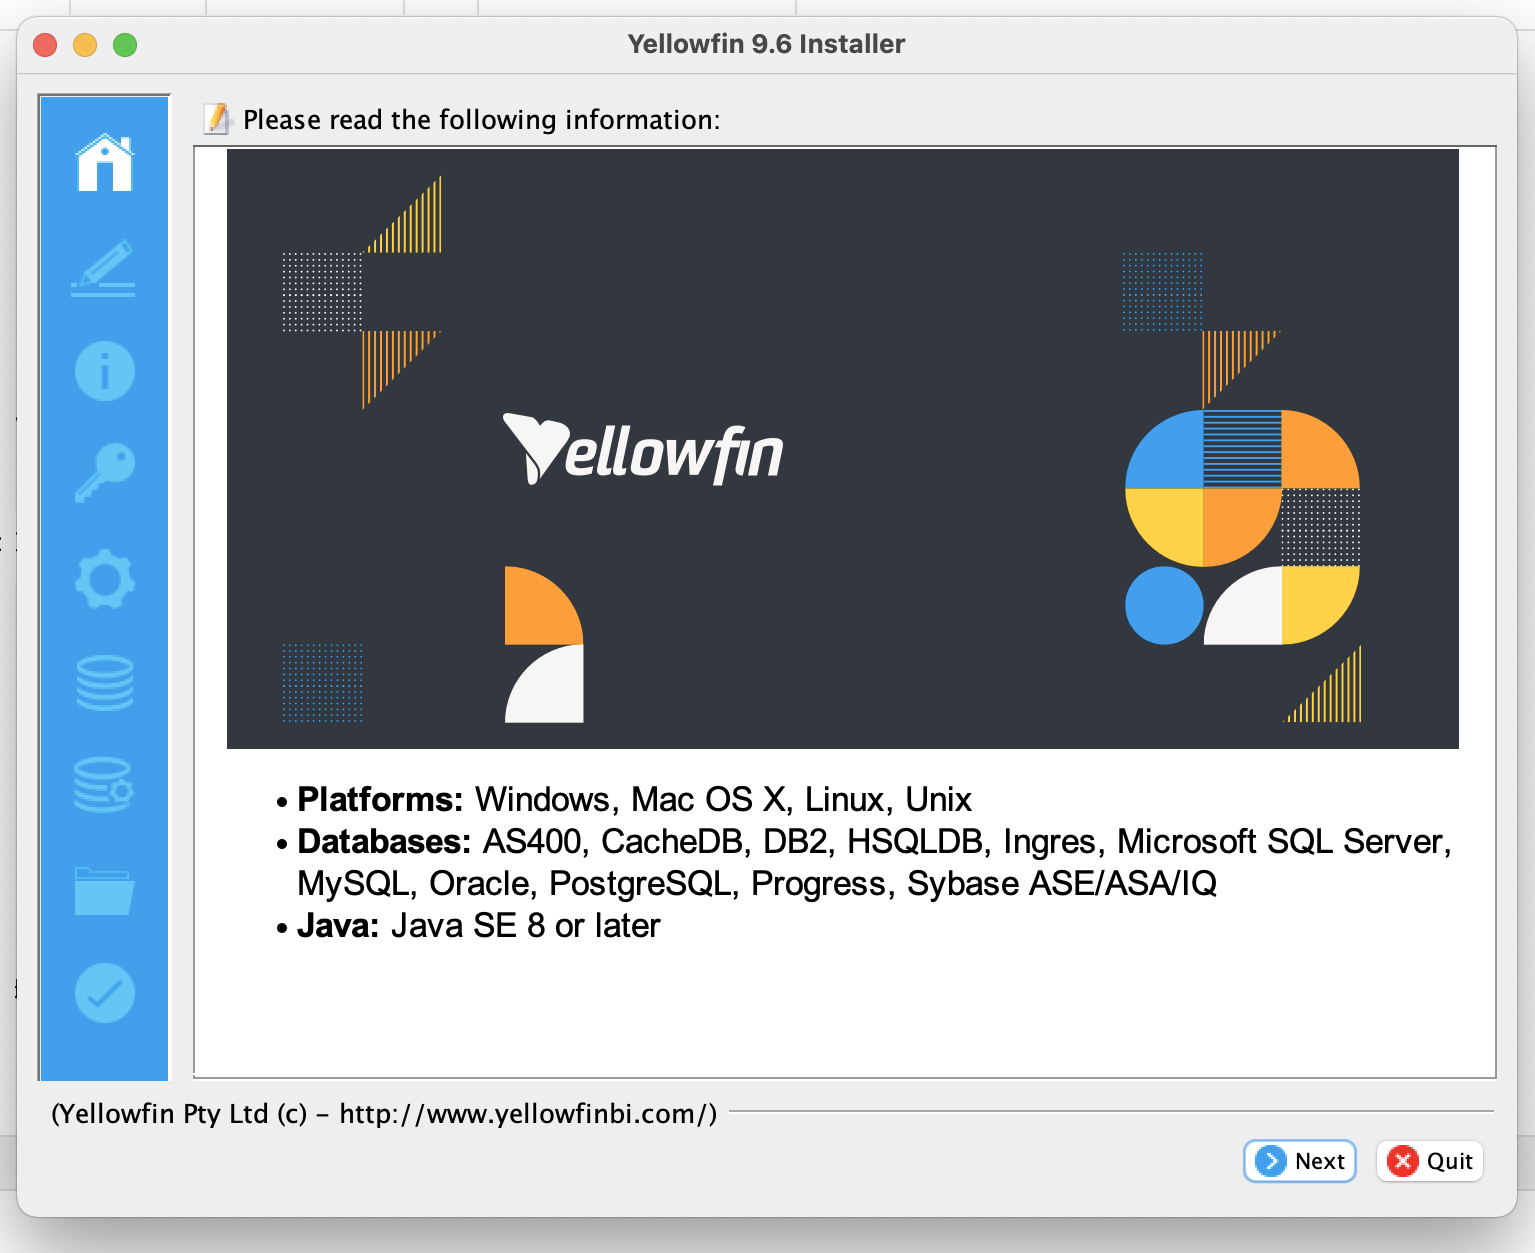
- Click the arrow to start installation or it will automatically continue after 15 seconds.
- Select the language, the default language will be displayed based on the user’s machine settings, click Next.
- Accept the Software License Agreement. Ensure you have installed the required supporting software listed, then click on the Next button to continue to the terms and conditions
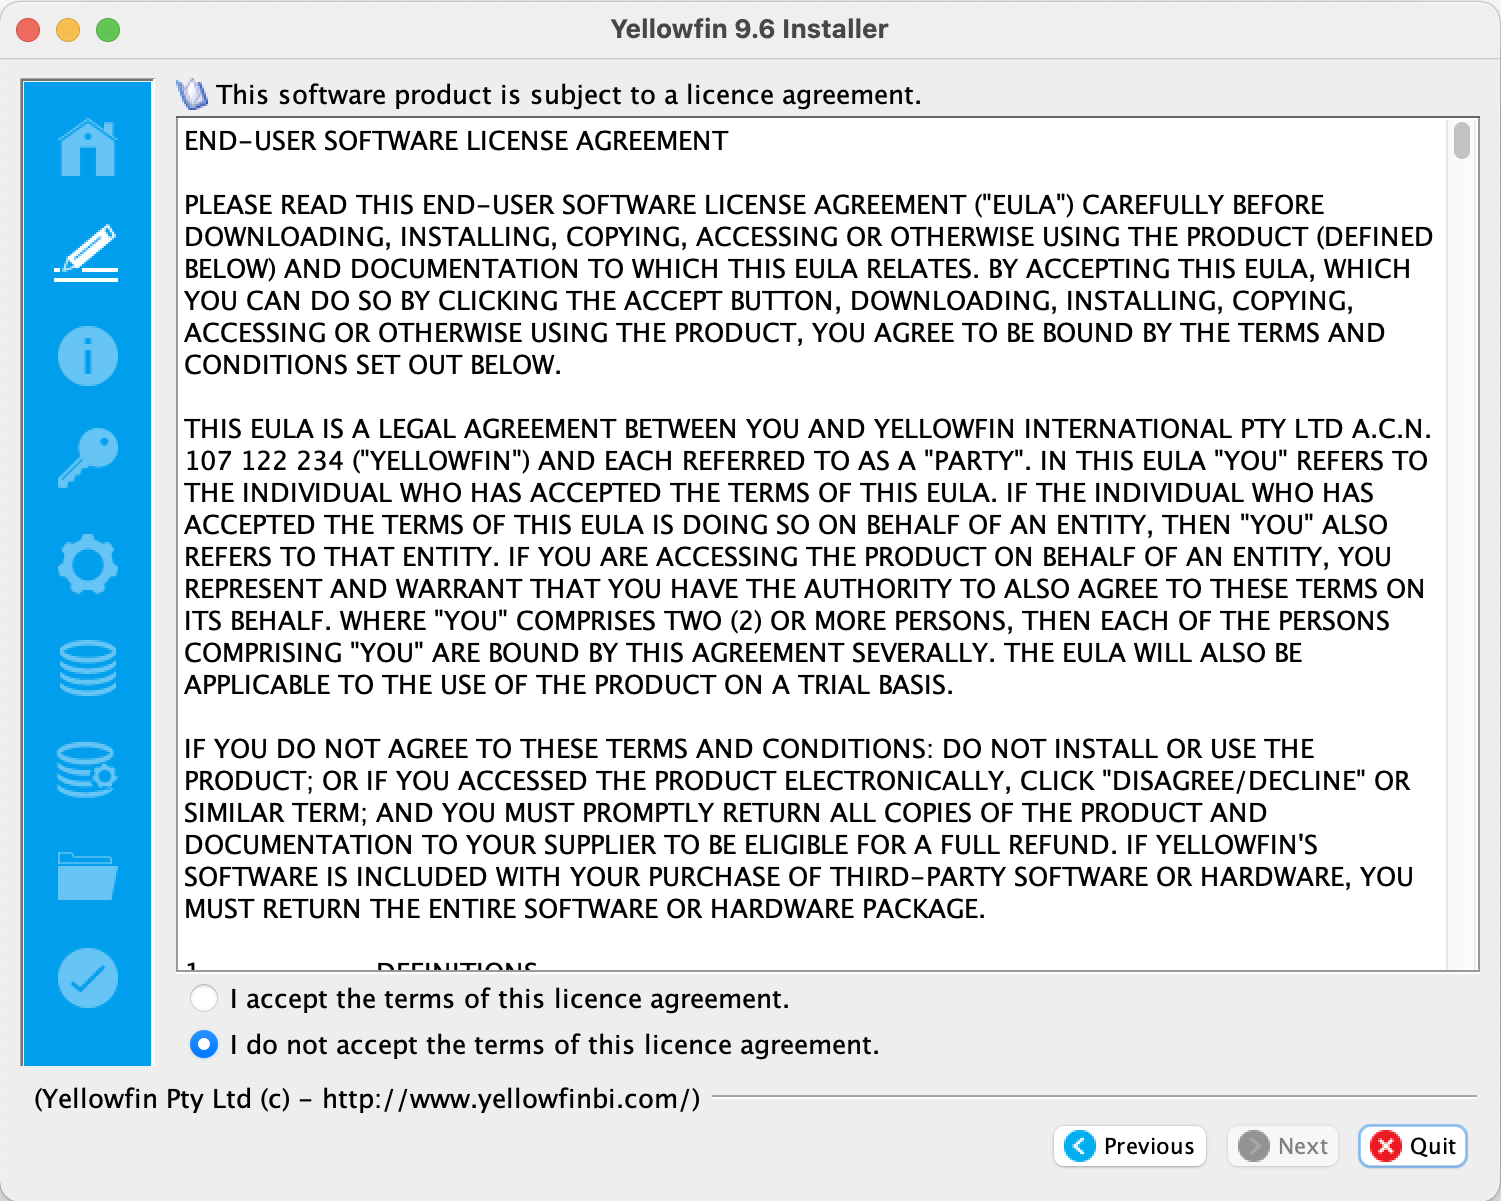
The Yellowfin end-user software agreement is also available as a PDF for download - When you have read and understood the terms, click on the I accept the terms of this licence agreement radio button, then click on the Next button
Apart from the core application, a number of content packages are available for installation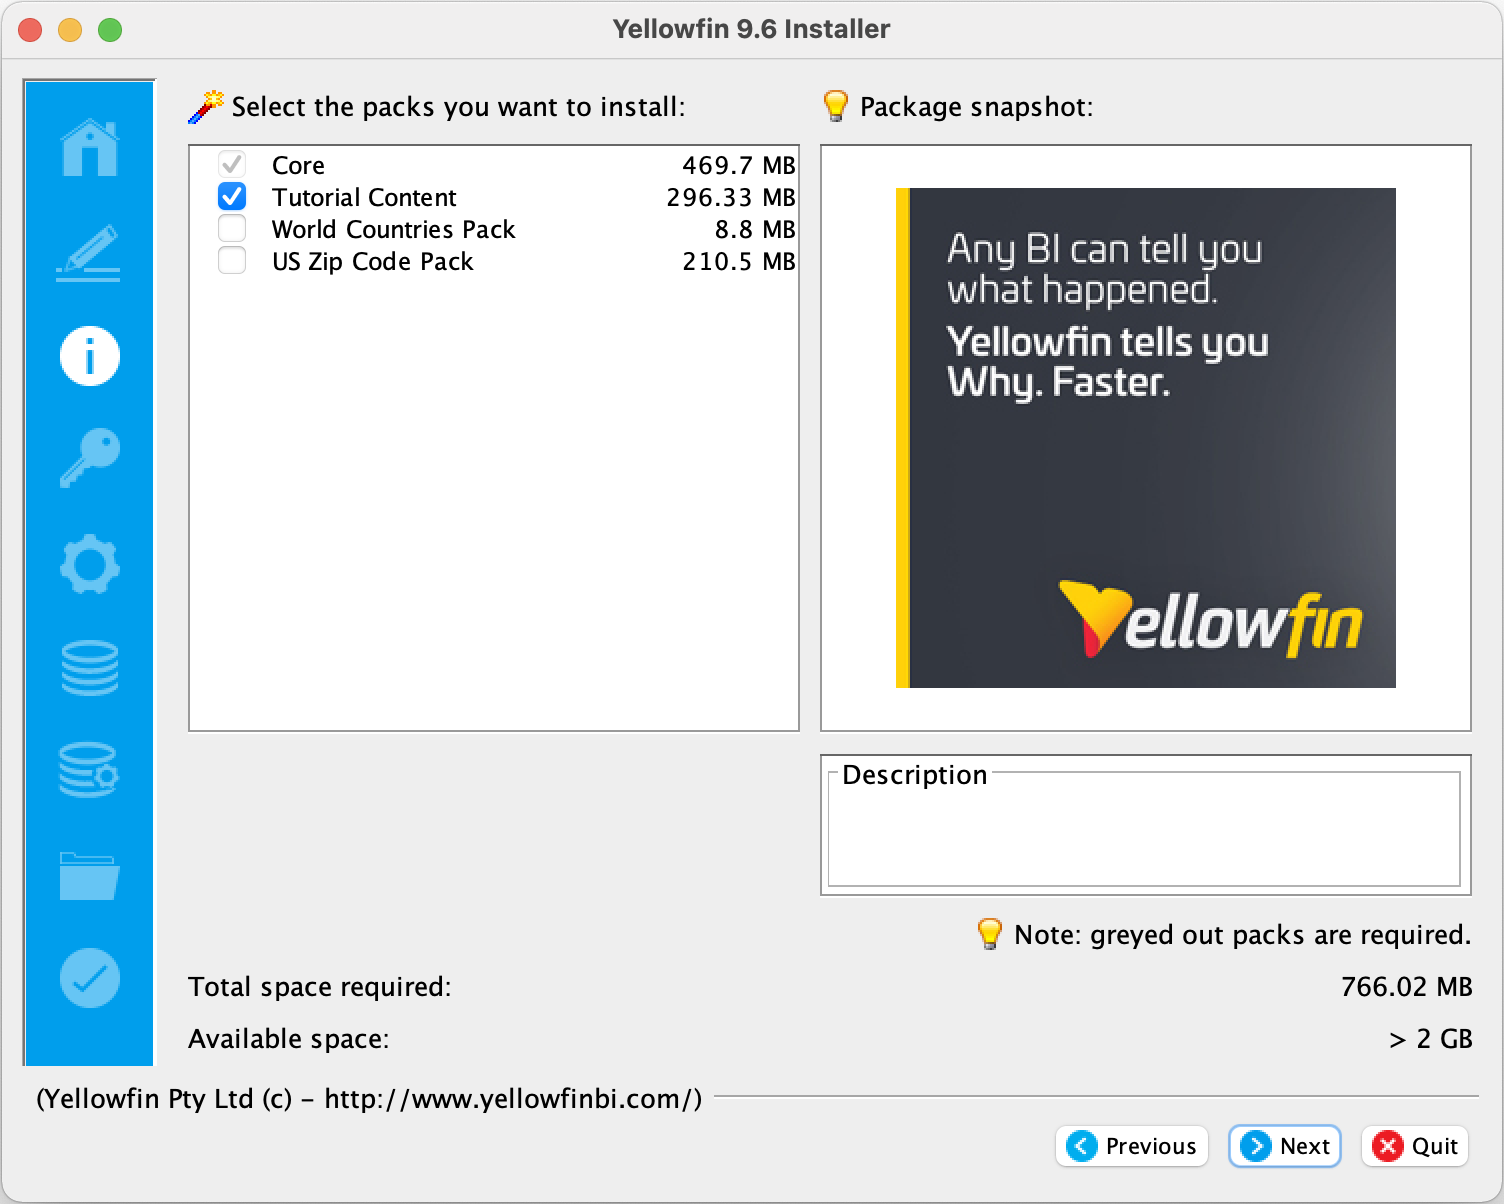
- Check any of the boxes for any content packages you wish to install, then click on the Next button
You will be prompted to locate your license file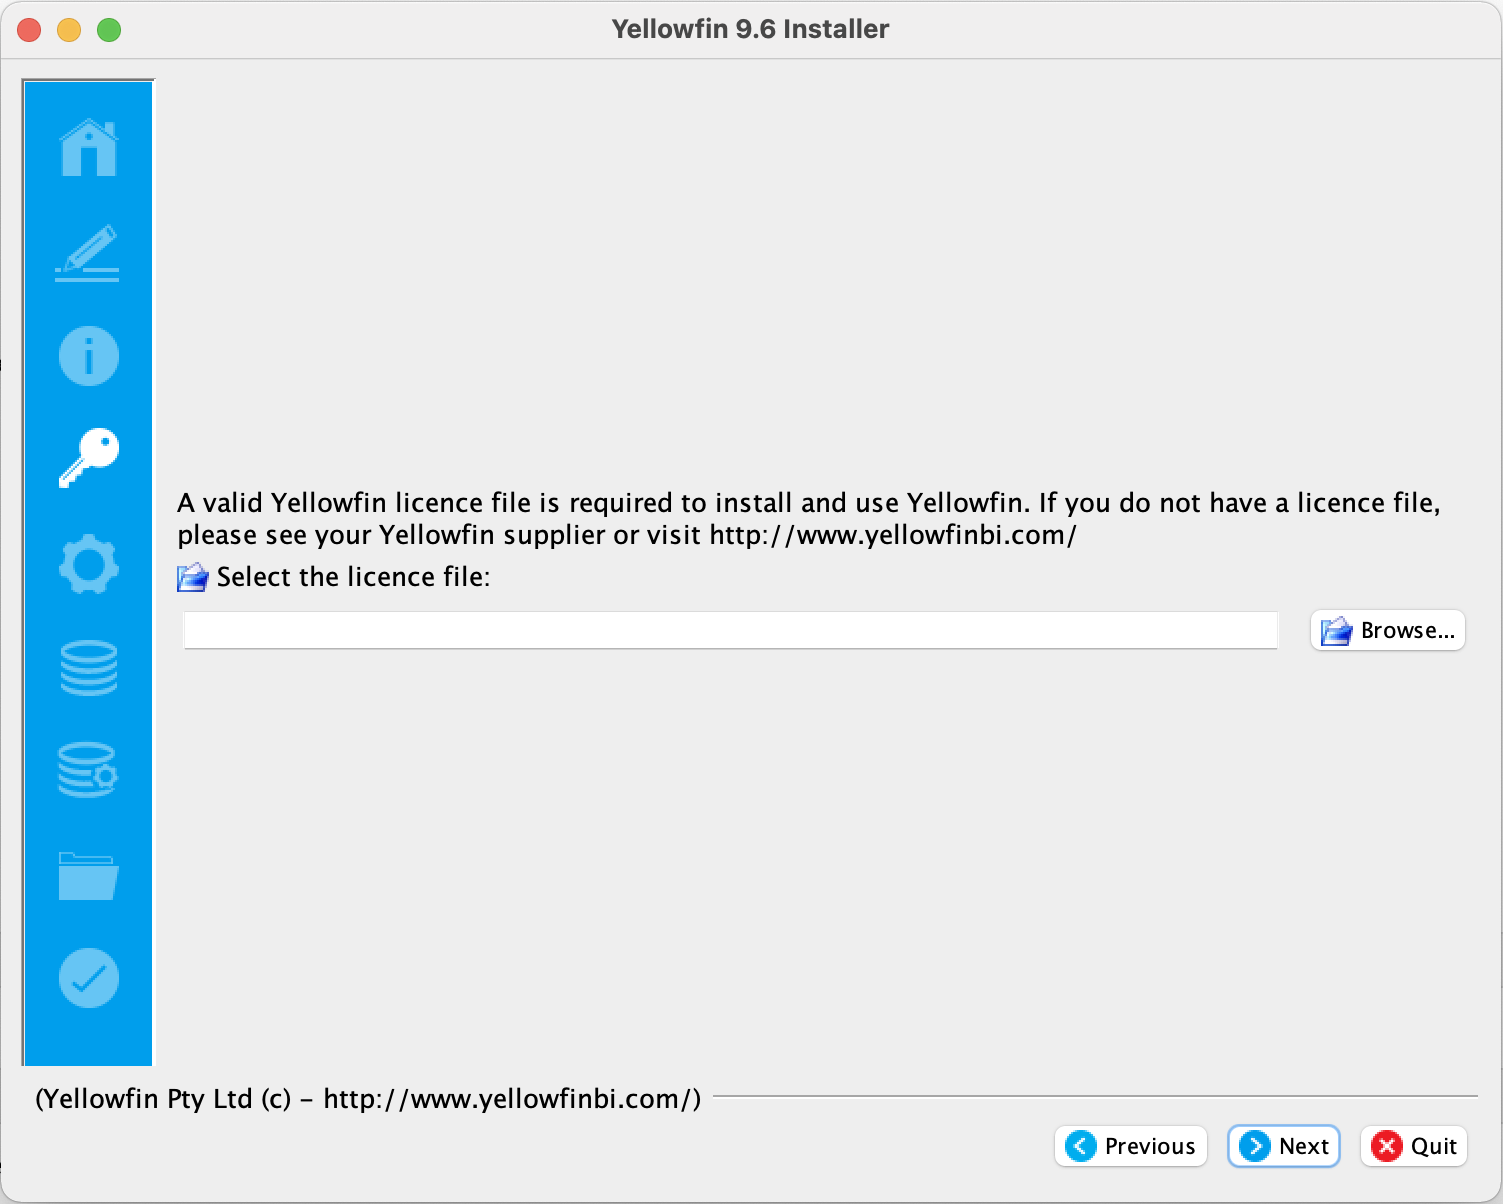
If you haven't already received a Yellowfin license, learn how to request a license here - available here.
- Select the pack available for installation and click Next.
- Select the License file by clicking the Browse button to locate your downloaded license file and click Next.
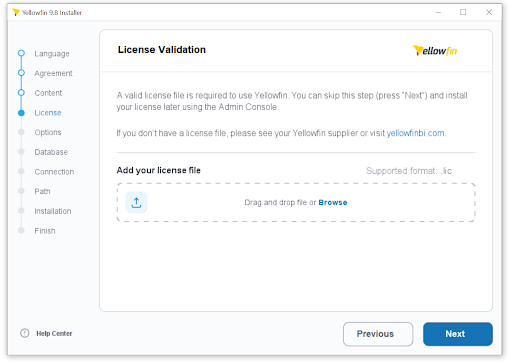
Click here, if you need a Yellowfin license.
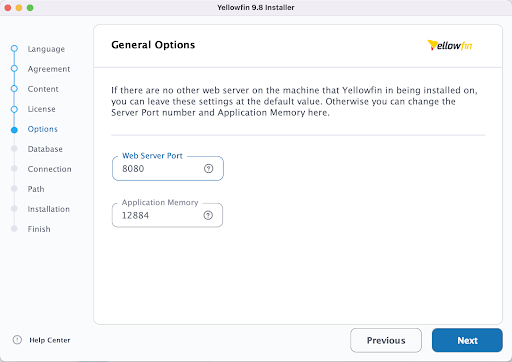
You can If you're waiting on your Yellowfin license, leave the box blank and add it later (see the a license later. Check the License Management page); otherwise, click on the Browse button to locate your downloaded license file. - In the Options section, leave the default value or change the Server Port and Application Memory, click Next.
Refer to the following page for more information. Click on the Next button to continue to the General Options section of the installer
If you're installing onto on Windows, the Windows Service option will be added.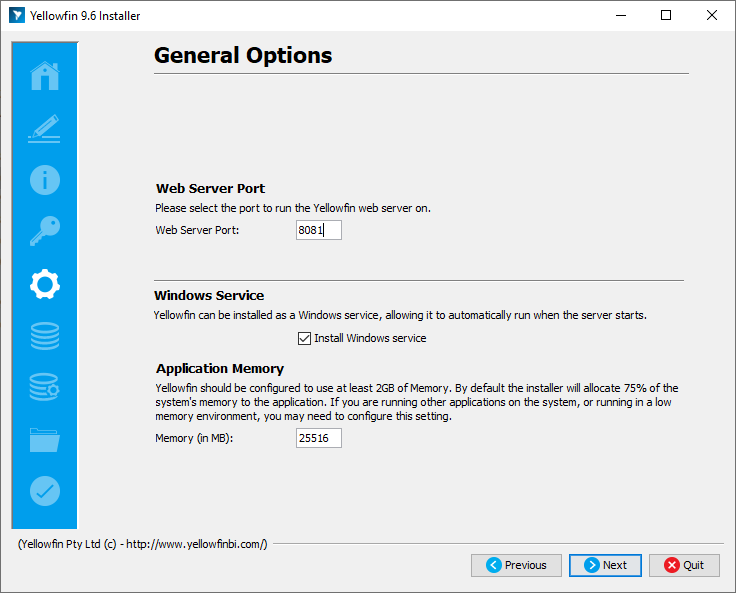
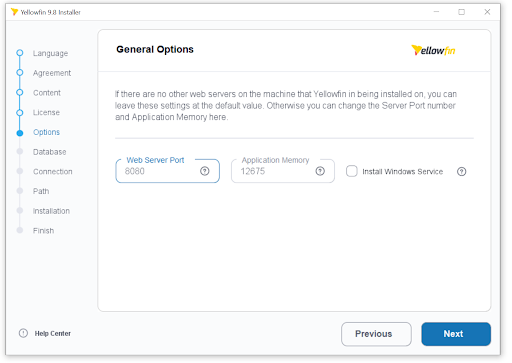
If you're installing onto on Mac OS or Linux, the Windows Service option is not displayed.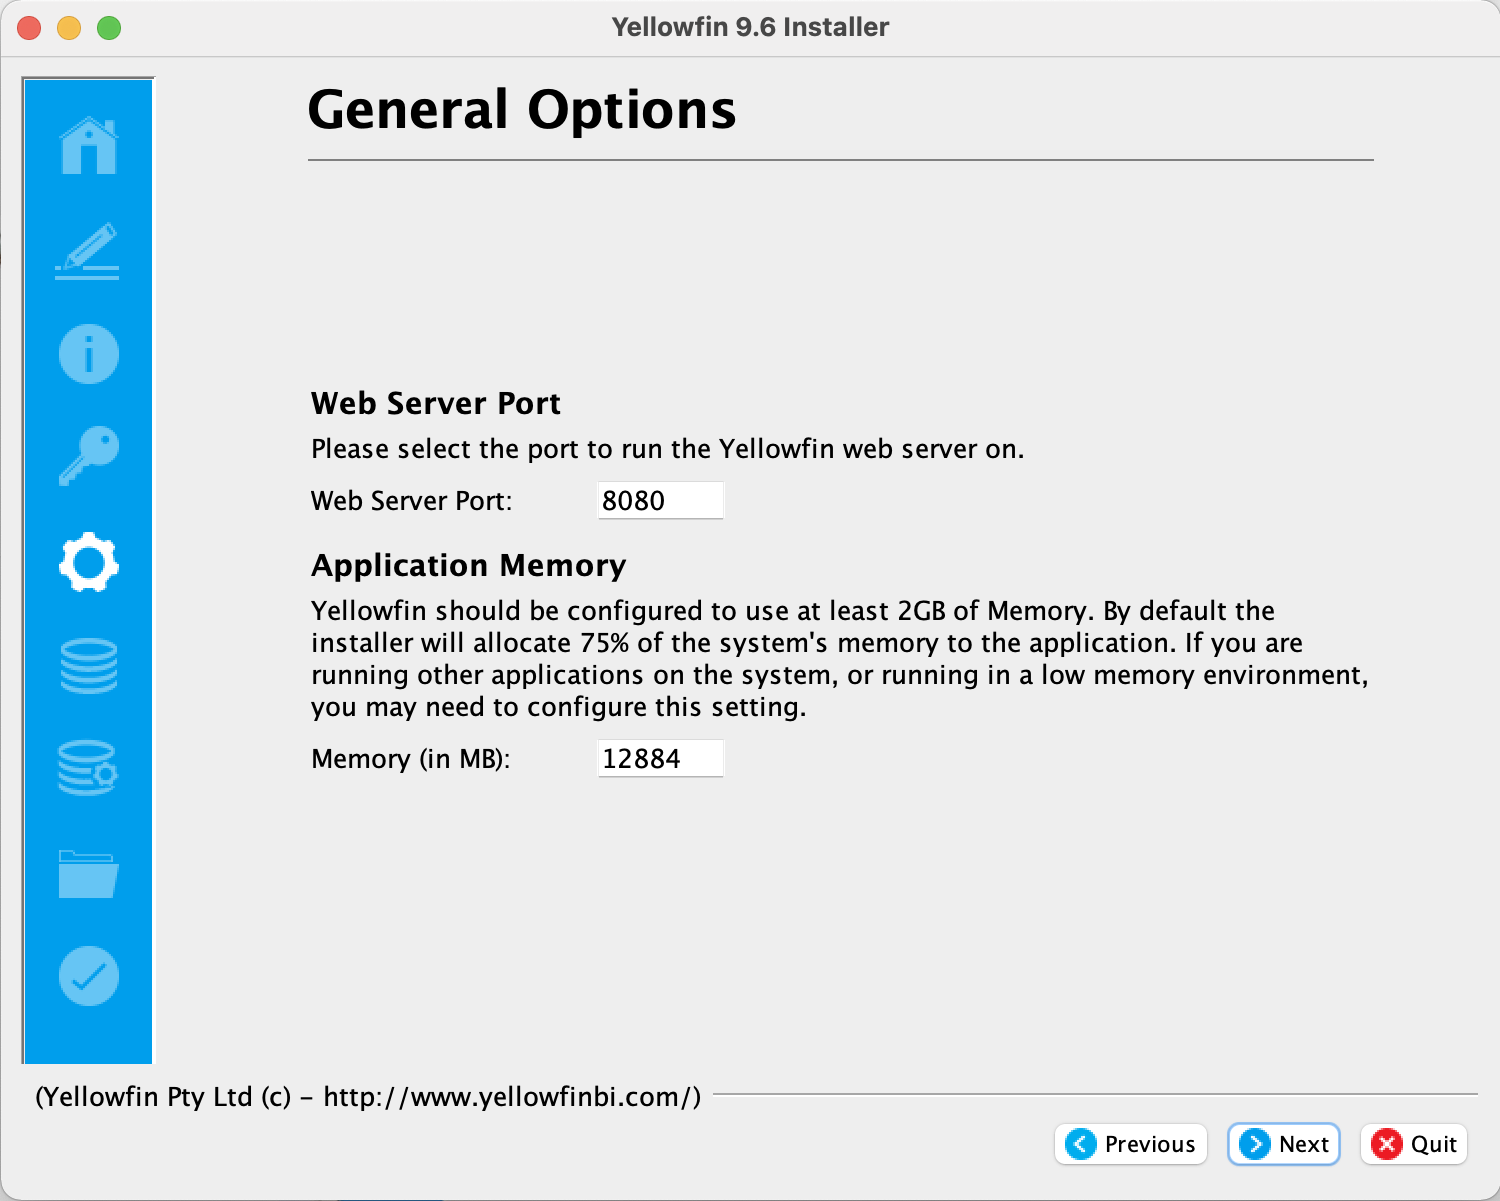
- Either accept the defaults, or refer to the table above for more information, then click on the Next button
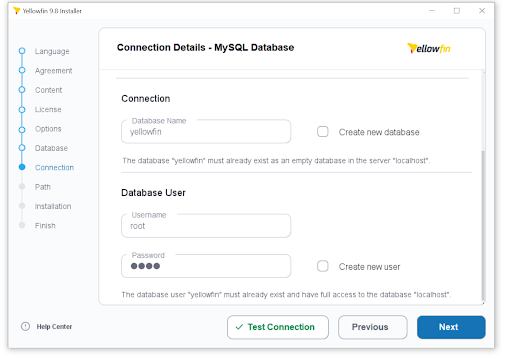
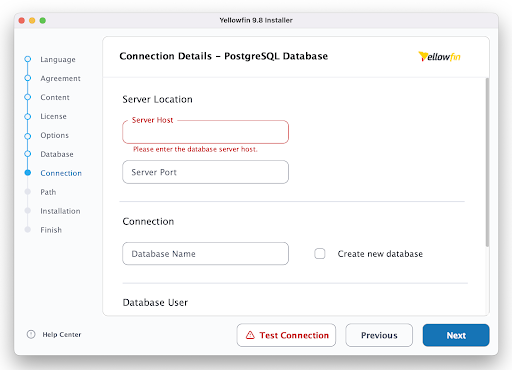
The Yellowfin Database Details section will be displayed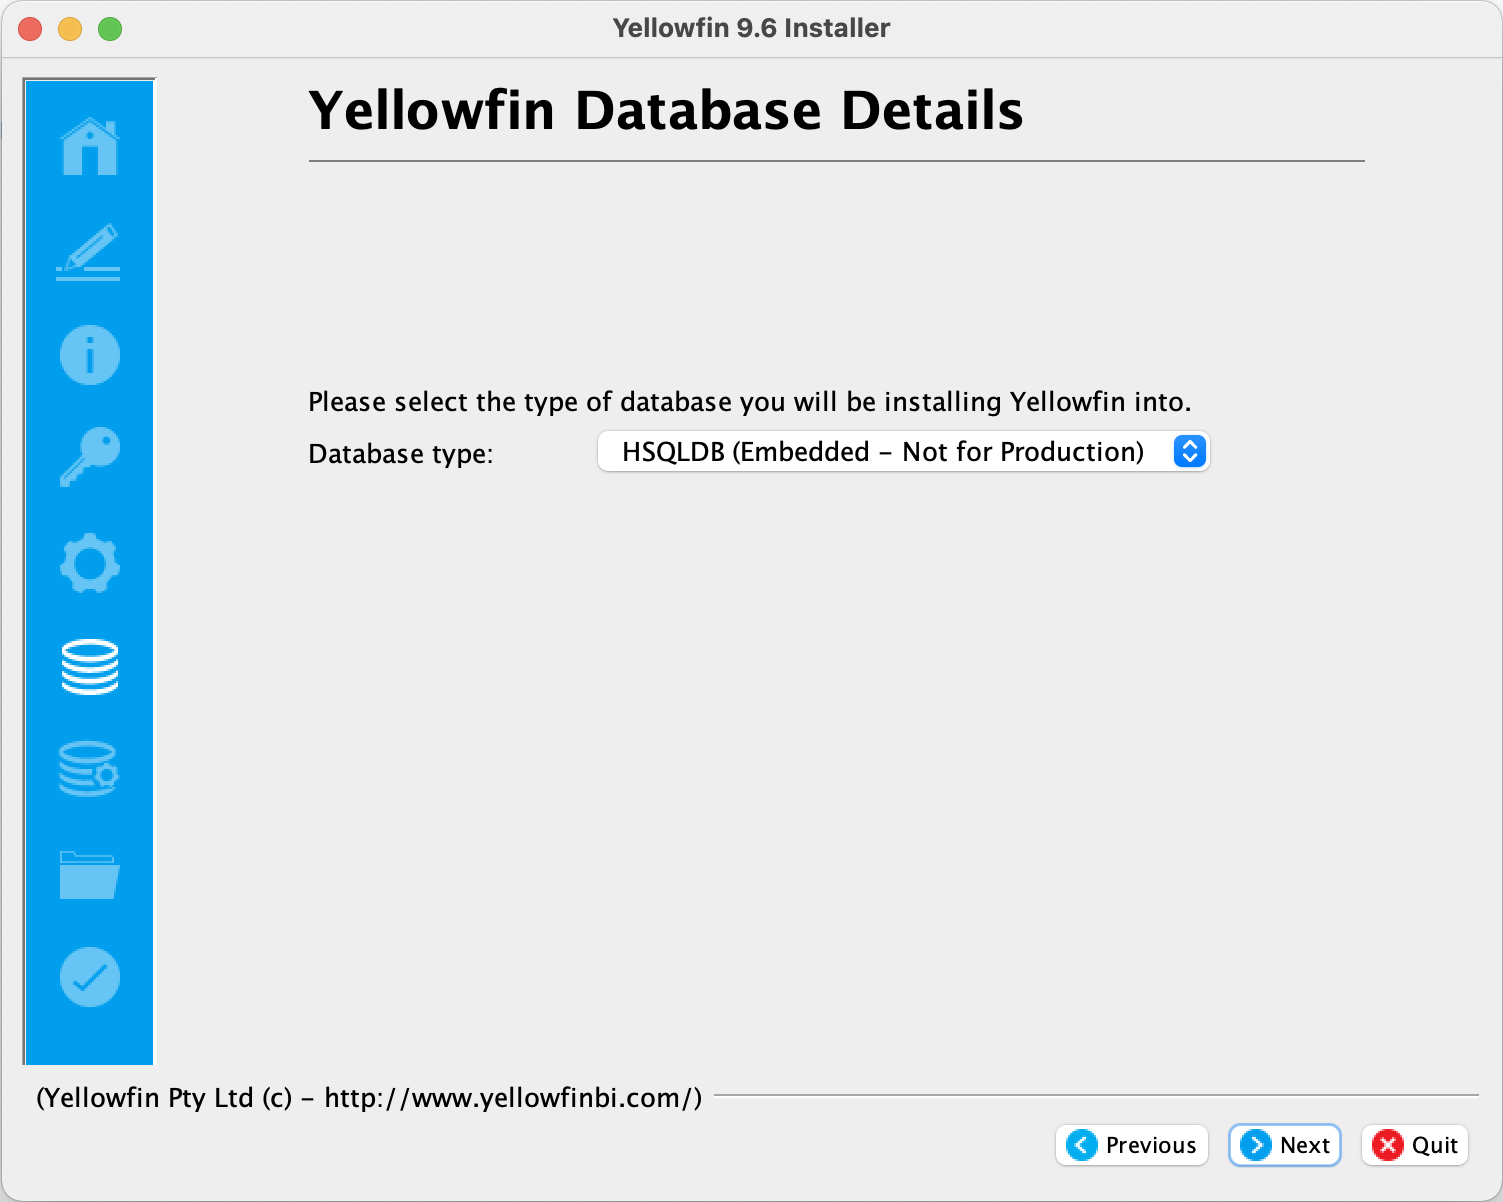
- Click on the dropdown In the Database Details section, click on the drop-down to select your database type: based . Based on your choice, the installation steps from here may differ. (some Some drivers are included with Yellowfin and some are not — see the Install And Deploy Yellowfin page for full details)
click here for more details.)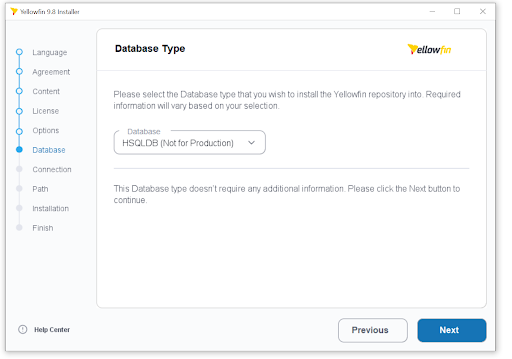
If you've chosen a database that Yellowfin doesn't include drivers for, you will be prompted to locate your driver files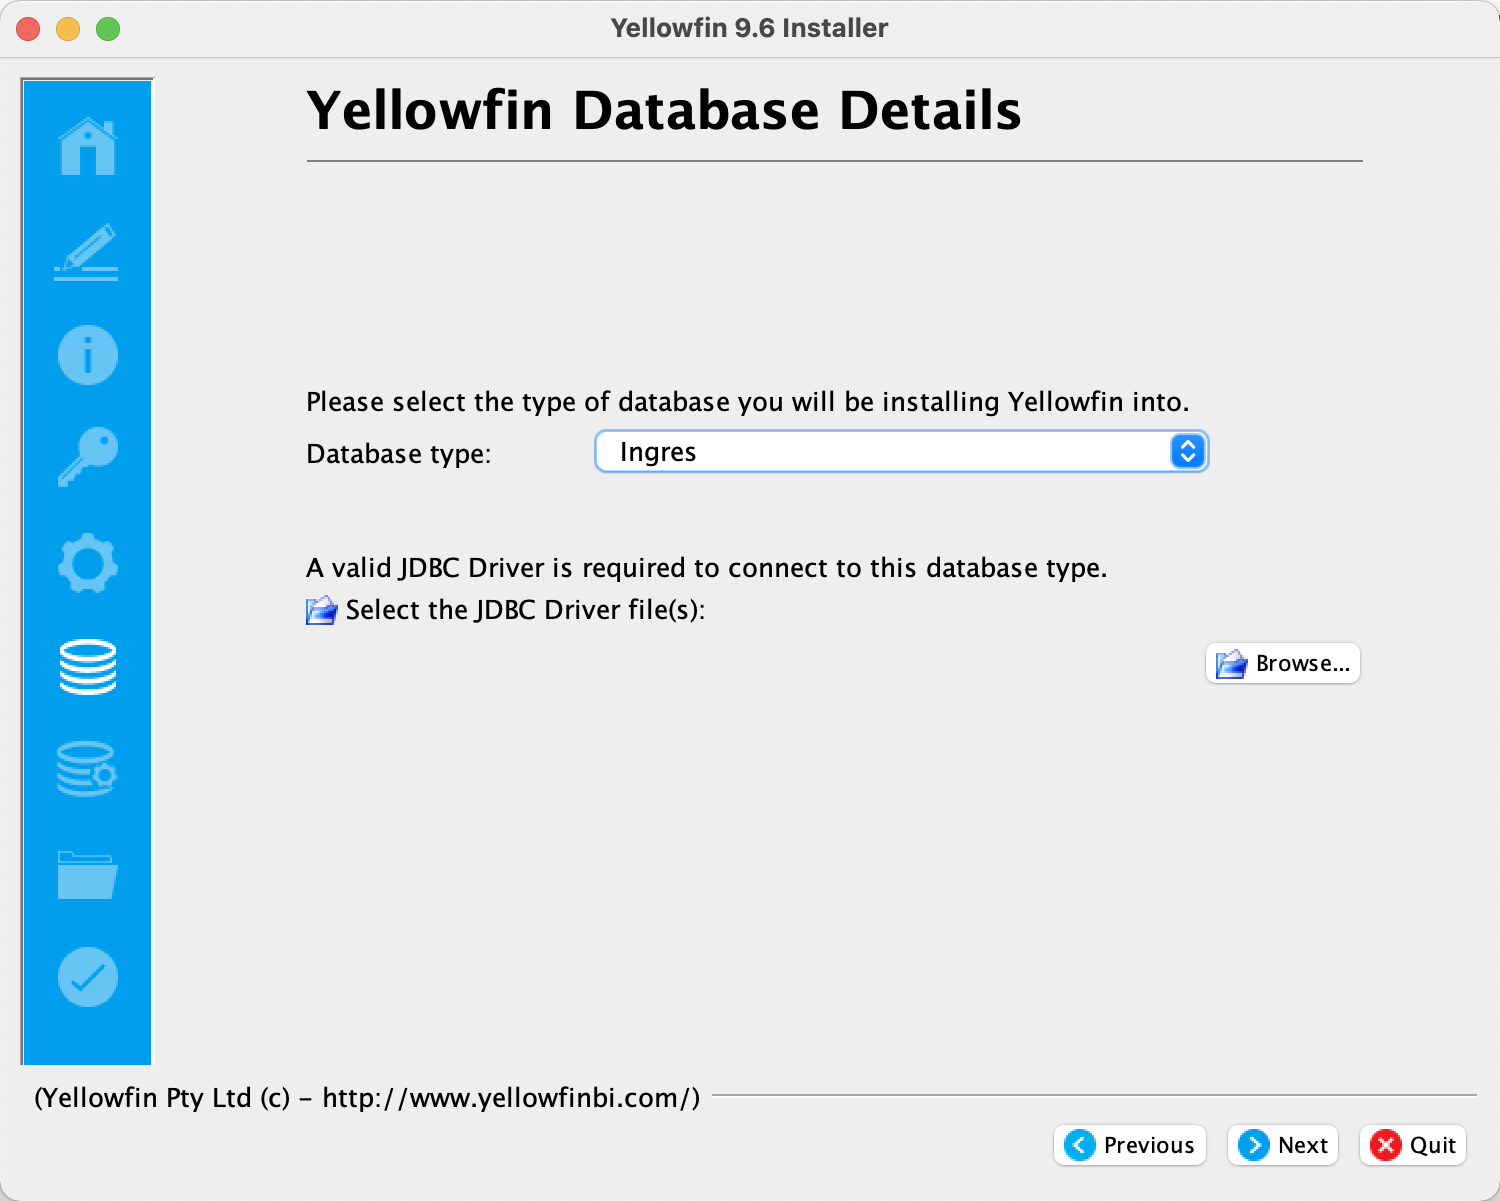 . Select any driver files using the Browse button , if promptedand click Next.
- The following screen only shows Click on the Next button to continue adding more database details
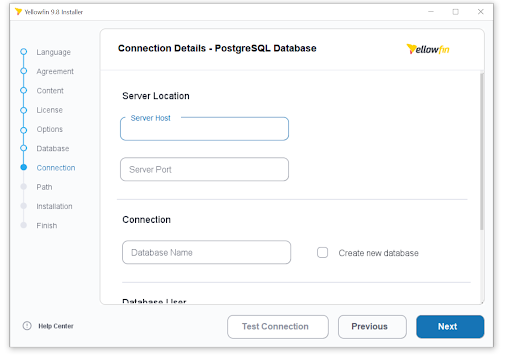
This screen won't appear if you chose the another database type and not HSQLDB (Embedded - Not for Production) from the list, and might contain slighty . It shows different options for different database types: this screen .
The image shows the options for PostgreSQL options.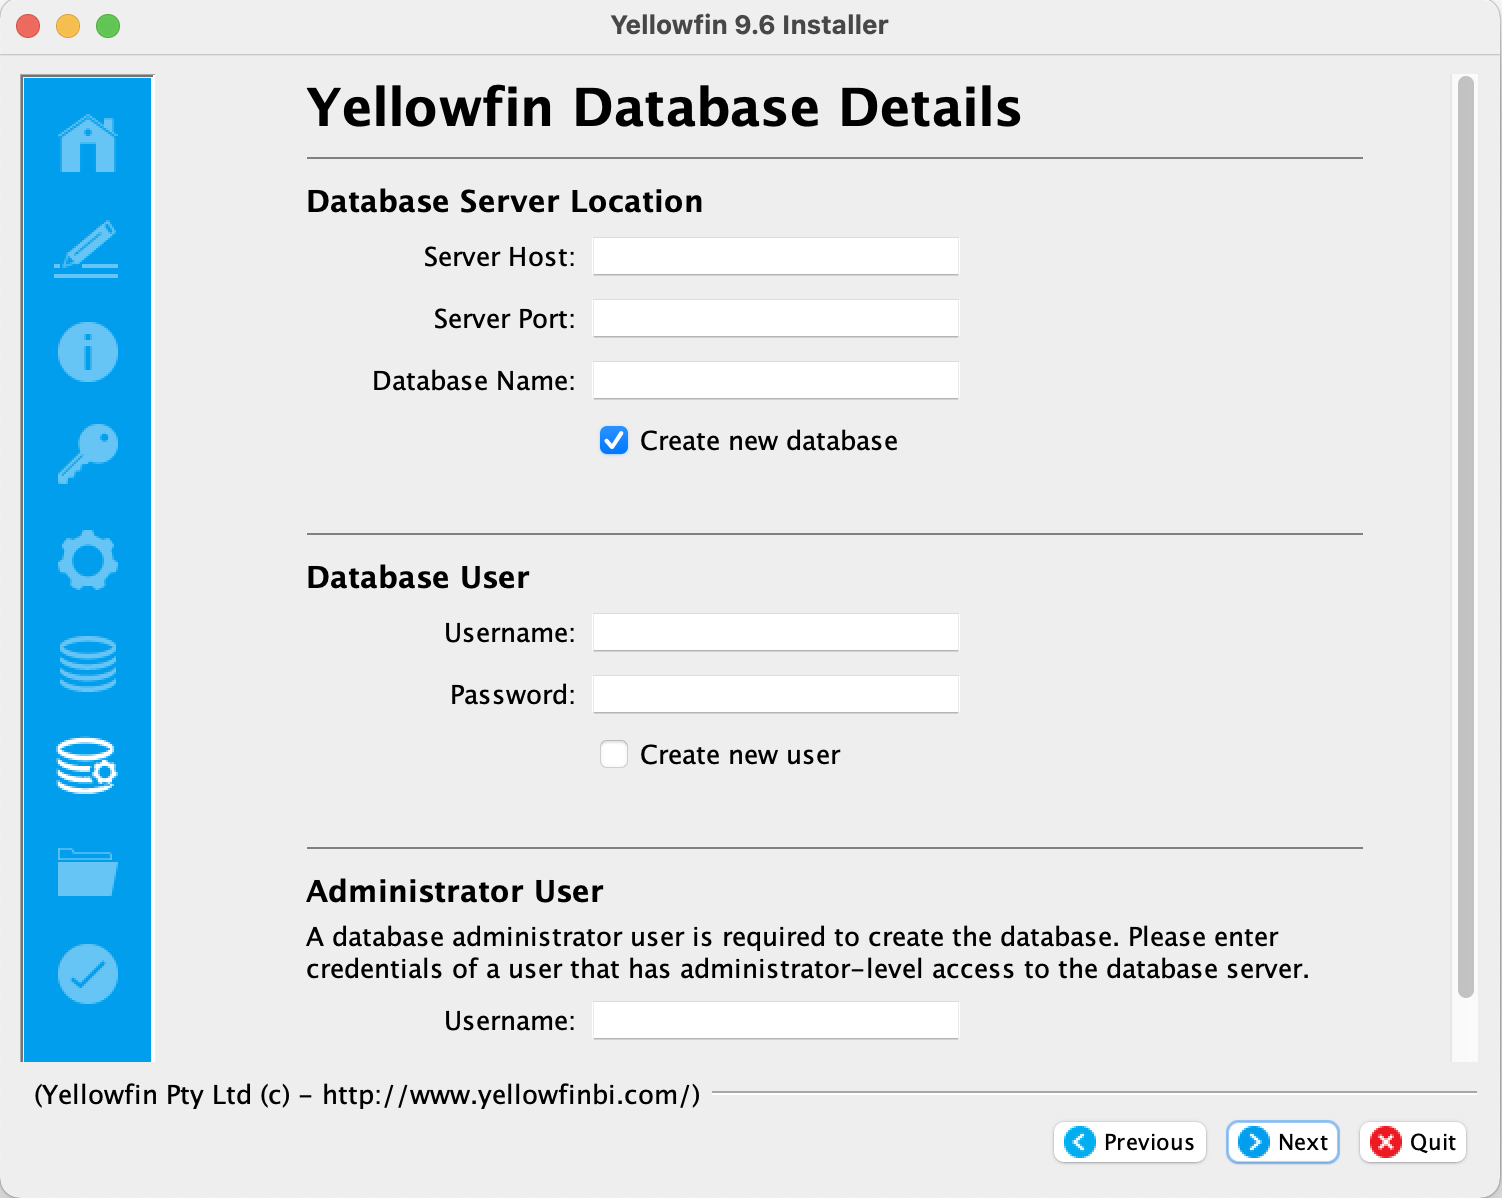
- Using the table at the top of this page for reference, fill in the fields (here's an example)

- Click on the Next button
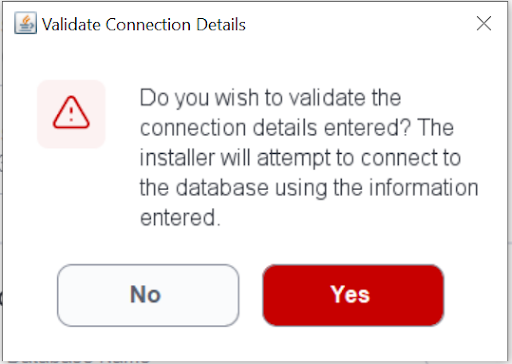
The installer will ask you if you'd like to validate your credentials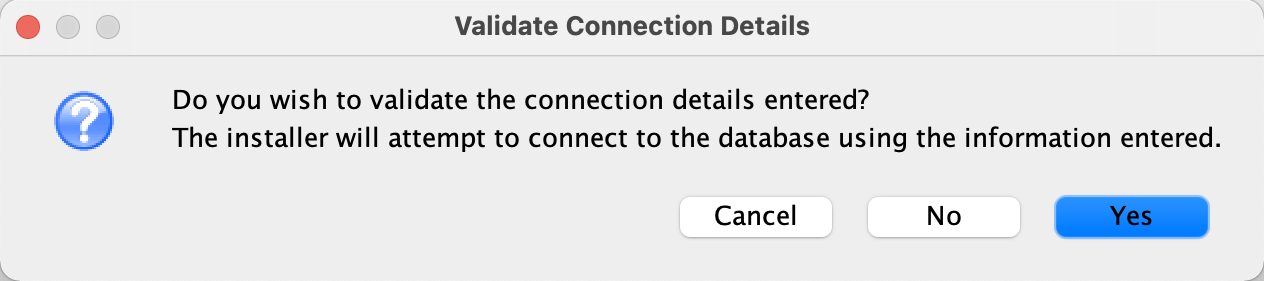
- Fill out the Connection Details, check the table above for reference. Then, click Test Connection.
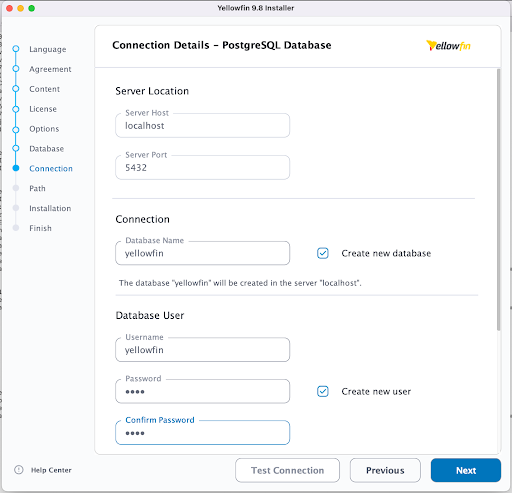
- Select if you want to validate your credentials or not.
If the validation is Select Yes to validate or No if you're sure your credentials are correct (we recommend you select Yes)
If you chose to validate and it was successful, the installer will display a confirmation message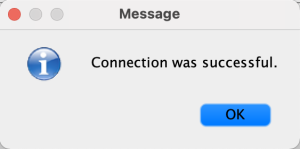
- If the confirmation message is displayed, click on the OK button to continue
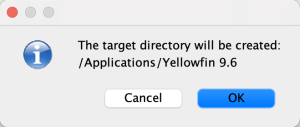
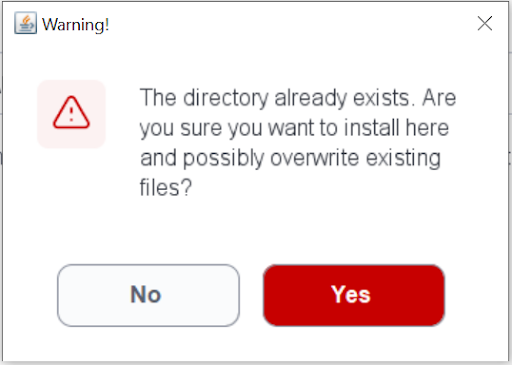
The installer will ask where you'd like the Yellowfin application to be installed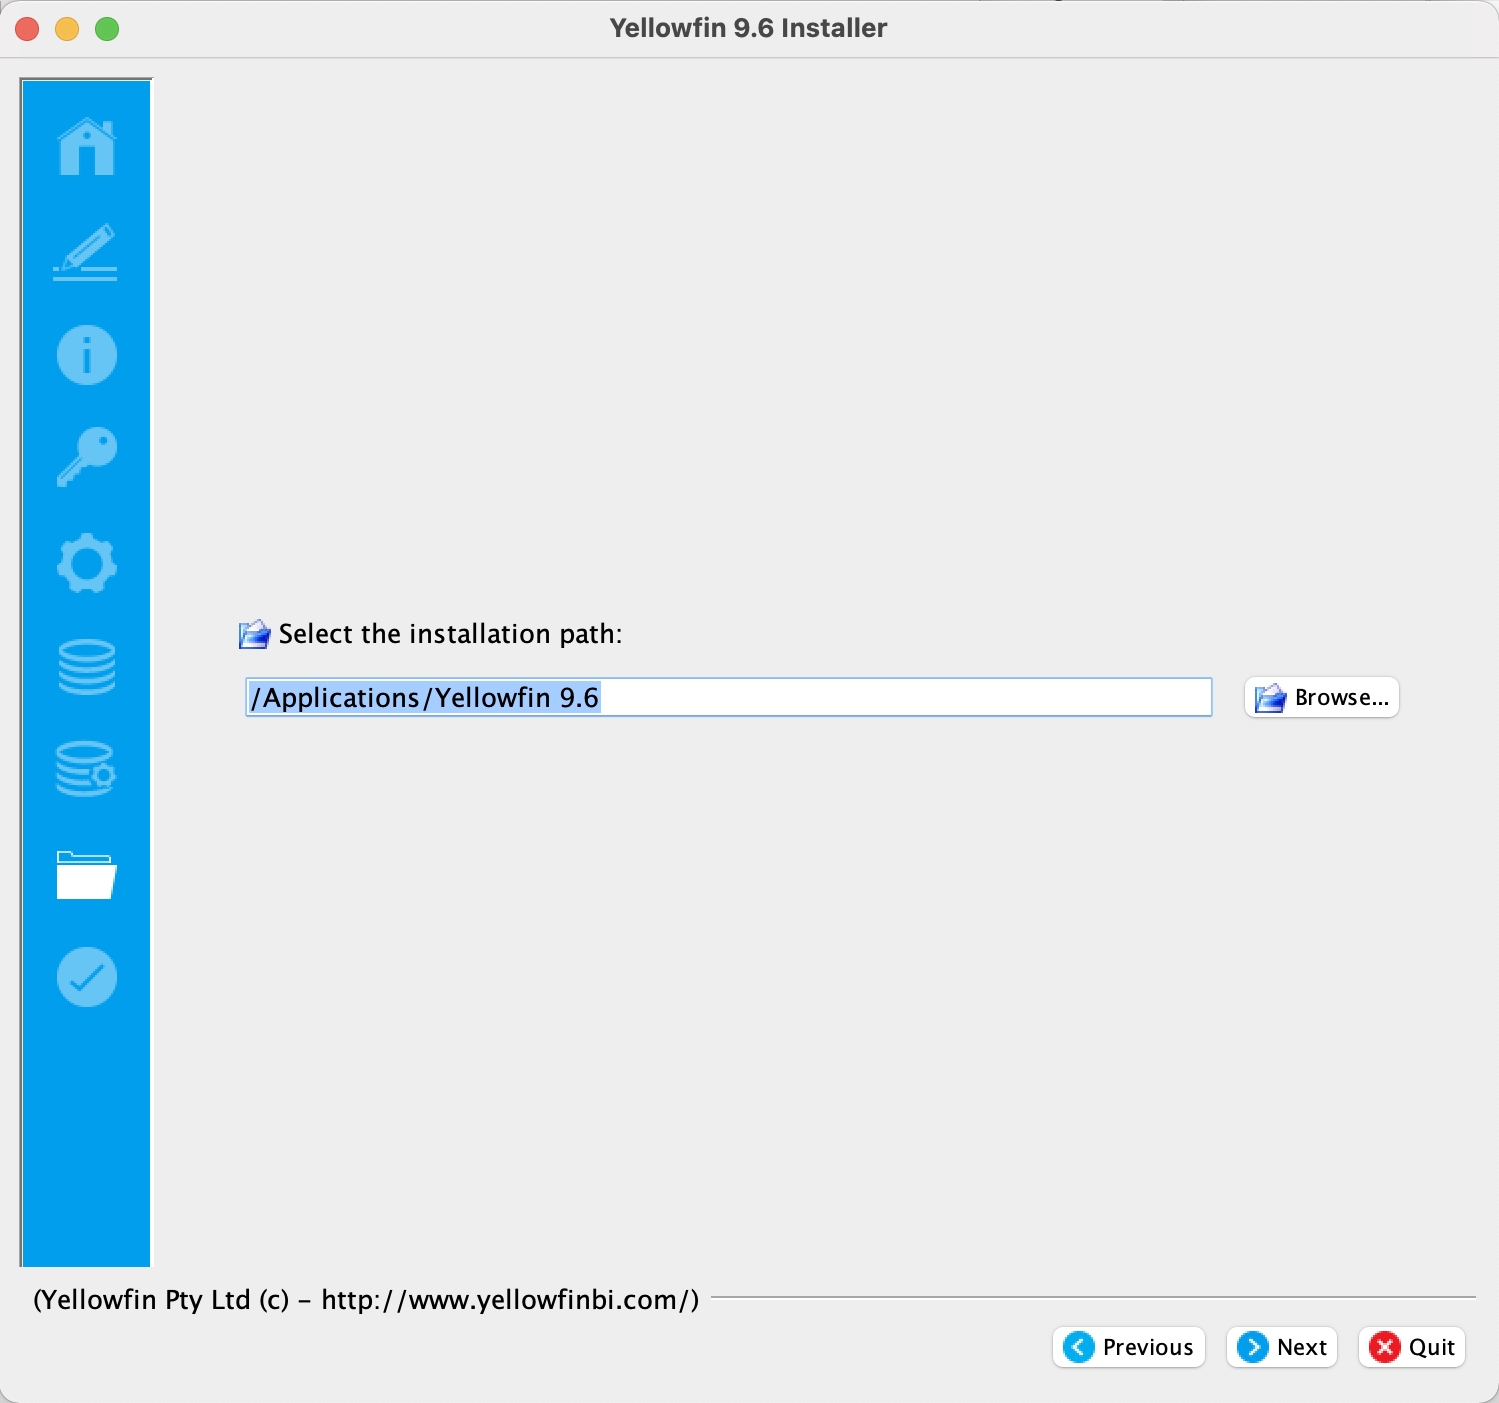
- If you don't wish to accept the default location (see the Installation path section for more info), use the Browse button. to select a different location
- Click on the Next button, which will display a prompt to confirm the directory location
- the Test Connection button in green. If it's not validated, the Test Connection will appear in red, as shown below. Then, click Next.
- In the Path section, users can select where to install Yellowfin by accepting the defaulted path, selecting an existing folder or by typing in the path name in the box. If the folder that is typed in does not exist, Yellowfin will offer to create the folder for you. Then, click Next.
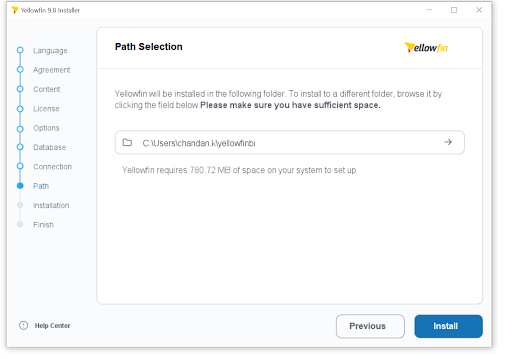
If Yellowfin doesn't recognize the folder, it will give you the option to create it.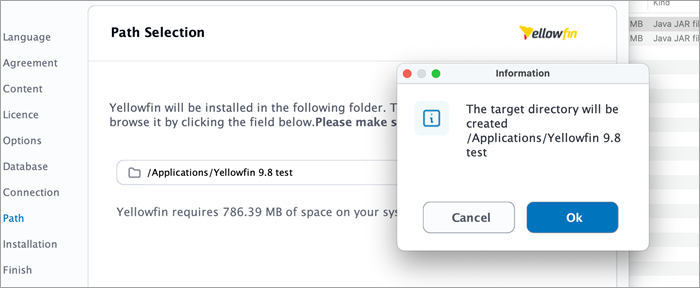
- Confirm the directory location.
- Click on the OK button
The Yellowfin installer will begin the installation process (, the time it takes depends on your hardware capacity and the packs you selected for installation)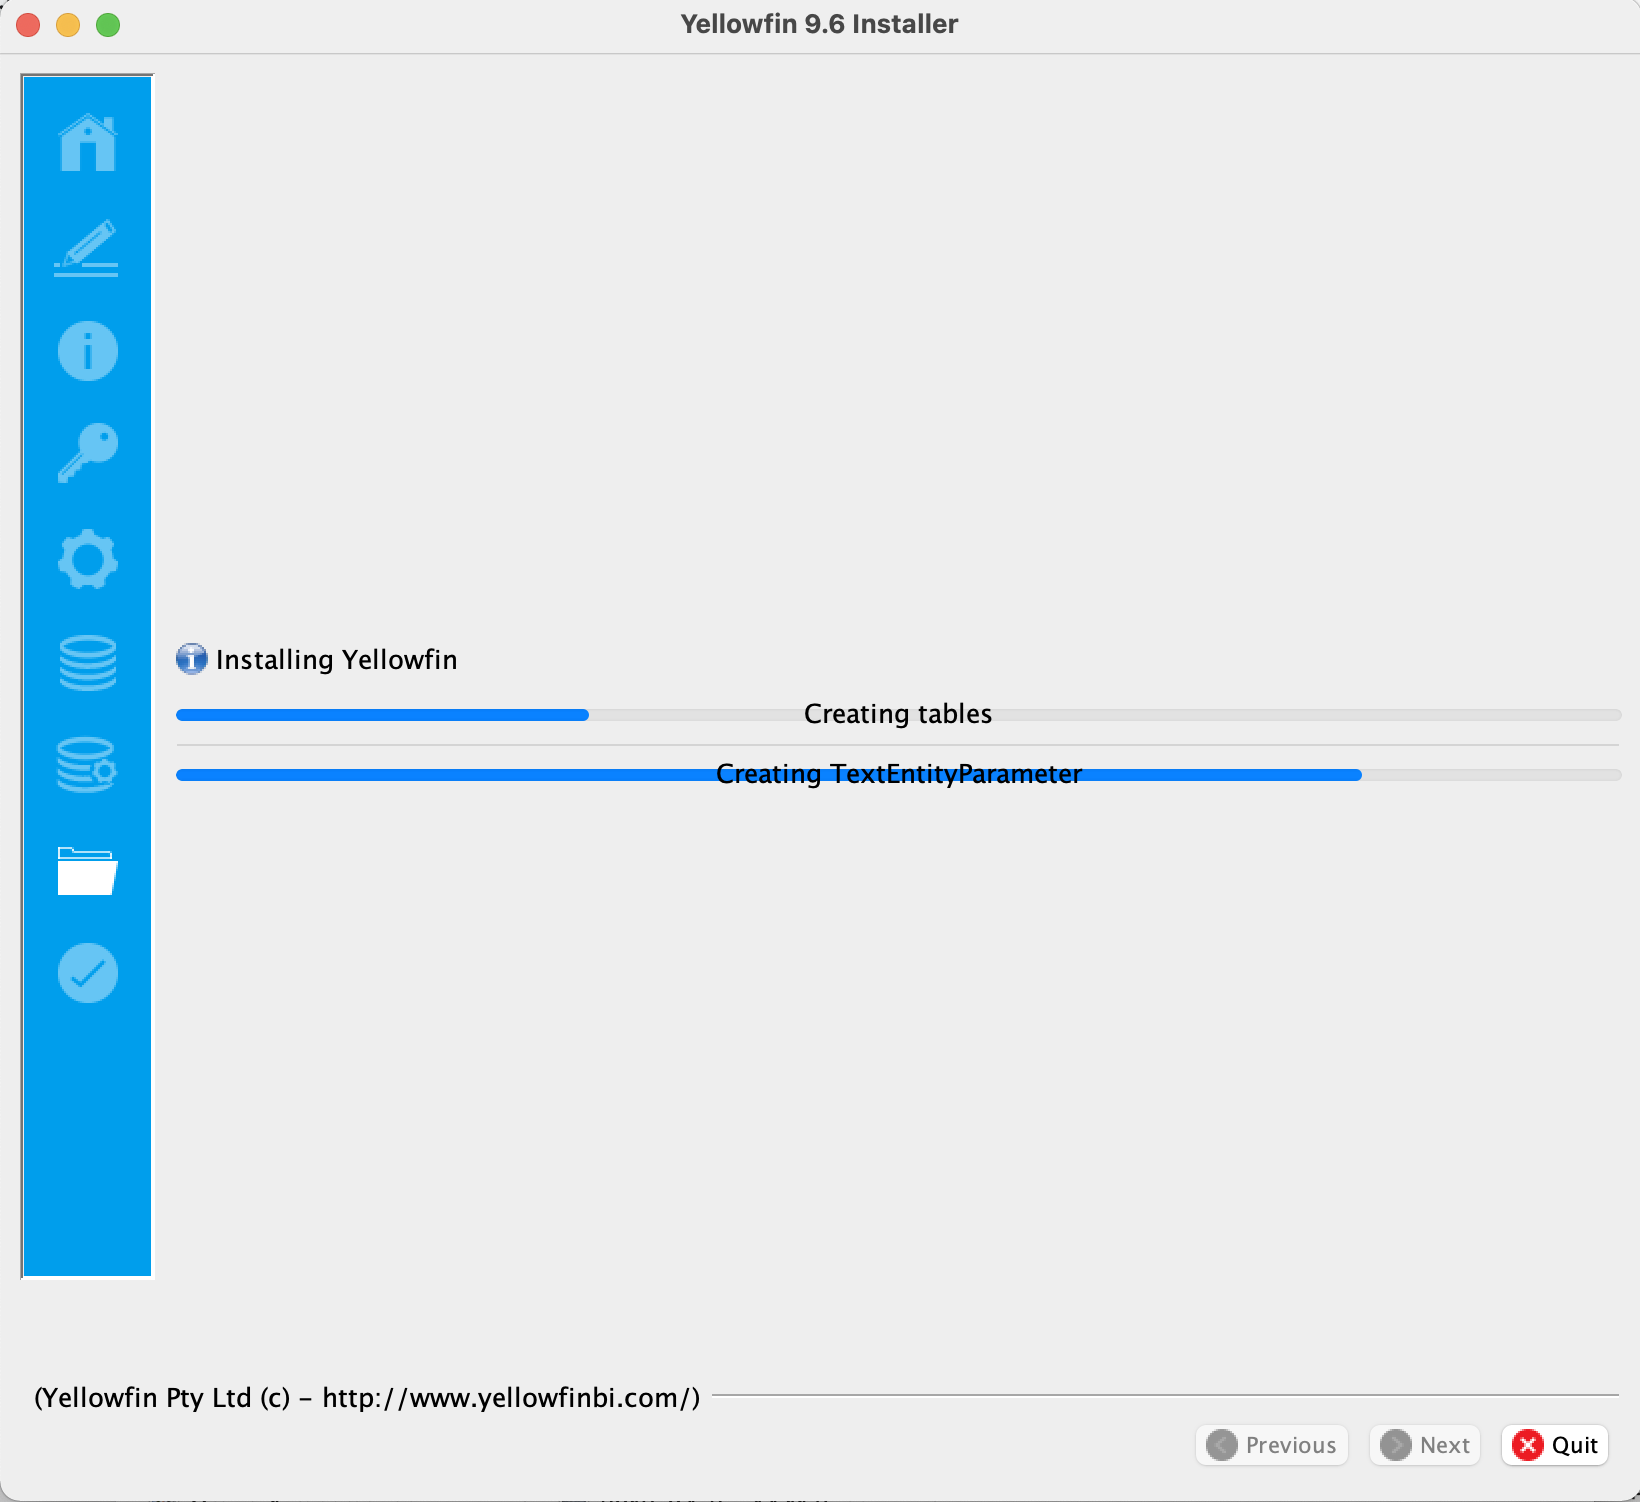 . Once the installation is done, click Finish.
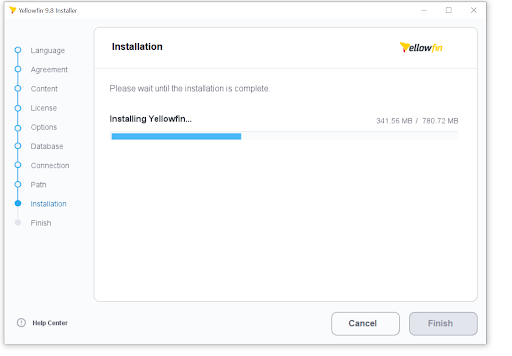
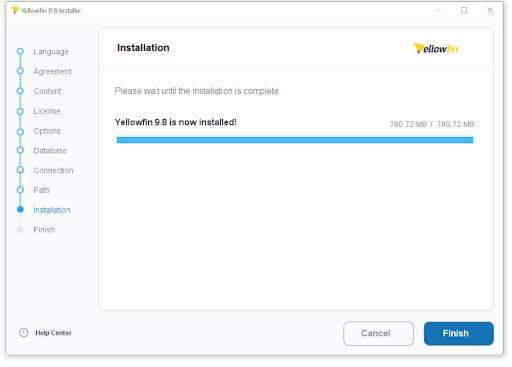
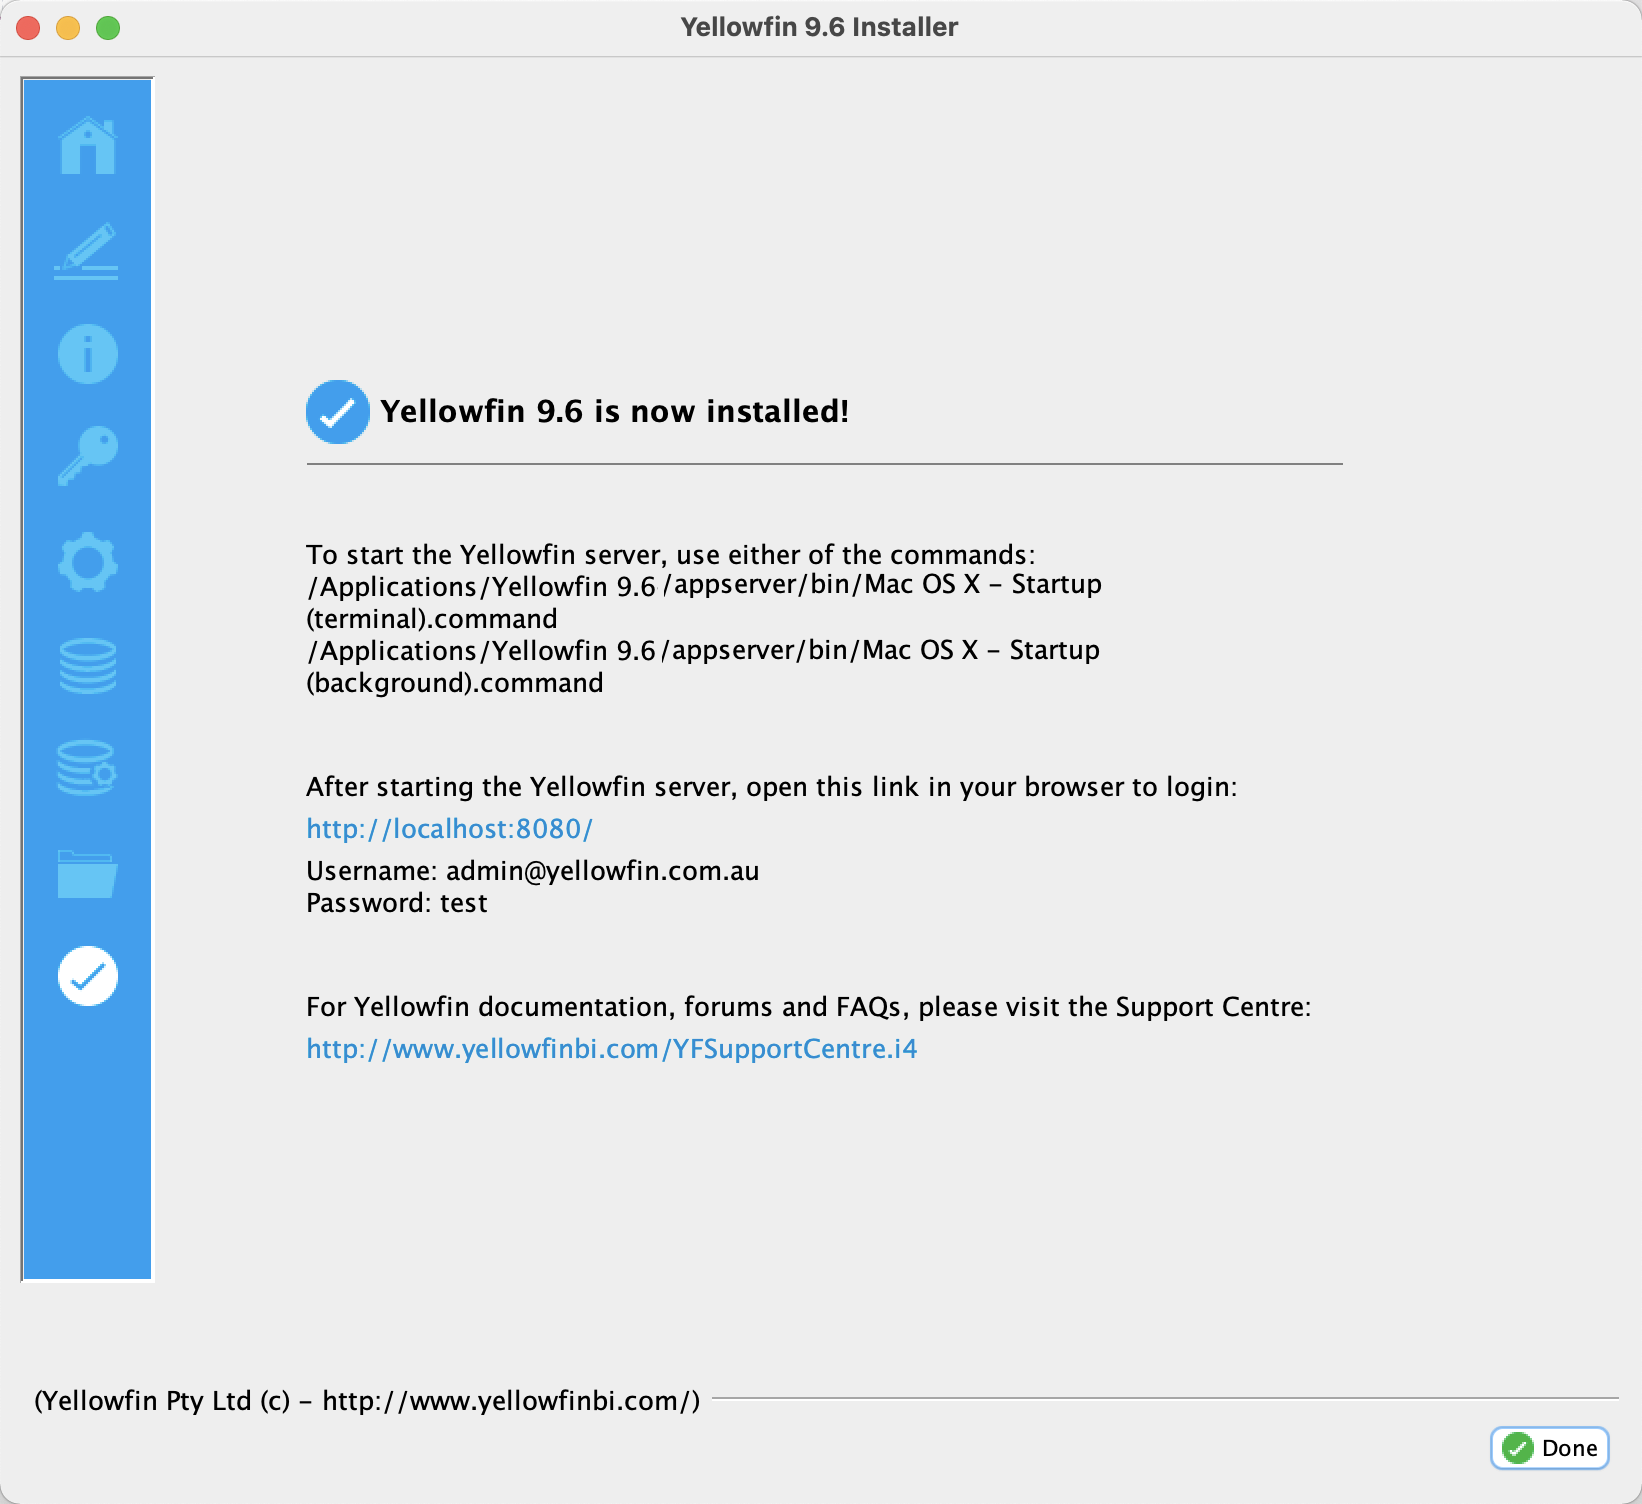
The Yellowfin installer will display the Installation Complete screen if the installation is successful: it contains some useful information
 useful information once you click Finish after a successful installation.
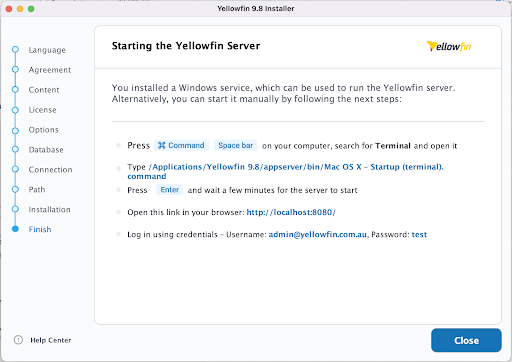
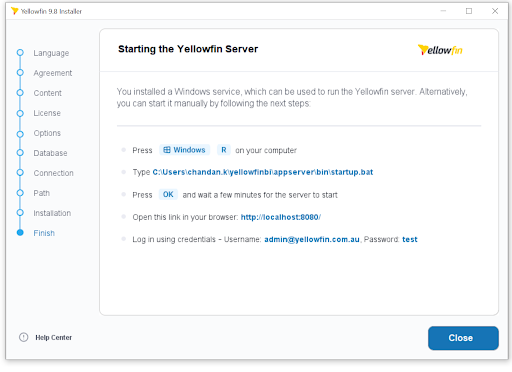
Note: In case you don’t select the Windows as Service checkbox, the finish screen will be a little different. - Click Close to complete the installation process.
If you do not see this screen, contact your Yellowfin representative or , contact Yellowfin Support, or see the Troubleshooting section below.
If you do see this screen, take note note of the information provided on this scree that provides details of how to start the Yellowfin application , and the information you need to log in to Yellowfin from a web browser.
Click on the Done button to complete the installation process
Note: You can click on the left menu to browse previous steps. Clicking Next is not allowed.
| Note |
|---|
An uninstall function has been created for you under the directory nominated in the database selection step. |
| Styleclass | ||
|---|---|---|
| ||
What next?
Now that Yellowfin is successfully installed on your machine, it's time to deploy. Visit the Deploy Yellowfin page for full details and instructions for a first-time deployment of Yellowfin and the minimal configuration needed.
| Styleclass | ||
|---|---|---|
| ||
Troubleshooting
Most problems related to the Yellowfin application server installation relate are related to database connectivity and administration issues.
As mentioned previously, a log is kept of the database installation and can be found in $INSTALL_DIRECTORY\uninstall directory.
The most likely problem will A common issue with the installation could be the incorrect setting or misspelling of the parameters entered in Step 7. Configure the Database Connection and User parameters eg. For example, database name, port, IP address, etc.
Customers using Microsoft SQLServer or Microsoft MSDE should ensure that the IP addresses and configuration are consistent with the parameter values entered. The Microsoft program svrnetcn.exe (SQLServer Network Utility) can be used to check that the SQLServer IP stack (including the JDBC port number) has been configured correctly. It can be used for both SQLServer and MSDE.
Example
Network error IOException: Connection refused: connect()
This error means that the installer cannot connect to your MS SQL server instance. This error occurs before authentication takes place. This means that either:
- SQL Server is stopped on the server you are trying to connect to.
- The connection details you entered were incorrect.
- You have a network problem that stops the computer you're running the installer on from connecting to the SQL server host (unlikely if you are connecting to your localhost).
Verify these settings on the Configuration DB Parameters screen on the installer.
- Database Server Name: This will probably be the "localhost".
- Database Server Port: This should be 1433.
- Database Name: This is the name of the database you want Yellowfin to install to. This should be "yellowfin". This is used for Yellowfin configuration and operational data. It is not the database you wish to report off.
- Create Database: Click this to create the new Yellowfin database. We suggest removing the Yellowfin database if your installation failed previously.
- DBA User: This could be "sa".
- DBA Password: This could be "sa".
- Reports UserId: Set this to "yellowfin_user".
- Reports UserId password: Set this to "yellowfin_user" or whatever you prefer.
- Create user id: Check this checkbox.
Contact Support
If the example above posts do not solve the issues you're experiencing, please send an email to support@yellowfin.bi with a clear description of the issue, along with the following:
- Screenshots (if applicable).
- YellowfinInstallLog-date.log (this can be found in the Yellowfin directory).
- All log files found in Yellowfin\appserver\LOGS (if you have any).
...
Section navigation
| Section | |||||||||||||||||||||||||||||||||||||||||||||
|---|---|---|---|---|---|---|---|---|---|---|---|---|---|---|---|---|---|---|---|---|---|---|---|---|---|---|---|---|---|---|---|---|---|---|---|---|---|---|---|---|---|---|---|---|---|
Current topic - Install on PremisesThis page is part of the Install And Deploy Yellowfin section of the wiki, which has these topics:
|
| Styleclass | ||
|---|---|---|
| ||