Page History
| Anchor | ||||
|---|---|---|---|---|
|
| Table of Contents | ||
|---|---|---|
|
Overview
| Styleclass | ||
|---|---|---|
| ||
...
Yellowfin has an open connector framework
...
for connecting third-party web applications.
...
Visit the Yellowfin Marketplace
...
Connector Information
...
to find preset connectors ready to install, or develop your own.
Connector file types
Connector file types include .jar and .yfp archives. Connectors can be packaged on their own, or with pre-built sample content.
...
Loading Connectors
| Styleclass | ||
|---|---|---|
| ||
1. To begin, you will need to navigate to the Plugin Management page in the Admin Console. You can do this by;
a. Navigating directly to the Plugin Management page through the Left Side Navigation panel, or
b. Navigating to the Admin Console and then selecting the Plugin Management page from the Admin list on the right.
| Left Side Navigation | Toolbar |
|---|---|
 |  |
 |
You will now be on the Plugin Management page.

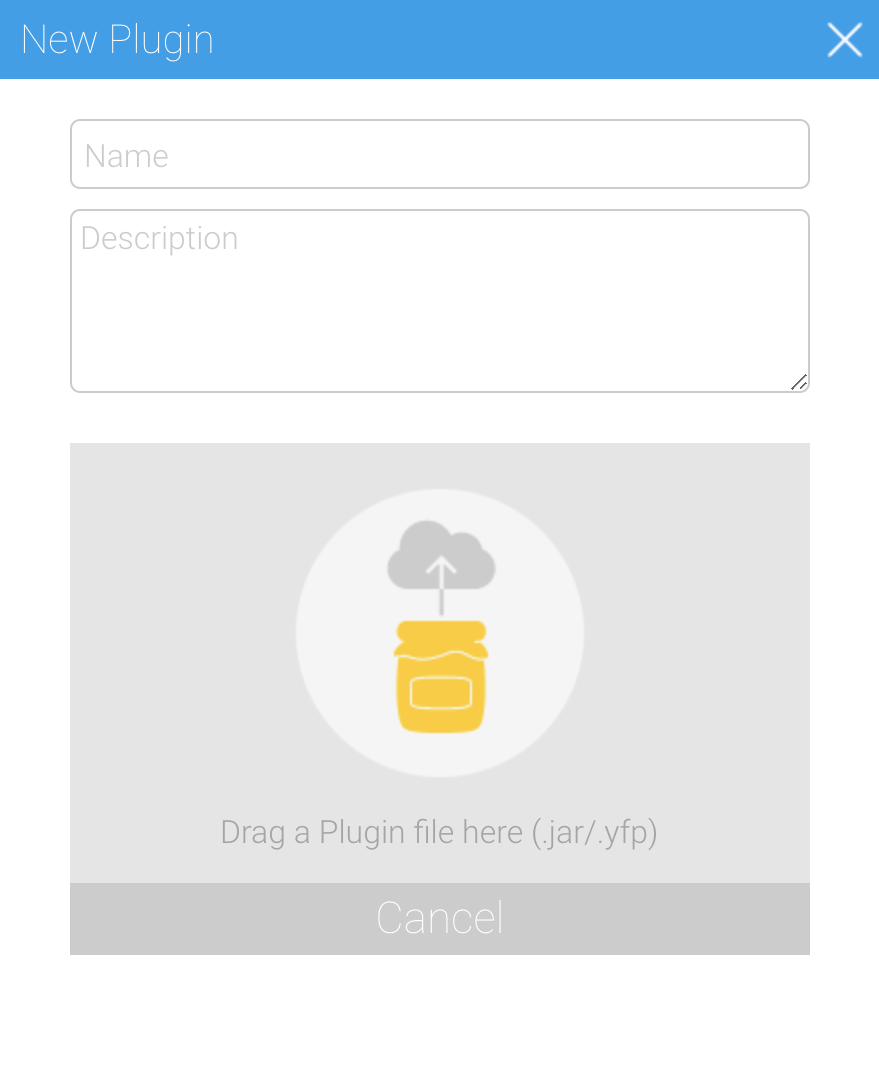
2. From here, you will need to click the Add button in order to start loading a new connector.

3. Drag & drop your connector onto the New Plugin window, or click on the icon to open browse in order to locate it.

4. Your connector will now be processed - the time this takes will vary depending on the size of the connector pack.

5. You now need to complete the connector by providing a name and description. This will help users understand what the plugin should be used for.
6. Click Submit to load your connector.

You will now see your new connector in the plugins list.

See Plugin Management for more information on different types of plugins.
Using Connectors
| Styleclass | ||
|---|---|---|
| ||
Some generic instructions can be found below.
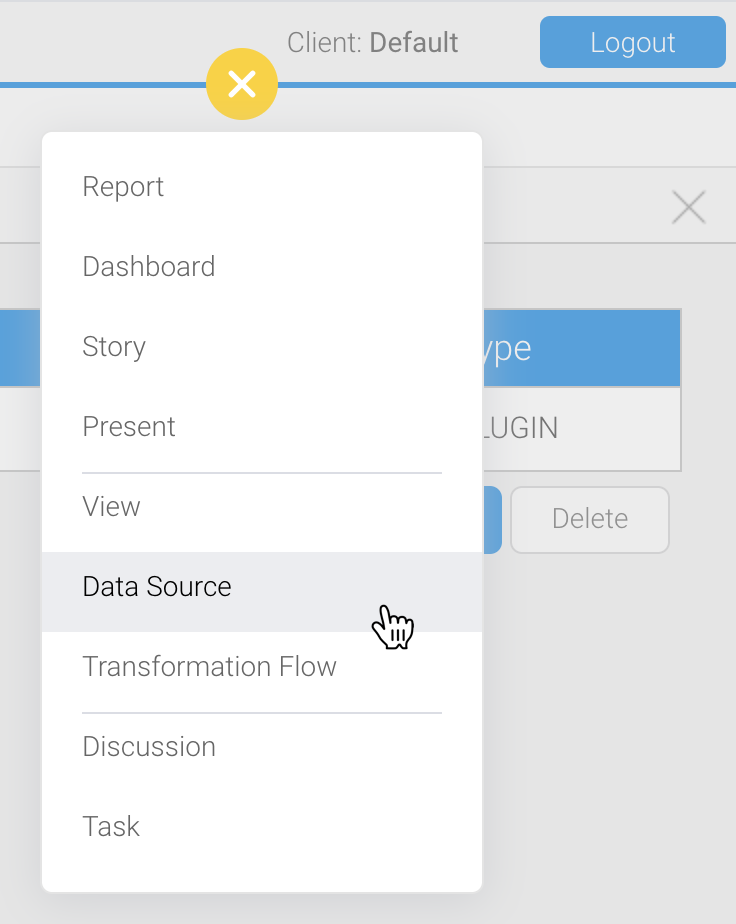
1. Create a new Data Source by using one of these methods:
- Left Side Nav - open the left side navigation panel, click on Create, select the Data Source option
- Top Right Button - click on the create button, select the Data Source option.
...
- Admin Console - navigate to the Admin Console, open the Data Sources section, click on the Add button.
Content could include views, reports, and dashboards, depending on the connector's purpose.
Connector location
Connectors are stored with other plugins. You can see a list of any connectors already added to your Yellowfin instance on the Plugin Management admin page within Yellowfin. From this page, you can upload new connectors, see the files associated with connectors, and delete connectors that are no longer needed.
Using data with a connector
A connector is already configured to do what it's intended to do. You simply create a new data source within Yellowfin and configure it to use the connector. The connector itself needs no configuration.
Adding a connector
Start by downloading a connector from the Yellowfin Marketplace or elsewhere, then follow the steps below to get started.
Some connectors require a number of security steps to ensure data exchange remains secure. In these special cases, the Yellowfin Marketplace will include an additional link to download a printable PDF with detailed instructions to ensure you have as much information as possible.
General steps
- From the Yellowfin burger bun
 menu in the top left corner, click on Administration, then Plugin Management
The Plugin Management dialog box will be displayed:
If you have already installed any other plugins or connectors, they will be listed here. - Click on the Add button to display the New Plugin dialog box
- Supply a name and a description, which will be used to list the connector on the Plugin Management page, then upload the connector.
- Click on the Submit button to add the connector to your Yellowfin instance.
Creating a data source
After adding a connector, you're ready to configure your data source.
Note that each connector has its own requirements for connecting to a source, so no two dialog boxes look the same. In the example below, we've used the simple Reporting Services connector for our data source.
Also note that the Yellowfin UI provides a variety of ways to add a new data source (see Creating a Basic Data Source Connection for details). They all perform the same function. We've used our favorite method below.
- In Yellowfin, click on the Create
 button in the top right corner to display a menu
 - Click on Data Source
The New Connection dialog box will be displayed: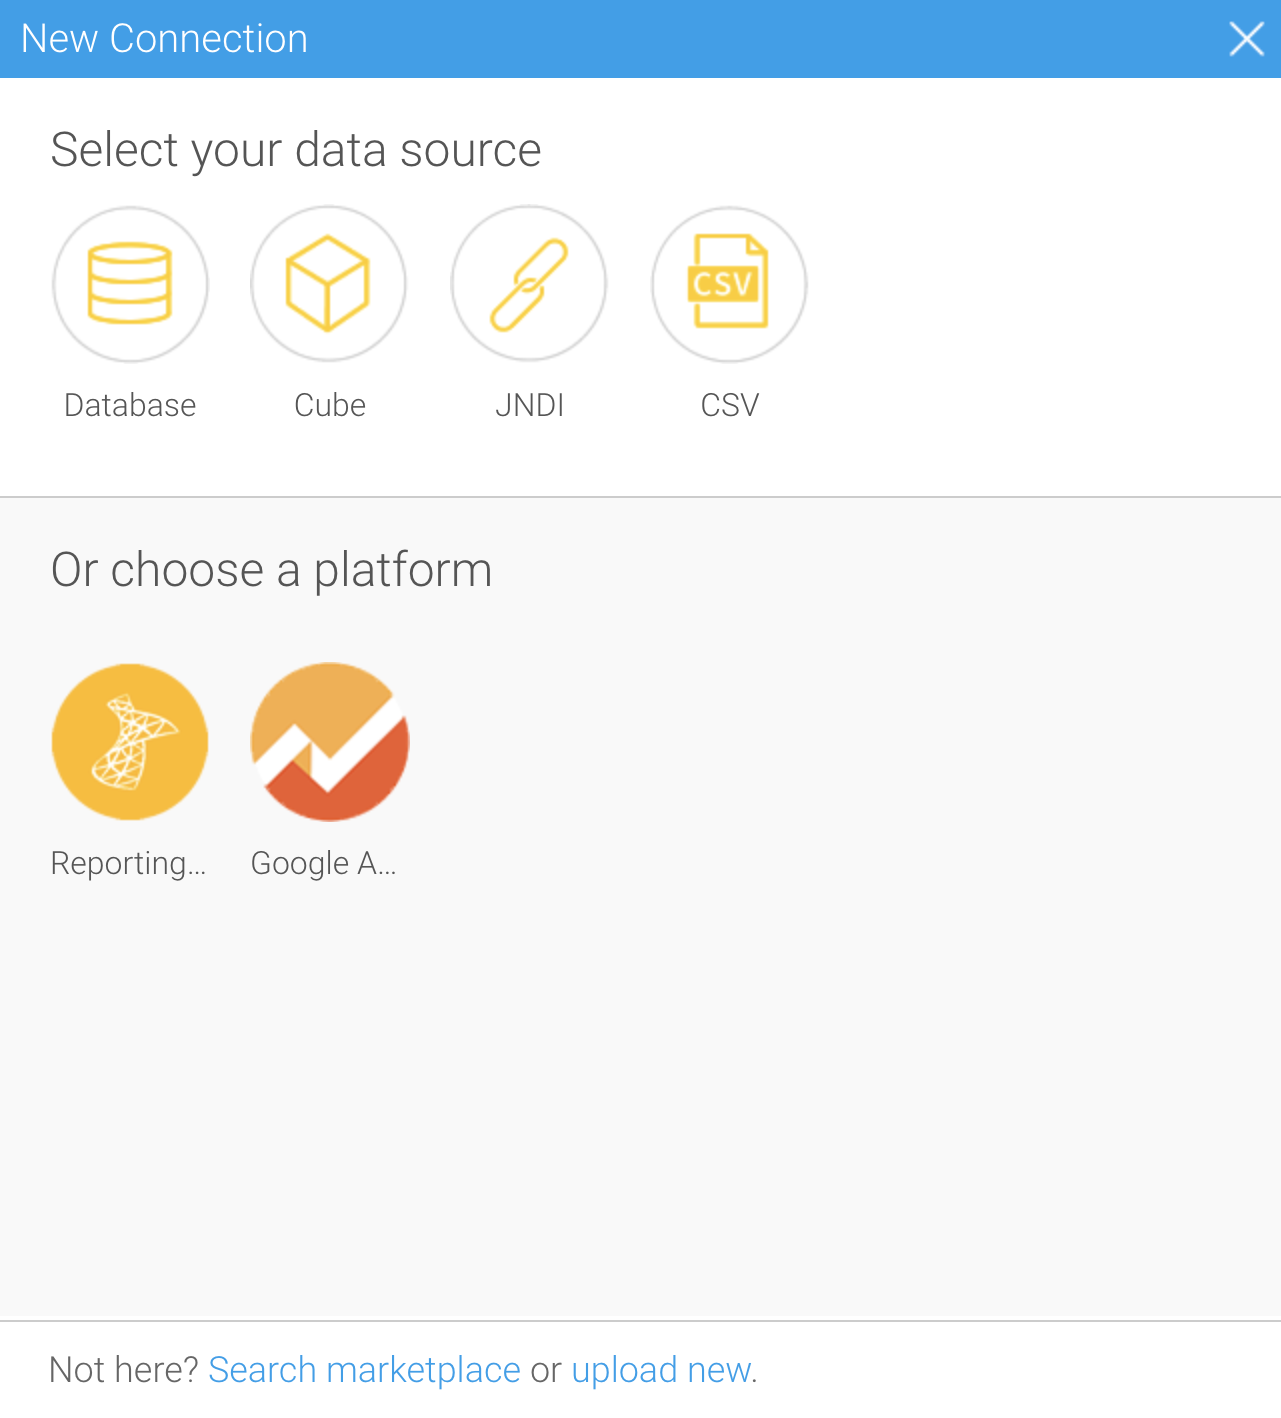
- Click on a connector listed in the 'Or choose a platform' section (we've chosen Report Services)
A dialog box with your connector's connection fields will be displayed: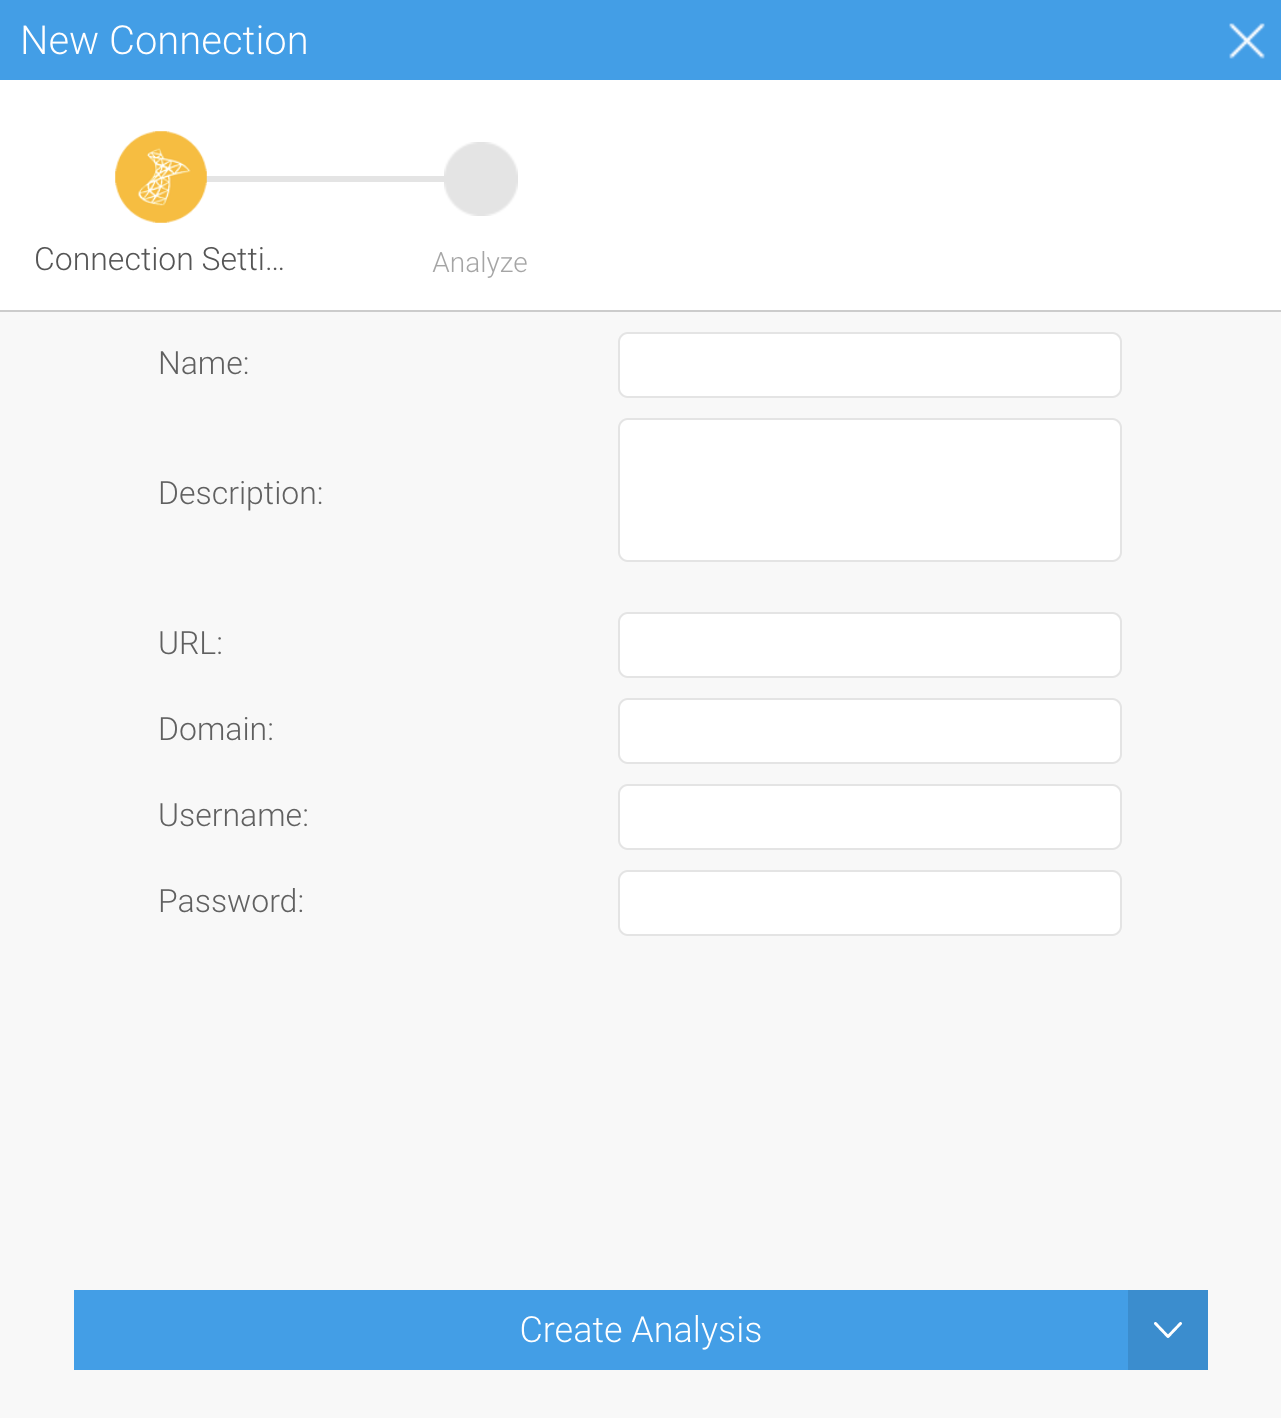
- Fill in the credentials required
- Click on the arrow to the right of the blue button to see what options are available (described below), then select the most appropriate action from the list.
New data source actions
The table below describes the different options available while you're working with a new data source.
| Action | Description |
|---|---|
| Advanced Connection Editor | Selecting this option takes you to the Advanced Connection Editor, which displays all the options available for your connector. Here, you can to further tweak and check your connections, including usage parameters, the connection pool and more. |
| Test Connection | Selecting this option sends a request to Yellowfin to test the connection parameters. A confirmation message will be displayed if successful, or an error message if there is a problem. |
| Create View | Selecting this option creates a new Yellowfin view based on the data connection. |
| Launch Pre-Build Content | Selecting this option will trigger the installation of any pre-built content that may ship with the connector. This may save you time in creating views, reports, dashboards, tabbed dashboards or any other content. |
| Save & Close | Selecting this option lets you save what you've configured and complete the setup any time later on. |
| Cancel | Selecting this option closes the current connector configuration without saving any of your changes. |
| Tip |
|---|
The steps above may differ for individual connectors. Check the list below for customized instructions for some connectors to help you get started quickly. |
Detailed instructions for popular connectors
| Children Display |
|---|
...
| Left Side Navigation | Top Right (with Left Side Nav enabled) |
|---|---|
 |  |
| Toolbar | Admin Console |
 |  |
2. Select the connector you wish to use to set up your data source.

3. Fill in the details required by the connector. In this example, you will need to complete the Name and Description.
This should describe the specific connection, rather than the connector, as you can use the connector multiple times.
4. Complete the Connection Instructions. Each connector will have different requirements that will need to be completed in order to successfully access your data. In this example you will need to Authorise Google Analytics.

5. Once you have followed the connection instructions you will be able to complete the connection. From here you have a range of options available to you:
...
Your connection is now complete.
...
| horizontalrule |
|---|
| Styleclass | ||
|---|---|---|
| ||
...