Page History
...
Once a view has been defined either through the View Builder, SQL clause or straight from the database you will need to define the field definitions and apply business metadata to them.
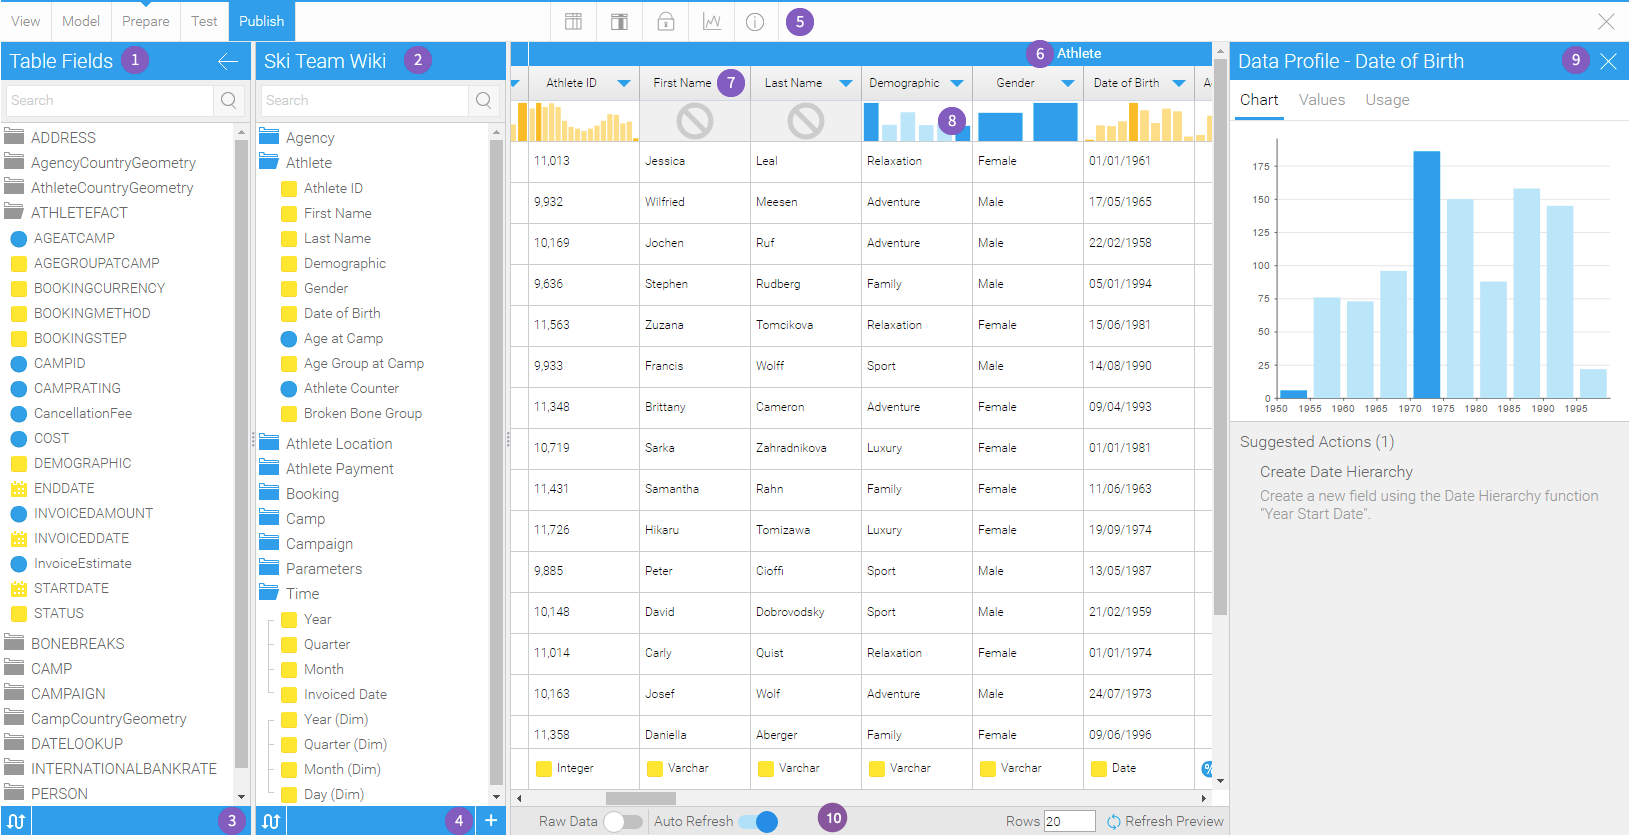
- Table Fields - Each field originally selected will initially be unattached. The process of adding fields to the view requires that metadata be applied. Drag fields from the Table Fields list to the folders you wish to apply them to.
- View Fields - Fields are grouped into folders. The purpose of this is to assist end users to find the fields they require. Fields displayed in the list provide some indication of their metadata, such as; hierarchies, dimensions or metrics, and business name.
- Toggle - This allows you to toggle the display of field and table names between database names and business names.
- Create - Click the + button to access a create menu that contains the following functions:
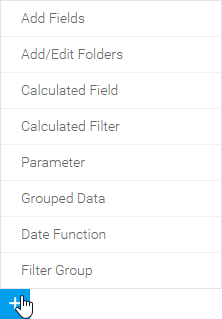
- Add Fields - this will expand the Table Fields panel, allowing you to add new fields to the view. See Add Fields for more information.
- Add/Edit Folders - this will open the Field Folders lightbox, allowing you to adjust the folders used to group fields in the view. See Add/Edit Folders for more information.
- Calculated Field - this will open the Calculated Field lightbox, allowing you to build a calculation to be included in the view. See Calculated Fields for more information.
- Calculated Filter - this will open the Calculated Filter lightbox, allowing you to build a filter to be included in the view. See Calculated Filters for more information.
- Parameter - this will open the Parameter lightbox, allowing you to define a parameter to be included in the view. See Parameters for more information.
- Grouped Data - this will open the Group Data lightbox, allowing you to define a field made up of groups of values based on another field, to be included in the view. See Grouped Data (Report) for more information.
- Date Function - this will open the Date Function lightbox, allowing you to define a new field calculated based on a date field, to be included in the view. See Date Functions for more information.
- Filter Group - this will open the Filter Group lightbox, allowing you to start creating a group of filters to be included as a set in the view. See Filter Groups for more information.
- Menu - The menu bar contains menus that allow for metadata preparation as well as access to security and view options.

- View Options - this will give you access to a range of view details and performance options. See View Options for more information.
- Field Settings - this will give you access to a range of default formatting and security options for each field. See Field Settings for more information.
- View Security - this will give you access to a range of permission options related to the view and its fields. See View Security for more information.
- Data Profiling - this will allow you to apply profiling to some or all of the fields in the view. See Data Profiling for more information.
- View Info - this will allow you access to a range of summary information related to the view. See View Summary for more information.
- Folder Bar - The blue heading bar displays the name of the field folder the fields are grouped into.
- Field Name - The field name can be clicked on to rename it.
- Profiling Bar - The profiling bar will display a histogram of the data profiling result. Clicking on this will open the data profile panel on the right of the screen. See Data Profiling for more information.
- Data Profile Panel - The Data Profile panel shows a full breakdown of the profiling applied to the selected field. See Data Profiling for more information.
Preview options bar - The options in this bar allow you control how to preview View data on the Prepare step. Note that this does not mean these changes are saved. The options are:
- Raw Data - If enabled, it displays the data as it would have been returned from the database. If disabled data is displayed with formatting applied by users.
- Auto Refresh - Switch this on to automatically refresh the preview panel as changes are made to the view set up, such as adding or removing columns.
- Rows - Specify the number of rows to be previewed here.
- Refresh Preview - If auto refresh is disabled, click on this to refresh the view data.
...