Page History
| Anchor | ||||
|---|---|---|---|---|
|
| Table of Contents | ||
|---|---|---|
|
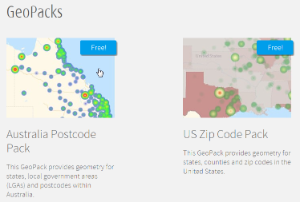
Overview
| Styleclass | ||
|---|---|---|
| ||
Once these are complete, you will be able to use your pack data through one of three methods. See GeoPack Use for more information.
Obtain
| Styleclass | ||
|---|---|---|
| ||
| Section | ||||||||||
|---|---|---|---|---|---|---|---|---|---|---|
|

| Section | ||||||||||
|---|---|---|---|---|---|---|---|---|---|---|
|

| Section | ||||||||||
|---|---|---|---|---|---|---|---|---|---|---|
|

| Section | ||||||||||
|---|---|---|---|---|---|---|---|---|---|---|
|
| Section | ||||||||||
|---|---|---|---|---|---|---|---|---|---|---|
|

Import
| Styleclass | ||
|---|---|---|
| ||
| HTML |
|---|
<iframe width="700" height="394" src="https://www.youtube.com/embed/4GYTTSL_fIA?color=white" frameborder="0" allowfullscreen></iframe> |
| Section | ||||||||||
|---|---|---|---|---|---|---|---|---|---|---|
|

| Section | ||||||||||
|---|---|---|---|---|---|---|---|---|---|---|
|

| Section | ||||||||||
|---|---|---|---|---|---|---|---|---|---|---|
|
| Section | ||||||||||
|---|---|---|---|---|---|---|---|---|---|---|
|

| Section | ||||||||||
|---|---|---|---|---|---|---|---|---|---|---|
|

| Section | ||||||||||
|---|---|---|---|---|---|---|---|---|---|---|
|
| Section | ||||||||||
|---|---|---|---|---|---|---|---|---|---|---|
|
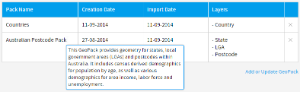
Now that your pack is uploaded you will be able to make use of it in your reports and maps. See GeoPack Use for more information.
Update
| Styleclass | ||
|---|---|---|
| ||
| horizontalrule |
|---|
| Styleclass | ||
|---|---|---|
| ||