Overview
Yellowfin can be integrated into existing or new applications by removing or replacing the Header and Footer panels. This also allows you to build in your own navigation into customised panels.Much like the Login Page, customisation of the standard Yellowfin Header & Footer can be performed two ways:
- Simple - this involves the replacement of images, and changes to the CSS files used by the header and/or footer, without having to write a panel. Generally this option is used for quick 'mock ups' but not the final restyled product.
- Complete - this involves writing a custom file to replace the header and/or footer panel. This method requires more technical knowledge, and more time.
Header
The Yellowfin header sits at the top of each page in the system: 
Footer
The footer is located at the bottom of the page, and is centred on the Dashboard if the dashboard position is set to Centre:
Simple Styling
If you wish to create a quick, temporary custom header & footer, simply replace the following images in the Yellowfin ROOT customimages directory (Yellowfin\appserver\webapps\ROOT\customimages) with your customised versions:- logo.svg
- logoFooter.svg
You will need to clear your browser cache once replacing these images in order for them to appear.
Note: the images you wish to use as replacements will need to have the same name and extension as the files listed above in order for the page to pick them up. You no longer have to overwrite the originals, simply place your new images in the custom directory. This will mean that they will not be overwritten during the upgrade process.
Example
Component | Standard | Custom |
|---|---|---|
Full Header |
|
|
Full Footer |
|
|
logo.svg |
|
|
logoFooter.svg |
|
|


Complete Styling
Instructions
The included HTML should be a fragment, suitable for including inline within another HTML page, rather than it being a full HTML document itself. That is, it should NOT contain <HTML>, <HEAD>, or <BODY> tags. Remember that any links inside the HTML will be relative to the Yellowfin page. It is recommended to use absolute HTML links.
It is also important to remember that the standard Yellowfin Header provides only one link for a user to log out of the system. If the header is being replaced and you wish to provide this link, include:
javascript:on_submit('logoff');
There is also a sample header file available as a starting point in the Yellowfin Examples directory (Yellowfin\development\examples\CustomHeaderExample.jsp).
- Save your custom Header & Footer files in the Yellowfin ROOT directory (
Yellowfin\appserver\webapps\ROOT) - Save any required images in the Yellowfin customimages directory (
Yellowfin\appserver\webapps\ROOT\customimages) - Update any CSS files used, or add new ones to the Yellowfin customcss directory (
Yellowfin\appserver\webapps\ROOT\customcss) - In Yellowfin, navigate to Administration > Configuration > Integration (tab)
Here you will need to specify the locations of your custom files, for example: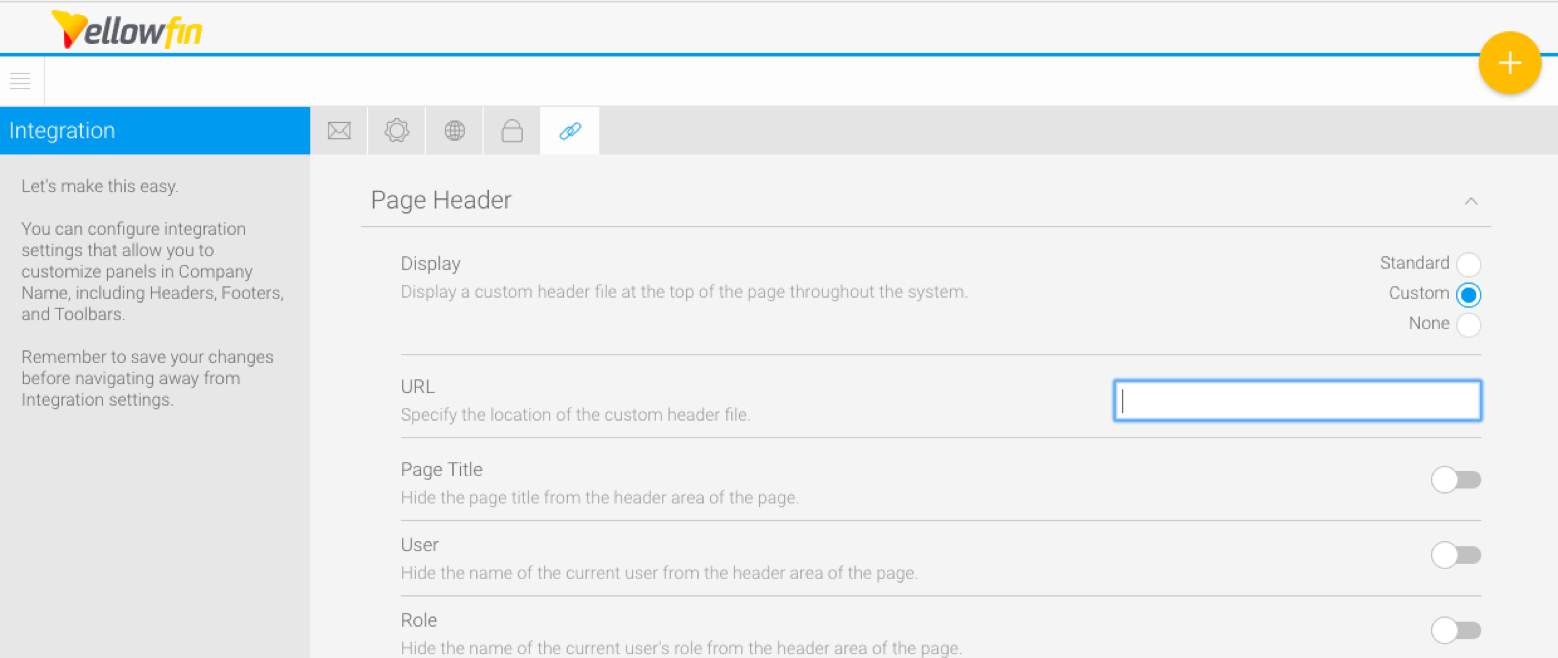
- Change the Page Header option from Standard Yellowfin Header to Custom Header and specify the URL of the file.
- Change the Page Footer option from Standard Yellowfin Footer to Custom Footer and specify the URL of the file.
The Custom URL is a link to the html fragment that will be included at runtime every time a page is loaded. It can be located on any server that the Yellowfin service can access, but for best performance it would be hosted on the same server. In this example we have placed the file in the Yellowfin ROOT directory (Yellowfin\appserver\webapps\ROOT\header.jsp and can then be found via header.jsp
Note: Instead of using the existing Yellowfin directories, you may wish to create a new folder in Yellowfin\appserver\webapps\ROOT to contain your custom files, to make locating them easier.
Example
Component | Standard | Custom |
|---|---|---|
Full Page |
|
|