Overview
The Date Conversion function is available during the CSV Import process. It allows you to convert date fields that are unconventionally formatted, into a standard date format that Yellowfin can recognise. For example, a date stored in your CSV as2014-Aug-12 can be converted to 12/08/2014.
In the example used here, we have a CSV file with two different date formats, and neither of them are recognised by Yellowfin as a standard date format. The CSV used can be located here.
Once the CSV file has initially been loaded, following the steps on either the View Builder CSV Import or Report Builder CSV Import pages, we can see there are two date fields in the file.
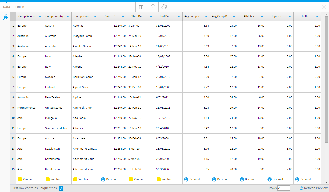
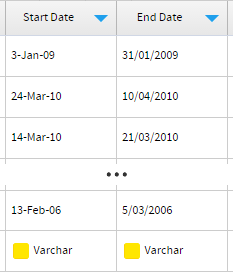
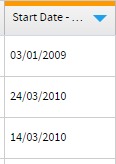
The Date fields, Start Date and End Date, are shown in the file, but Yellowfin has recognised them as Varchar (text) fields, as they were not formatted in the standard date format.
Example
dd-MMM-yy
1. Click on the New Function button on the left of the CSV Data page. This will open a menu displaying all the functions that can be built into your file.
Note: this screenshot is from the Report Builder CSV Import, if using the View Builder CSV Import not all of these options will be available, as they are available in later stages of the standard View Builder process instead.
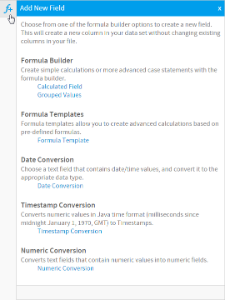
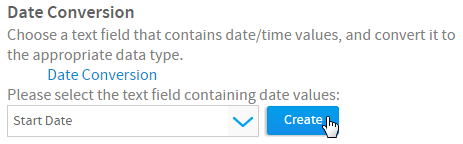
2. Click on the Date Conversion link to start the process.
3. From here you will need to select the field that requires converting. We will start with the Start Date field.
4. Click Create.
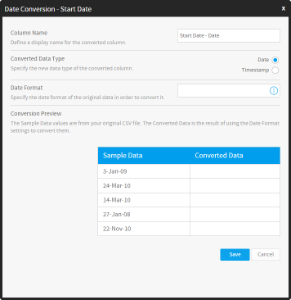
5. From here, the Date Conversion window will be displayed. First, you can provide a name for the converted version of the field.
Note: this will be a new field, the original unconverted field will remain. You may wish to rename the original field as well.
6. Next, you will need to select which Converted Data Type you wish the field to be stored as. If the field contains time components and you wish to use them in reporting, select Timestamp, otherwise select Date.
Last, you will need to define the Date Format the CSV field is currently stored in. Yellowfin will always convert to the format specified in Administration > Configuration > Regional Settings, which is dd/MM/yyyy by default, what you have to do is tell it how to read the original field. In this example, the Start Date field is displaying as 3-Jan-09, which means it's formatted as dd-MMM-yy.
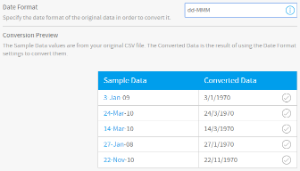
7. Enter dd-MMM into the Date Format field. You will notice that in the preview panel at the bottom of the window, Yellowfin has highlighted the 3-Jan component of the Sample Data, and as such is returning 3/1/1970. What happens here is that Yellowfin converts the parts you specify (in this case day and month) and populates the rest with components from the date: 1/1/1970.
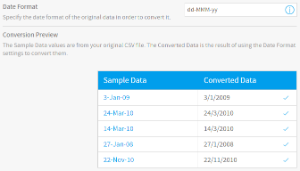
8. Finish entering the date: enter dd-MMM-yy into the Date Format field. Yellowfin has now converted the entire date in the preview panel.
9. Click Save to complete.
You will now have a new field at the end of your CSV table. This will have an orange band at the top to identify it as a converted field.
dd/MM/yy
In this example, we are going to convert the End Date field. At the moment this field looks like a date Yellowfin should recognise, as it's in our default format of dd/MM/yyyy, but Yellowfin actually needs to read in dates from the format yyyy/MM/dd. So while it looks OK to us, Yellowfin has recognised it as text rather than a date.
1. Click the New Function button, select Date Conversion and choose the End Date field.
2. Click Create to begin.
3. Complete the Name and Converted Date Type as before.
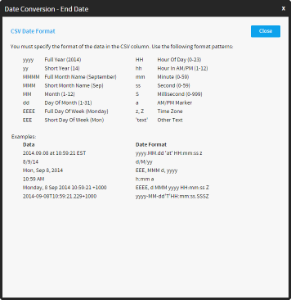
4. If you were not sure how to specify your date format, i.e. what characters to use in the Date Format field, click on the ![]() symbol in the field.
symbol in the field.

5. From here you will be shown what character combinations make up what date components. Work out which characters you need and click Close to return to the previous screen.
6. Enter dd/MM/yy and click Save to complete.