Overview
The security of your reports is managed at the folder and sub folder level, not at the individual item level. The purpose of this is to simplify the creation of reports in the system.
- Folders are used to hold and split Sub Folders into groups. They do not contain content directly.
- Sub Folders are located within a defined Folder and are used to store content with specified function and access permissions.
The content types that are stored in this structure are Reports, Dashboard tabs, Storyboards, Views, Data transformation flows, and Stories.
Ensure that you create both, a folder, and a sub folder before you save your content.
Folder Creation
This process shows how to create a parent folder, which can be used to store sub folders.
- Navigate to Administration > Administration Console from the left side navigation.
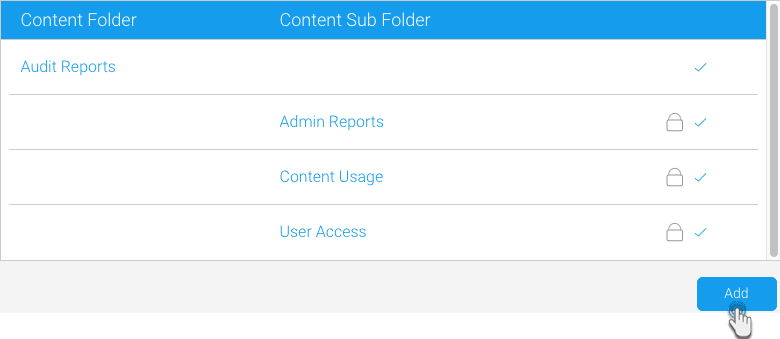
Expand the Content Folders tab. Click the Add button.
You will be taken to the Folder setup page, where you will need to define the following:
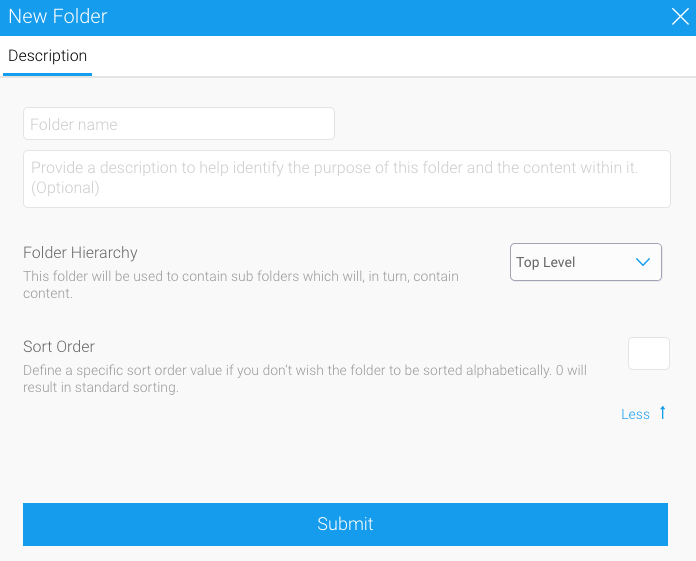
Parameter Description Folder Name This will be the name of the folder displayed in various parts of the system when saving and viewing content. Description This will be the description of the folder, used to define its intended purpose and audience. Folder Hierarchy This defines the level of the folder. Select 'Top Level' to create a new parent folder. Sort Order (Advanced setting) Provide a numeric sort order to list the folders accordingly. For example, a sort order of 1 means the folder will be displayed first. Defaults to zero in which case the folders are sorted alphabetically. Click Submit to complete the folder.
Next, create a sub folder. See the process below for further instructions.
Sub Folder Creation
Create a sub folder by following the steps below. Note that at least one folder should already be created.
- Once a folder has been created, click the Add button under the Content Folders list in the Admin Console to start defining Sub Folders.
- You will be taken to the same folder setup page. In the Folder Hierarchy field, select a parent folder where the sub folder will be created. A range of different options will become available..
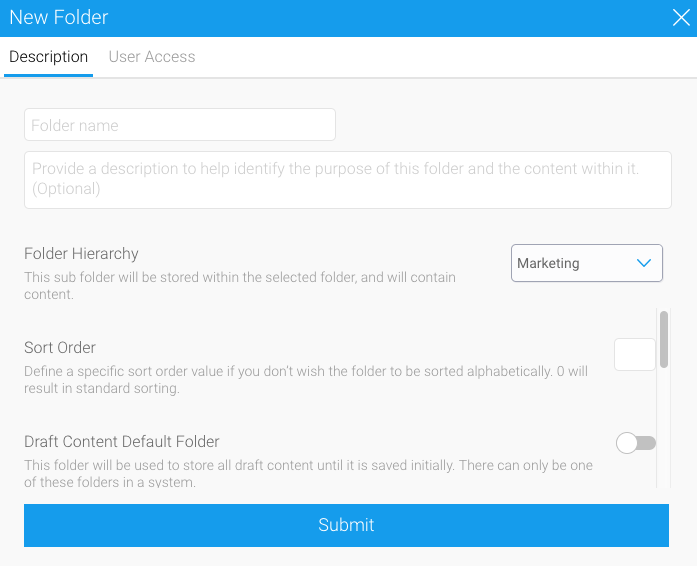
Now that you are creating a sub folder, the following sections will need to be defined. These relate to content settings and as such only correspond to the sub folder level, as the folder level can't directly contain content.
Parameter Description Folder Name Name of the sub folder displayed in various parts of the system when saving and viewing content. Description Description of the folder, used to define its intended purpose and audience. Folder Hierarchy This is used to select the parent folder within which this sub folder should exist. Advanced settings Expand this link to access additional advanced settings. These are discussed below. Sort Order Provide a numeric sort order to list the sub folders accordingly. For example, a sort order of 1 means the sub folder will be displayed first. Defaults to zero in which case the folders are sorted alphabetically. Draft Content Default Folder
Enabling this toggle means that any content that is not activated is automatically stored in this Sub Folder, such as draft reports, dashboards, etc. Note that there can be one default draft sub folder in the system, which will contain all draft content until a different sub folder has been selected by the content writer. This is used to keep all draft content in one place, making it easier to keep the system organized. Default View Folder Enable this toggle to define this sub folder to be used to store Views that are automatically created. Note that there can be only one of these folders in a system.
Version History The version history allows you to store the data returned in a report, in order to maintain historical result sets for reports.
- If version history is set to Current Version Only set then no historical results will be kept. This means that the system runs a database query, and creates a result set every time the report is run.
- If the Keep Historical Versions option is selected then all historical versions of the reports will be kept. With this option not only will the report definition saved but the data as well. This allows users to view previous versions of the report and compare result sets. Note: It's important to remember that this option can quickly build up quite a large amount of data, so use this option sparingly.
All versions of the report data are stored in the Yellowfin Database. As the administrator you can determine how much history and the maximum size of reports you wish to save. This is an application management process that permits you to control the use of your infrastructure. Refer to the following parameters for more information.
Max Size Define the amount of storage available for caching report content in this folder (in KB). This lets you set a limit to the amount of report data that will be stored. If this limit is exceeded, the system will delete older cached content to store new one.
Max Versions Define the number of historical result sets that will be accessible, per report. For example, you can limit each report to store 20 result sets. If this number is exceeded, the system will delete older cached sets to store new one.
Note: Content folder limitations related to versions and age, do not apply if the content in question is used in a Story.
Max Age Define how long the historical result sets should be stored before they are deleted. For example, if you define this age limit to be 5 years, then content will be stored for 5 years; all older content will be deleted.
Note: This limitation will not apply if the content in question is used in a Story.
- Next, you can define the security access and approval settings for the content that will be created in this sub folder. Refer to the sub section below.
Content Approval and Security Access
This section allows you to configure an expert approval process for some content types stored in this folder, as well as define which users can access the content. Approval can be set up for reports, stories and views. Approval is not available for dashboards and storyboards.
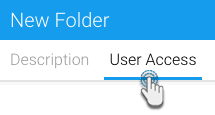
- After providing details of the sub folder, click the User Access tab.
- Enable the Expert Approval Required to Publish toggle to define an approval process for content created in this folder. This allows administrators and advanced users to approve all reports, stories and views stored into the folder before they are activated for public consumption, ensuring they are correct and the data can be trusted.

- Then select a user or group in the Person/Group panel, to be the expert approver of the content.

Sub Folders can also be secured to restrict access to the content they contain based on specified permissions. The options for setting the security are as follows:
Security setting Description Unsecure People can access the content stored here without logging in. Public Users will have to log in before being able to view the content, but all users of the system will be able to view it. Private Only selected users will be able to access this content. - If you choose Private, then you must select a person or group and then the level of access that they are permitted.
Click on the access level of the selected user (or approver) to update their level of access. Three types of access exist:
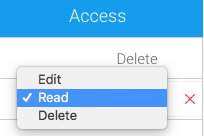
Access Level Description Read Users will only be able to read the content but not create new items of this type of content. Edit If a content item exists a user will be able to edit and update an existing piece of content but not create new or delete items in this folder. They will also be able to read all content in this folder. Delete Users with delete access will be able to read, edit, create and delete content of this type. You must have at least one person with delete access Note: if you want all your users to be able to read the item make sure you have a group created with all your users. Use this group for read access.
- You can have as many groups and people in the list as you wish. You cannot finish the process if you do not have at least one person or group with delete access. Select a person with delete access to finish.
- Once done, click Submit to save changes.
Primary Org Content Security
When using Client Org functionality, you are able to secure content sub folders at the primary org by assigning access to user groups created at the client org level. This will allow administrators to restrict primary org content to specified users in each client org, rather than all primary content being available to all client org users.
Edit Folder/Sub Folder
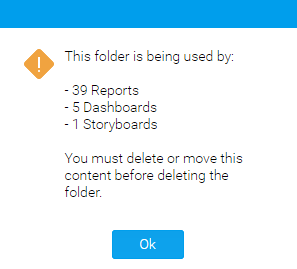
Delete Folder/Sub Folder
From here you will be required to confirm the deletion. If, however, the folder contains content you will be informed that this content must be moved or deleted before the folder can be.