Creating a new Story
Get started by creating a new story.
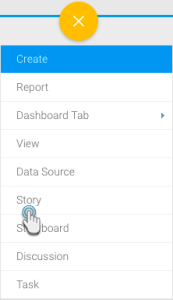
- Click the Create button in your Yellowfin instance.
- Select Story from the list. (If you do not see this option, then ensure that you have the correct role function. Click here to learn more.)
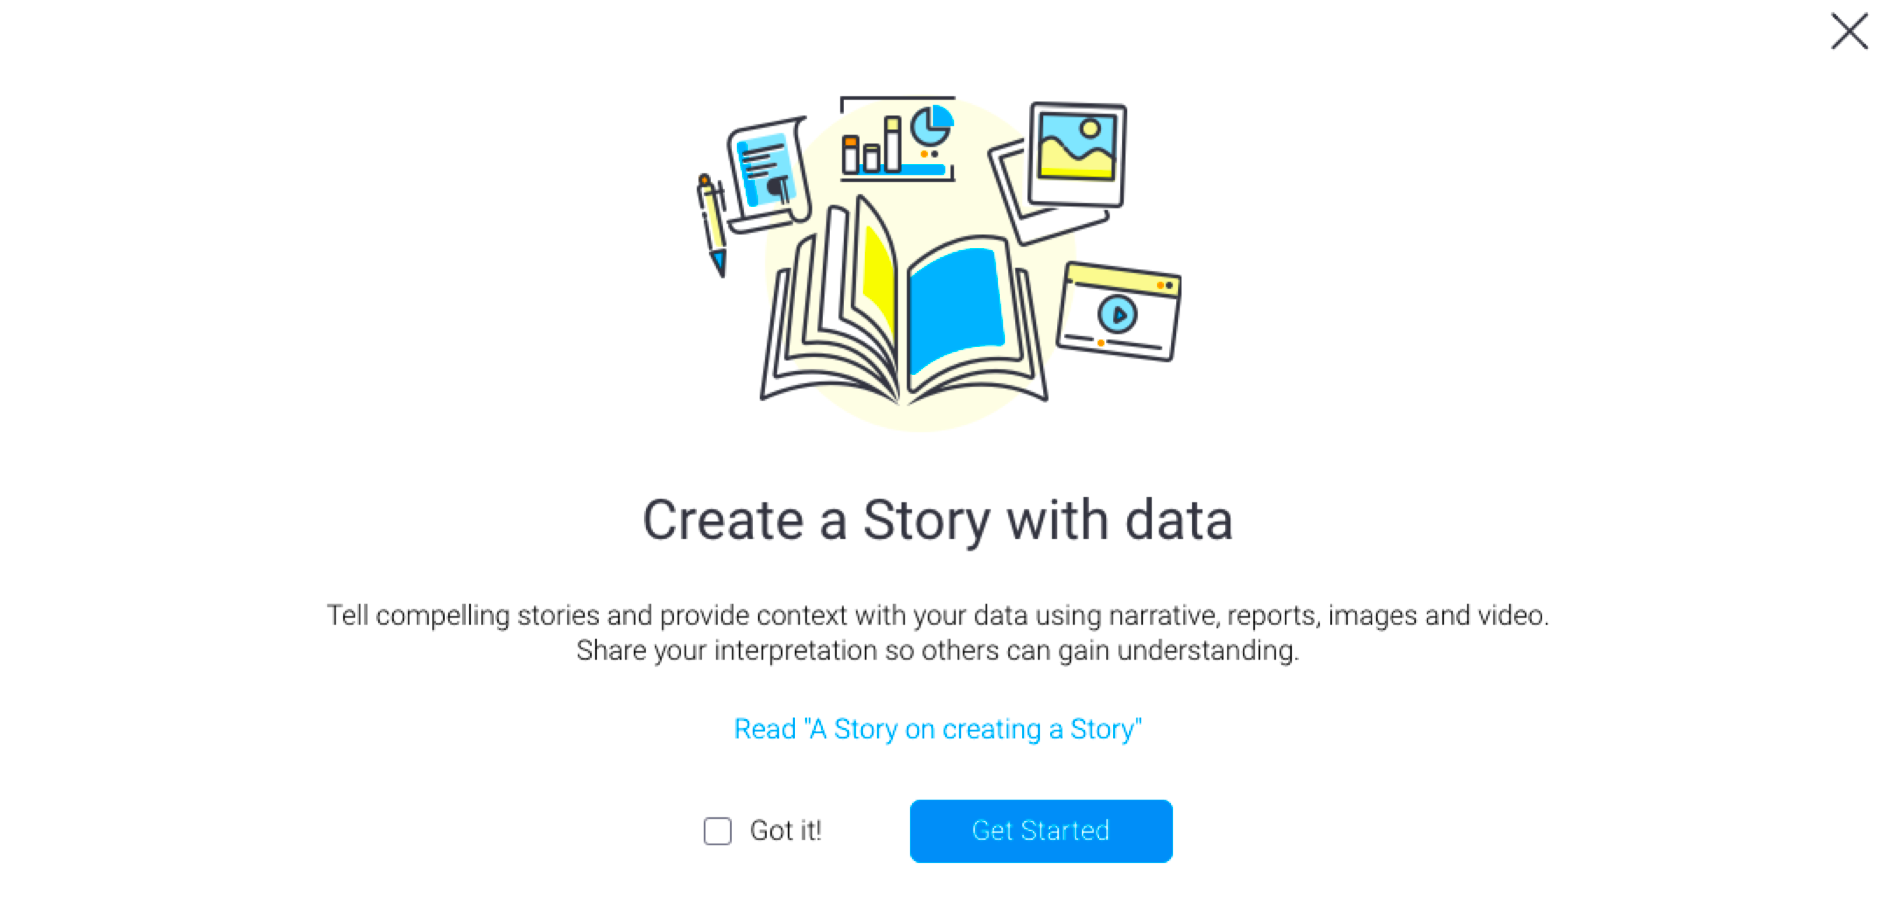
- If this is your first time opening the Story builder, you will be greeted with a welcome message. If you wish to never see this message again, select the Got It! checkbox, otherwise this message continues to appear every time the builder is opened. Click Get Started to begin editing the Story.
- You will be navigated to the Story Builder that lets you create a new Story. Click here to learn about the different options of this builder.
Including a title
Give your Story a title. If one is not provided, a default title ("Untitled Story") will be given to your Story.
- Click the area that says 'Start your story with a title.' to make it editable.

- Provide a title, and press the Enter key to save it.
- You will then be able to see the title in the blue header bar at the top of your Story.

- You can also update your title by performing the same steps.
Note: You can also add or edit the Story title when you publish it. Click here for more details.
Story header image
Add any image to be displayed as the Story's header. This will appear at the top of the Story. Although a header image is not mandatory, if one is added, it will also serve as the Story's thumbnail in the Browse page.
Note: Ensure that the image you select, does not exceed the size limit, which is 1200 x 300 px.
Add a new header image
To add one, follow the steps below:
- Click on the header image area at the top of your Story.
- The Image Manager popup will appear on doing so. Use this to choose an already existing image, or upload a new image using the Add button.
- Note that the header size is fixed in the Story module. If your image size exceeds the limit, the displayed image will be cropped. See the note above for further clarification.
Edit or delete an existing header image
If you'd like to replace or delete the header image of your Story, then follow the steps below:
- Hover over the header image to bring up its menu.
- Click on the edit icon to bring up the Image Manager popup, and choose another image.
- Or click on the delete icon to completely remove the current image.
Managing Story Users
A user can start building a Story, but will have sole access to view or edit it while it is in draft mode. They can invite other users to contribute to it. The Story creator will be known as the author, and the other users who are invited will be known as collaborators. Not every collaborator will end up contributing to a Story; those who do, will be referred to as editors.
Once a Story is finalized and published, all of its users will be listed. This ensures data governance as Story readers will be able to identify exactly who has contributed to a story, such as data experts, increasing the reader's trust in the Story. If a published Story requires updating, then only the author will be able to put the Story back in draft mode, to allow collaborators to update it. Similarly, only the author will be able to delete a Story. A collaborator can copy a Story, and become the author of the copied version, but will not be able to delete the original Story.
Multiple collaborators
Live co-authoring is currently not supported, so in case of multiple collaborators, only one user will be able to edit a Story at a time, including the author. Other collaborators will be able to preview the Story, but only edit it when the current editor closes it. This ensures that changes do not get overwritten.
A warning appears if a collaborator tries to edit a Story that is already being edited.
Add or remove collaborators
The steps below outline the process of adding or removing collaborators:
- Click on the More button, and select the Collaborators option.
- In the new popup, click on the Add Collaborators field, and select a user from the list. Repeat this step to select multiple users. Note: You can only add individual users here, not user groups.
- You may enter an optional message to be sent with the invitation.
- Click the Invite button. On doing so, the user will be added as a collaborator. A message will be sent to their timeline to notify them of this.
- All current collaborators of the Story will be listed on the left side of the new popup, under the Manage Collaborators list. You can remove a collaborator by clicking on Remove next to their name. Note that contributors who have worked on a Story, cannot be removed.
- Once you are done managing collaborators, simply click on the exit button at the top-right corner.
Other Story Content
Besides text and reports, you can include additional content such as images, videos and even dividers into a Story.
Adding an image to a Story
- Click on the plus button at the start of a new line. (Note if you do not see this button, simply click on a new line. The button will only appear if no text gets entered.)
- Then select the image icon.
- The image manager popup will appear. Use it to choose an existing image by selecting its thumbnail, or add a new image by using the Add button.
- Once added, you can resize the image. See the chart below for the options.
- The image will be captioned with its name, which can also be edited or removed.
Image resizing options
Icon | Size option | Description |
| Original | Displays the image in its actual size. This option only appears if the original image width is less than 700 pixels. |
Fit | Displays the image to fit the Story size, which is 700 pixels (that is, the image width will be stretched to 700 px while maintaining the aspect ratio). The image is displayed in this size by default. | |
Wide | The maximum size an image can be displayed in. (This option will stretch the width to 900 pixels, while maintaining the aspect ratio.) |
Embedding a video to a Story
You can embed Youtube or Vimeo videos in this module. Here's a simple procedure that explains how to do this:
- Click on the plus button at the start of a new line. (Note if you do not see this button, simply click on a new line. The button will only appear if no text gets entered.)
- Select the video icon.
- Copy the link from either video platform, and paste it in the area specified. Press the Enter key.
- The video will be displayed, and captioned with the link. You can edit or remove this caption.
- To delete the video, simply select it and press the Delete key.
Note: Although the video image will be displayed in a Story while in draft mode, it can only be played when the Story is published.
Adding a divider
Include a divider in your story to display a horizontal line that's used to divide your story content.
- Click on the plus button at the start of a new line. (Note if you do not see this button, simply click on a new line. The button will only appear if no text gets entered.)
- Then select the divider icon.
- A horizontal line will appear.
Deleting attached content
You can delete an attached content, such as a report, image, video, etc, by selecting the item and pressing the backspace or delete key.
Publishing your Story
Once your story is ready, you can publish it. This involves activating the Story to make it available to other users besides the collaborators. When publishing, you can choose to make the story publicly accessible to all Yellowfin users, or a specific bunch of users by setting the access rights to the story accordingly.
Once you are ready to publish your story, follow these steps.
- Click Publish at the top-right corner of the story builder.
- In the new popup, you can enter or edit the story title. (If your story already has a title, the first field will display it; if you change the title, it will be updated in the story as well. If no title is provided, your story will be named 'Untitled Story'.)
- Provide a description for the story to assist users with understanding its purpose and content.
- Select a folder and sub folder to save the story into. You will only be able to select folders you have access to.
- Choose a story access setting:
- Public: permits all users with folder access to be able to view this story.
- Private: the author/collaborator may assign users access to the story. In this case, a new User Access tab will appear, allowing you to add specific users.
- Click the Save button to save and activate the story. Note: you can save your story as a draft and activate it at a later time, by expanding the drop down button next to Save and choosing Draft.
- Once a Story is published, you can view its author, editors, and collaborators at the bottom of the page.
Story Approval
For utmost security and data governance, you can set up your process so that your Stories will require approval before they're published and made available to the users. This is achieved by saving the Story into a private content folder. Only once a Story is approved, will it get published for readers. Also note that when a Story is pending approval, it can still be viewed and edited by its author and collaborators.
Each content folder only has one approver. If a user group gets assigned to approve Stories, the group member with the least number of tasks gets appointed as the content approver.
Any user with the Approval Admin role function will also be able to approve a story besides the appointed approver.
Approvers can only review the Story without making any changes to it. Following outlines the approval workflow:
- The author/collaborator publishes the story, selecting a secure folder to save it into. A message will appear on doing so (this only appears if the user saving this Story is not the approver of the folder). Note: Secure folders can be identified with the security icon next to them.
- Enter a message to be sent to the approver with this request, and click the Request Approval button.
- The approver will get a message on their timeline, notifying them of this update.
- On accessing this story, they will see it in its Preview mode. If the approver is happy to approve the Story, they will need to click on the Approval Required button.
- This brings up the approval message in the Activity Panel. (Simultaneously, this panel message will also come up if the approver clicks on the Timeline message for the Story.)
- Click Approve if the Story is ready to be published.
- Once approved, users with rights to the Story will be able to view it. Approved Stories also include the name of the approver, increasing the reader's trust in the information shared.
- Alternatively, you can reject a story, in which case it will not be published. (Warning: you cannot undo this action, until the Story is updated and requested for approval again.)
- In the activity panel, click on the dropdown button and choose Reject.
- You must enter a reason for rejecting the Story. Click Submit.
- The Story will then be placed in draft mode. You can repeat the approval process again after updating the Story.
Sharing a published Story
Once a Story is published, you will be able to share it. Public Stories can be shared with any user, however if a Story is private then it can only be shared with specific users that are allowed to view it. Learn how to do this below.
Note: To be able to share a published Story, you will need the "Distribute Story" role function. Learn more about this here.
- Once your story has been published, click on the new Share button in the top right corner.
- In the new popup, specify the user to share this story with, and if required, provide an additional message.
- Then click on Submit.
- The user will be notified of this with a message on their Timeline.
Editing a published Story
If a published story requires changes, it will need to be viewed in draft or edit mode. Only the story author (or a user with 'Story Admin' role functionality) can put the story back in draft mode, so that collaborators can update it. Note however, that the last published version of the story will still be available for readers, until the updated version is published.
The steps below demonstrate how draft mode is enabled on a story.
- While the story is opened, click More and select Edit.
- Alternatively, click on the menu option of the story thumbnail in the Browse page, and click Edit. Click on the Ok button when the confirmation popup appears.
- The story will change to, or open in, draft mode, allowing you to edit it as normal. Note that while the story is being updated, the latest published version would still be accessible by viewers.
- To make the updates visible to other viewers, you must publish the story again. This will replace the story with the latest version.
Previewing a Story
You can preview the final outcome of a Story to see what it looks like to the readers at any time. Follow these steps:
- While the story is opened, click More and then Preview.
- You will then be able to view the Story in preview mode.
- To go back to draft mode, click Edit Story.
Delete a Story
The author is the only user who can delete a Story. This way even if a collaborator copies a Story and becomes the author of the copied version, they will not be able to delete the original Story.
Note that a Story that is currently being edited cannot be deleted.
The process of deleting a Story is same if the Story is published, or still in draft mode.
- Locate the Story that you want to delete in the Browse page.
- Click on its menu icon, and select Delete. (This option will only appear if you are the Story's author.)
- A confirmation popup will appear. Click Delete if you are certain you want to delete the Story.
- The Story will be deleted permanently.