Overview
Guided NLQ facilitates data analytics for business users with little or no report-writing skills. Make their experience as successful as possible by providing views with fields that are easy for them to use and understand. A small change, such as descriptive field names, can make a big difference to someone using Guided NLQ for the first time.
This section provides a checklist of what you can do to improve the Guided NLQ experience from the view level with business users in mind. After the checklist, each option is explained in more detail.
Checklist
- Limit fields for Guided NLQ
Fewer fields keep Guided NLQ running quickly and aid users who may be bogged down by too many field choices. - Understand filter value caching
Guided NLQ is already fast, and the Load Filter Values gives you extra flexibility during configuration - Provide meaningful field names
Descriptive field names help first-time users get started. - Add plurals
Adding a plural to a field name ensures a more natural question flow for Guided NLQ users. - Prepare intuitive calculated fields
Consider creating calculated fields to help your users formulate simpler questions. - Prepare non-continuous date fields
Use date functions to create additional ways to analyze your data. - Create popular focus areas
Focus areas enable quick and simple refinement of complex data, saving users from writing long, complicated questions. - Match user access to skill level
Very complex views should only be given to users with a high degree of data skill and familiarity with the data sets — including NLQ access - Organise a date hierarchy
Data aggregation results may differ if date hierarchies aren’t correctly set up.
Limit fields for Guided NLQ
Rather than switching on all fields for Guided NLQ, it makes sense to exclude any fields that a user is never likely to use, such as a field with more obscure values. Limiting the fields for Guided NLQ provides several benefits:
- The system requires less resources due to reduced caching of dimension fields and data.
- Users won’t be slowed down by scanning through fields they won’t ever ask questions of.
In any real-life situation where you’re asked to choose between many options, you’d probably want to know more about the choices available, and what impact your choice might have. Reducing the field choices within Guided NLQ therefore reduces the overhead often involved with learning new information. Keeping data sets as simple as possible therefore makes it easier for business users to get started with Guided NLQ with minimal assistance.
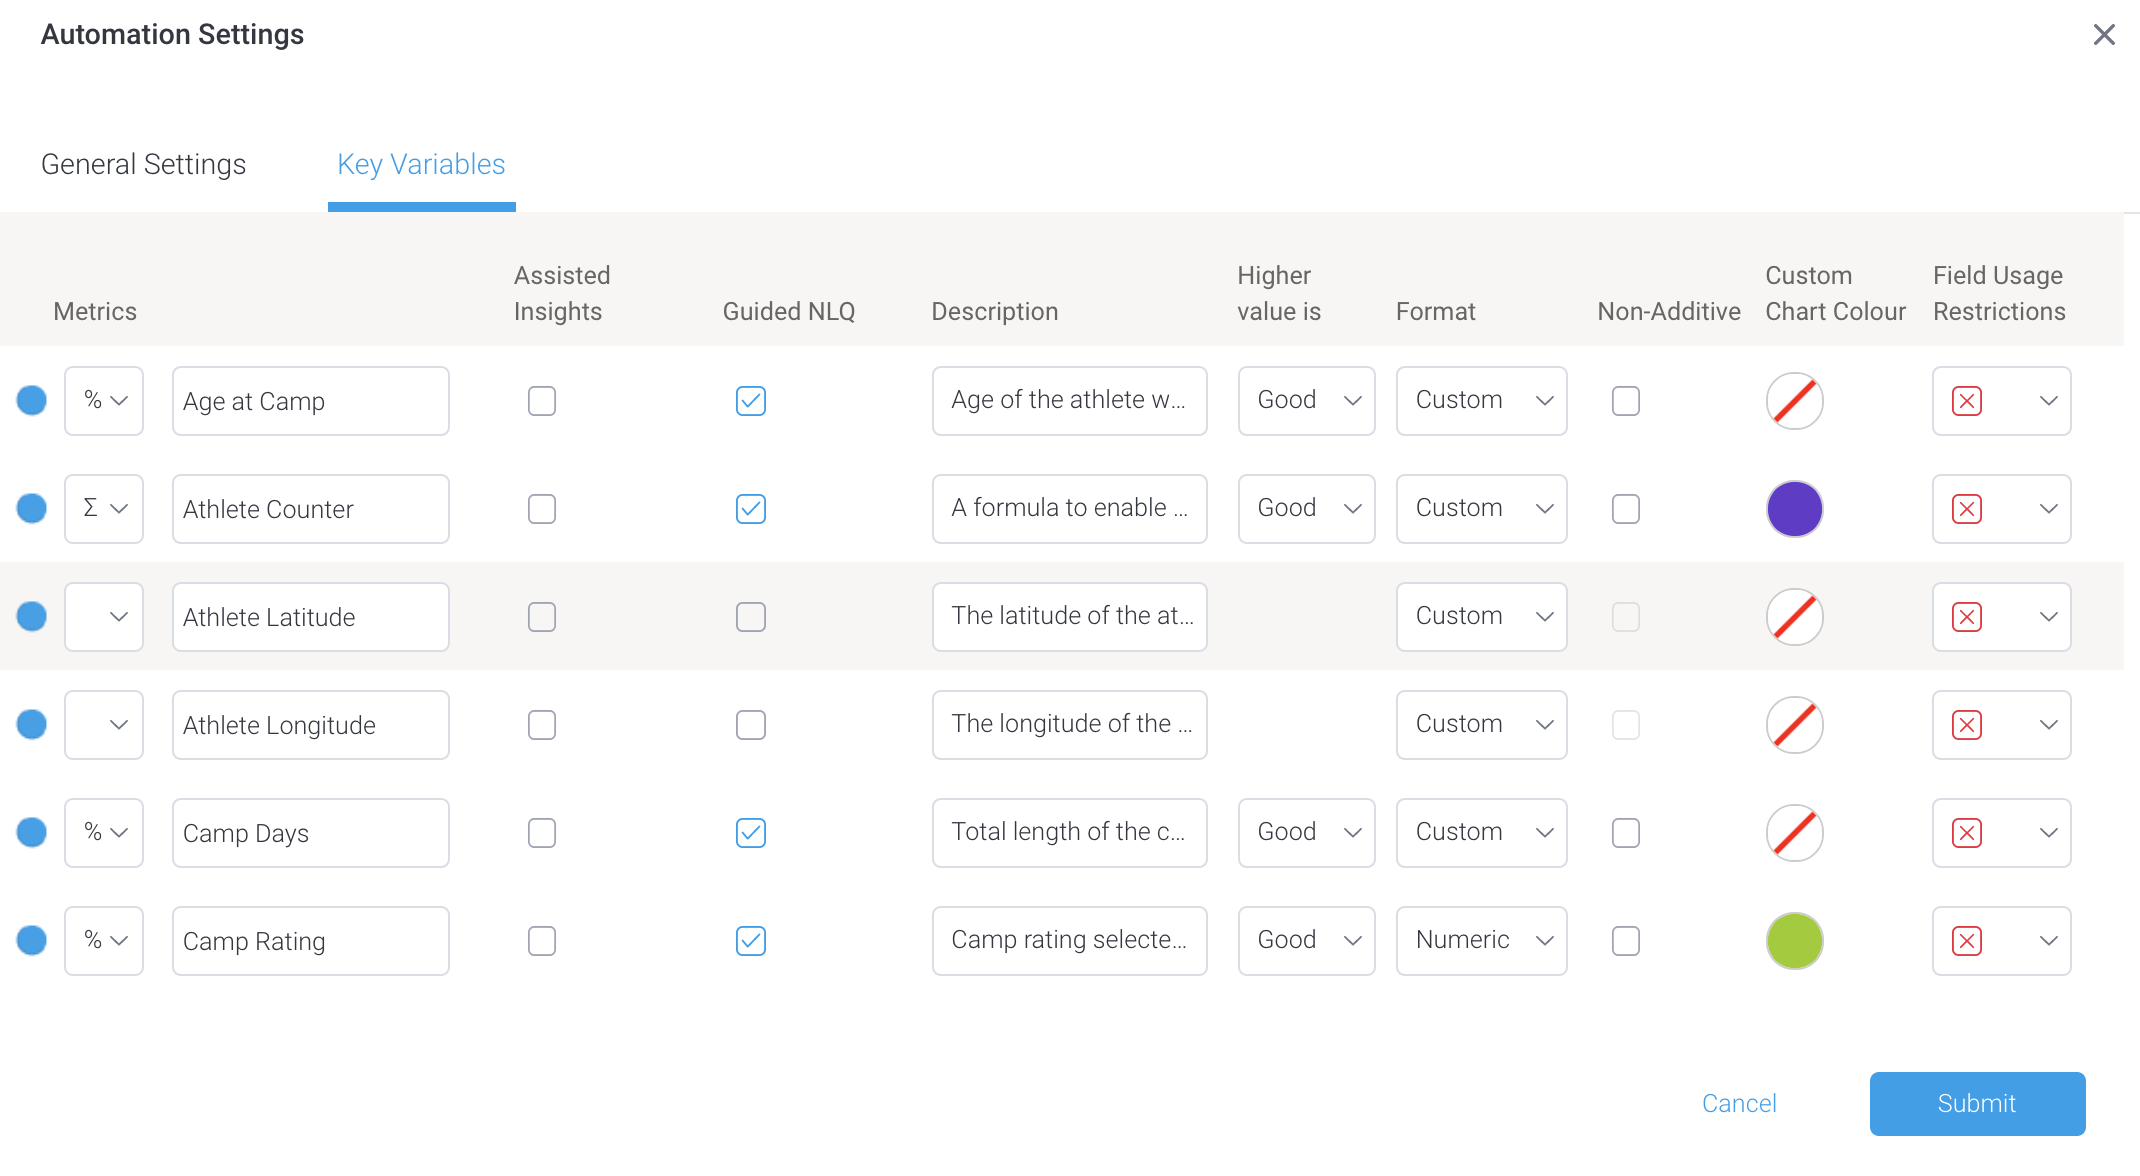
You can limit field usage via the Key Variables tab of your view’s automation settings.
Understand filter value caching
Yellowfin uses filter value caching on NLQ-enabled dimension fields to avoid any potential loss of load speed. Caching filter values speeds up the display of available values when the user is prompted to select those values. Yellowfin determines which fields are likely to consume a lot of system resources if they're cached and disables caching automatically for those fields. Guided NLQ fetches any uncached values when a user asks a question (live queries).
Although this caching threshold cannot be adjusted manually, Yellowfin contains an option to switch off filter value caching and live querying — the Load Filter Values checkbox.
The Load Filter Values checkbox is available for each field within a view, so you have full discretion over its use. For example, an email address field may contain hundreds of thousands of values, but it’s unlikely that a Guided NLQ user would ever want to select an email address from such a large list. However, the field would still be required for Guided NLQ if users wish to ask a question to list this month’s new accounts so they can send a personalised email greeting.
Choosing whether to apply this option to your own data fields depends on the data itself and how your users interact with it. For example, if a user wants to ask a question about a field that has the Load Filter Values option switched off, Guided NLQ will prompt them to manually enter a filter value of their choice, and the results will display anything that matches. The output is only as good as the input, so if a user types ‘Monday’ when the data contains similar values ‘monday’, ‘Mon’ and ‘mon’, the results for those similar values will be excluded. As a rule of thumb, disabling Load Filter Values is not recommended for fields that are likely to be used as a filter within Guided NLQ.
Disabling filter value caching can therefore save system resources on views with many fields or with a large amount of data. In our Ski Team tutorial data, for example, we’ve disabled filter value caching for the Athlete ID field without excluding it from Guided NLQ.
To disable filter value loading, go to your view’s automation settings (if you’re not sure how, see the wiki page for setting up Guided NLQ).
- Ensure you’re looking at the Key Variables tab of your view’s automation settings
- Scroll down to the Dimensions section of the dialog box and find the field you wish to use with NLQ without caching its filter values
- Ensure the Guided NLQ checkbox is checked, then click on the dropdown for the Field Usage Restrictions column
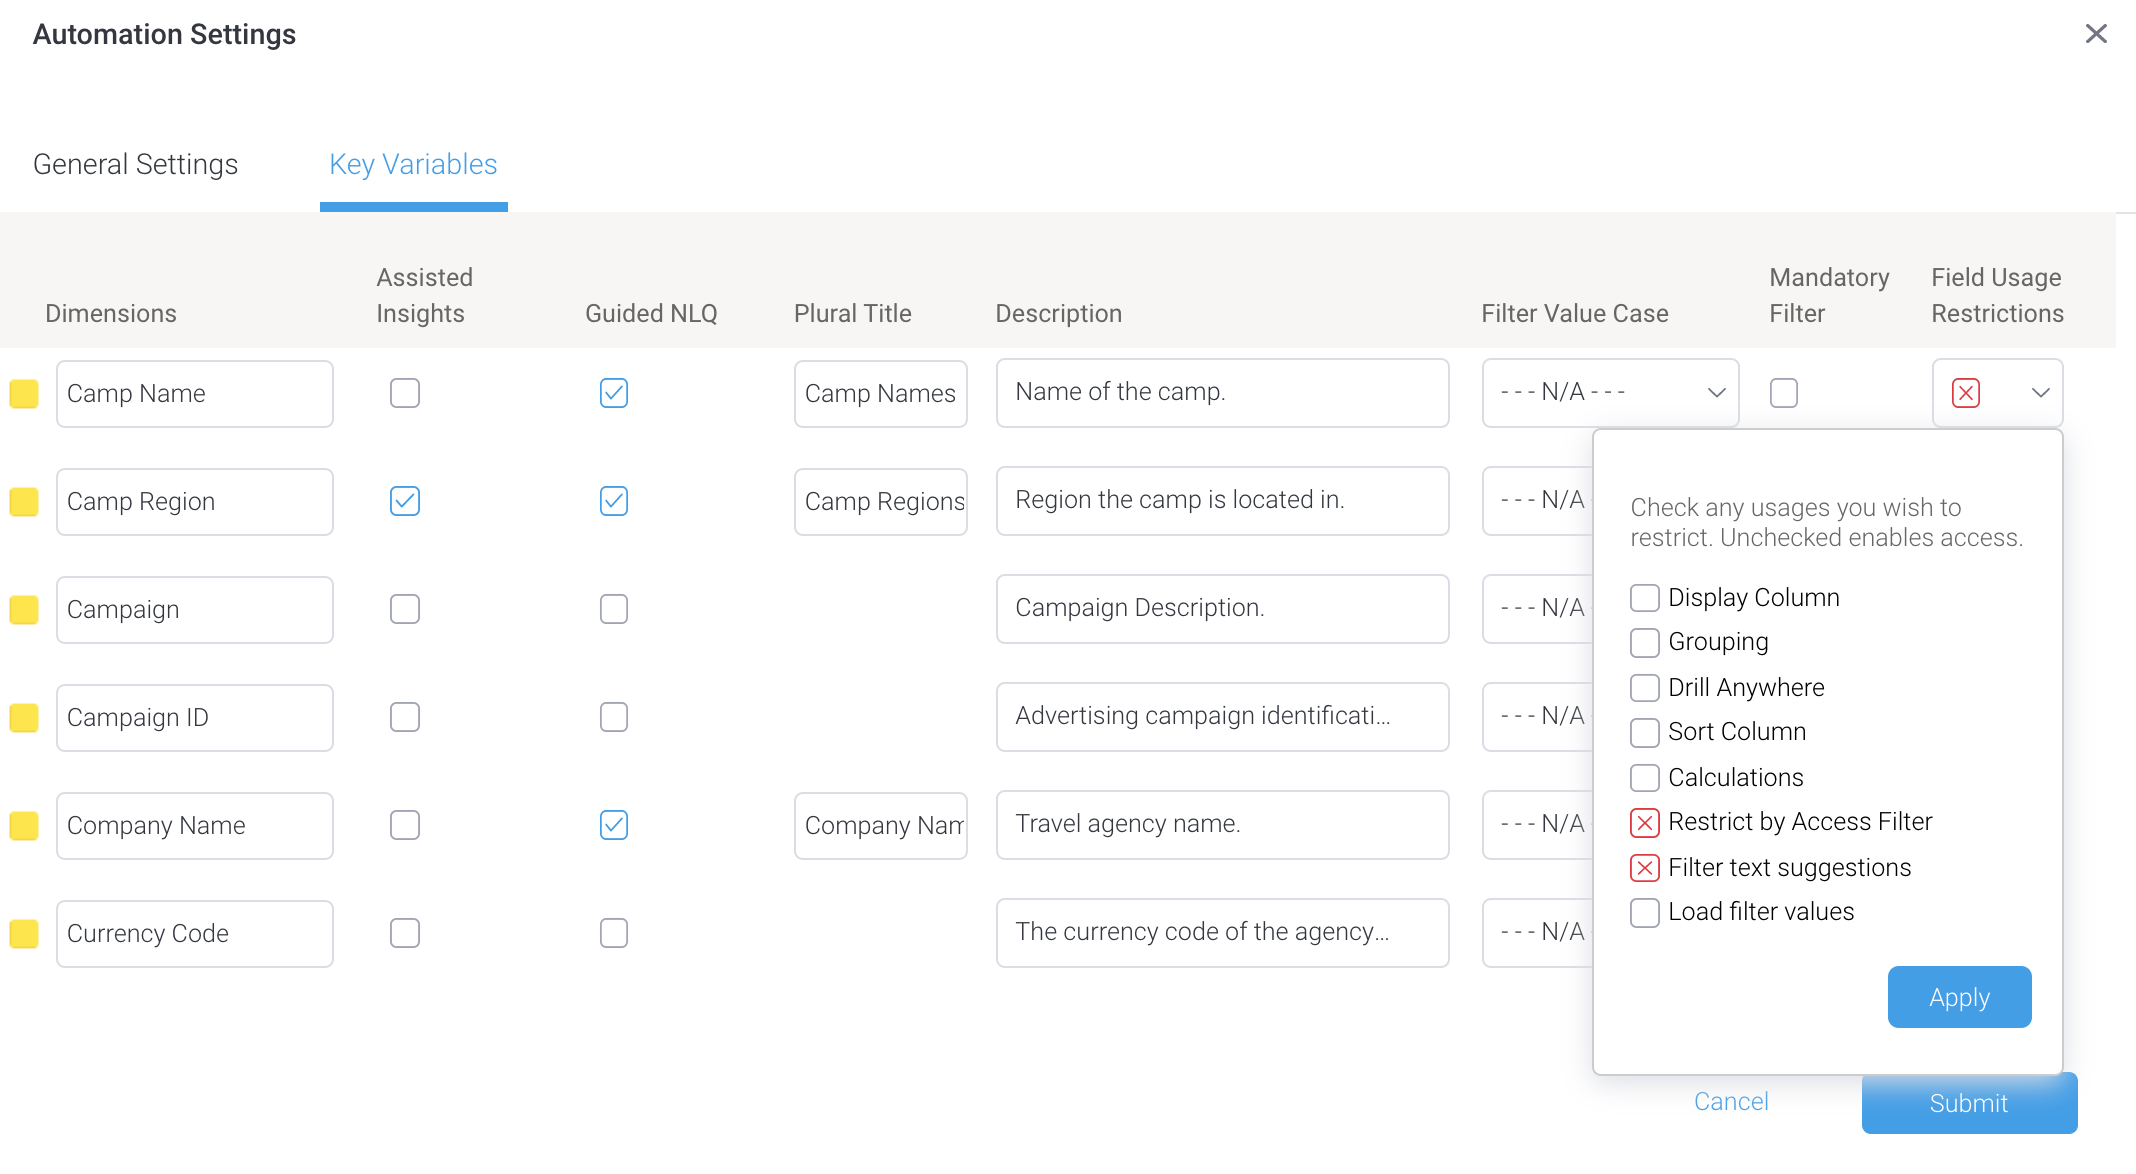
- Click the checkbox for Load filter values so that a red cross appears
The red cross indicates it’s disabled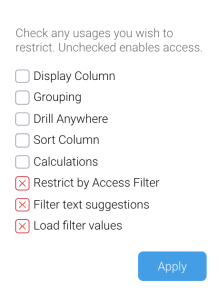
- Click the Apply button to close the dropdown, then click the Submit button to save your changes
Provide meaningful field names
A field named ‘Count’ isn’t of any use to a Guided NLQ user. Asking a question with Guided NLQ provides field names on dropdown lists for the user to choose from, so the field names must be clear and must accurately reflect its contents.
You can rename fields via the Key Variables tab of your view’s automation settings, and remember that any field names you change here will be reflected in the view and any new content created from it (existing content won’t be affected).
Add plurals
Guided NLQ includes the option of adding pluralised field names. Adding plurals helps to create a more natural sentence flow for the user, who can focus on the question content rather than how to formulate it. This is optional, but recommended.
You can add pluralised field names via the Key Variables tab of your view’s automation settings. Any pluralised field names you add here will be used by both Guided NLQ and Assisted Insights.
Prepare intuitive calculated fields
By definition, Guided NLQ mimics natural language, so complicated calculations aren’t part of those sentences. Instead, you can set these up within your view as calculated fields.
Calculated fields can take the complexity away from Guided NLQ. Calculated fields could contain simple calculations (such as ratios or time differences) through to your own custom SQL. The resulting field may be transformed to a different format to suit your needs.
Using our Ski Team tutorial as an example, you could create a count distinct field that counts the total number of athlete countries and save them as a metric field called ‘Athlete Country Counter’. Once enabled as a field for Guided NLQ, this calculated field would appear with the other metrics enabled for the view, ready for business users to select as part of their question without having to perform a calculation.
You can create additional fields from the Prepare step of a view. For more information, visit our wiki page about calculated field creation.
Prepare non-continuous date fields
Guided NLQ contains a broad range of date periods and treats them all as continuous — where, for example, asking for sales by month (invoiced date) for the last 24 months will display a line chart showing 24 months of data.
However, your business users might want to see sales for Mondays only. When you wish to interrupt the continuous flow of data, a discrete (non-continuous) field provides a sub-set of distinct values from that flow, such as data from all Mondays. Create a non-continuous date field from existing continuous fields if you’d like to provide answers based on days of the week, time of day, weeks of the year and so on.
You can create non-continuous fields from the Prepare step of a view. For more information, visit our wiki page about calculated date functions.
Create popular focus areas
Focus areas enable quick and simple refinement of complex data, saving users from writing long, complicated questions. They are both convenient and time saving for business users. To figure out useful focus areas, find out what the most common ways that users filter their data by. They might focus on a geographical region, a period of time or a number range. They might focus on a combination of things.
The benefits of focus areas include:
- Easy to set up and permanently available to business users via Guided NLQ (create once, use often).
- Business users save time by asking questions without having to manually add a filter.
- Business users are also saved from having to write lengthy filters into their questions.
- Convenient filter access (from a dropdown along the top of Guided NLQ).
- Fast to switch between focus areas for immediate comparisons.
- Fully customizable based on your business users’ needs.
You can create focus areas from the Prepare step of a view. For more information, visit our wiki page that covers focus areas .
Match user access to skill level
Know your audience and give them access as appropriate. Business users are unlikely to know how to query a complex dataset even via Guided NLQ. Giving them access to advanced datasets is likely to cause them frustration, requests for assistance, and the risk of creating reports that don’t accurately reflect the facts. In these situations, consider limiting complex dataset access to their usual audience of data analysts only.
Organise a date hierarchy
Guided NLQ highlights the importance of using a date hierarchy within your views. Without a date hierarchy, asking a question with the wrong date granularity may produce inaccurate results.
Using a simplistic example to illustrate this, let’s take our Ski Team tutorial data. If you ask for the average number of athletes at a camp according to ‘Start Date (month)’, it will give you a different answer to 'Start Date (day)’. Let’s say there are 31 athletes in June at one camp.
Asking for the June average by day, it would display "1" because 31 athletes divided by 31 days = 1.
Asking for the June average by month, it would display "31" because 31 divided by 1 month = 31.
Date hierarchies are regular drill down hierarchies, except they drill from coarse-grained to fine-grained temporal fields, in the correct order — Year, Month, Day, for example. You can apply date functions to manufacture more coarse grained fields, such as the "month start date" date function to the Start Date field (which has day granularity), which would produce a new version of the Start Date field with monthly granularity.
You can improve date granularity and create hierarchies from the Prepare step of a view. For more information, visit our wiki page about date granularity.