Page History
Overview
Using the Aggregate transformation step, you can aggregate your data by changing it into a summary form by applying various functions.
...
This step is used to create a calculated field based on other fields, allowing you to perform custom calculations on your data.
Calculated Field
...
Aggregate Functions
Following are the different types of aggregate functions:
...
Transformation Flow
In this example, we will cover how to create a simple transformation flow that aggregates datainvolves the calculated field step. This flow transformation will involve setting up an input step, applying the Aggregate calculated field transformation step, and then storing the data into a database. You could always include more steps to your flowstransformation flow.
Click on the Create button in the top-right corner.
Then select Transformation Flow.
Note If you do not see this option, you may not have security access to transformation flows. Learn how to get access here.

You will be taken to the transformation flow builder.
Hover your cursor over the Input Steps button on the left side. A panel with a list of all data extraction steps will appear.

Drag one of these steps onto the canvas. ( For this procedure, we will use the report single table step as an example. (Click here to learn about all the different input steps.)
On doing so, a popup will appear , to choose a report that you want to use in your flow.

load data from a data source.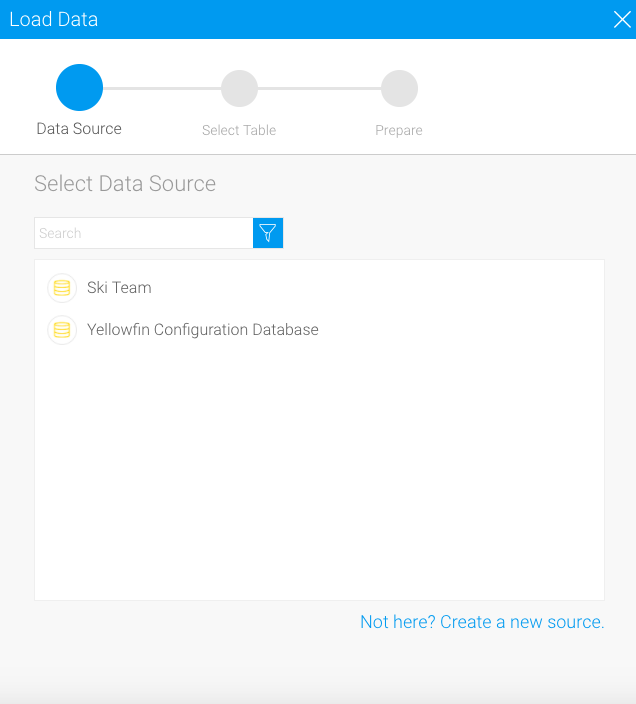
Click on the data source that you require.
Then choose the database table, and click on Submit.

The table Select a report by providing its name, and once the column fields appear, click Add Report.

The report fields will appear in the transformation flow panel to be configured.When in the Configure tab, select Select only the fields that you want data to be extracted from.


You can make further changes, such as filtering the data, or renaming the step, etc.
Once you’re done with the step configuration, click on the Apply button.
Warning You must click on the Apply button to save the configuration details. If Otherwise, if you do not click on this button, and click somewhere else first, you will lose the configuration details.
On doing so, the data preview panel will display the data extracted from the configured data sourcedatabase table.


You can also apply transformations to fields directly from the data preview panel. Click here to learn more .A new Fields tab will also appear in the step configuration panel. Use this to manage the data fields that are extracted from the step.
 about this.
You can also add other steps to your transformation flow.
When you are ready to aggregate your data, follow the steps use the calculated field step in your flow, continue with the procedure below.
Expand the transformation step panel by hovering on its icon in the step builder, and then dragging the Aggregate Calculated Field step onto the canvas.
Next, create a connection between the input step (or the previous step, if you've added any other ones) and the aggregate step. Hover over the calculated field step, and then drag by dragging a connection point to the aggregate calculated field step. (Click here to learn about rules involving connections, and how to break existing connections.)


Now click Click on the aggregate calculated field step icon to configure it. The transformation flow panel will display each of the incoming fields from the previous steps.
 wil be updated.
Click on Add Item.

A popup window will appear to create a new calculated field.

- Update the name of the calculated field.
- Define your calculation using the buttons at the bottom of the window, for example:
- Search for the Sum Invoiced Amount field in the -- Select Field -- drop down list and click on it to add it to the formula box.
- Press the minus ( – ) button.
- Search for the Sum Cost of Camp field and add it to the formula.
- You will now have Invoiced Amount - Cost.
- Test your calculation by using the Validate button. (An error will appear if it is invalid.)
Select the aggregate function for the fields that you want to aggregate. The list above explains each of these functions in detail.

Once aggregation selection for all the required fields have been made, click Apply. The transformed data will appear in the data preview panel

You can continue to transform your data further by adding more transformation steps.
Once you are read to save your data in a writeable database, follow the steps below.
Extend the output step panel by hovering on its icon, and drag the SQL database output step onto the canvas.

Next, connect the aggregate step (or the previous step in your flow) to the output step by creating a connection.
And then configure the output step through the panel on the right-side. Click here to learn more about configuring this step.
Note: By default, the output step will be highlighted as red to signify that it contains errors. This is because it has not been configured yet.
You can now execute the draft flow by clicking on the run button in the top header menu.

Or save the flow for a full execution. To do that, click on the Publish button.

Then provide details in the popup that appears, such as providing a proper name, and selecting rights to access the flow.

Finally click on the Save button.
...