Page History
| Anchor | ||||
|---|---|---|---|---|
|
| Table of Contents | ||
|---|---|---|
|
Overview
| Styleclass | ||
|---|---|---|
| ||
In order for Yellowfin to retrieve results to populate reports a database connection must exist. This connection record provides Yellowfin with the location, user credentials, and logon method to be used in order to access your database
...
.
...
Create a Data Source Connection
...
| Styleclass | ||
|---|---|---|
| ||
1. Start the Data Source creation process by using one of these methods:
- Left Side Nav - open the left side navigation panel, click on Create, select the Data Source option
- Top Right Button - click on the create button, select the Data Source option.
...
- Admin Console - navigate to the Admin Console, open the Data Sources section, click on the Add button.
...
| Left Side Navigation | Top Right (with Left Side Nav enabled) |
|---|---|
 |  |
| Toolbar | Admin Console |
|---|---|
 |  |
2. From here you will need to either;
...
We're going to select a Database from the source type list.

3. You will now see the basic parameters required for your source connection.
![]()
4. Provide the required connection parameters.
See Understanding Connection Parameters for more information.

5. Once you've completed your connection information, you will have several options;
...
We're going to click on the Save & Close option.
There are two ways to Add a Data Source.
- Click on the Burger Bun
 . Open the Administration section and click on Admin Console. Then, select “Data Sources” and click on Add.
OR - Click the Create
 button and select “Data Source”.
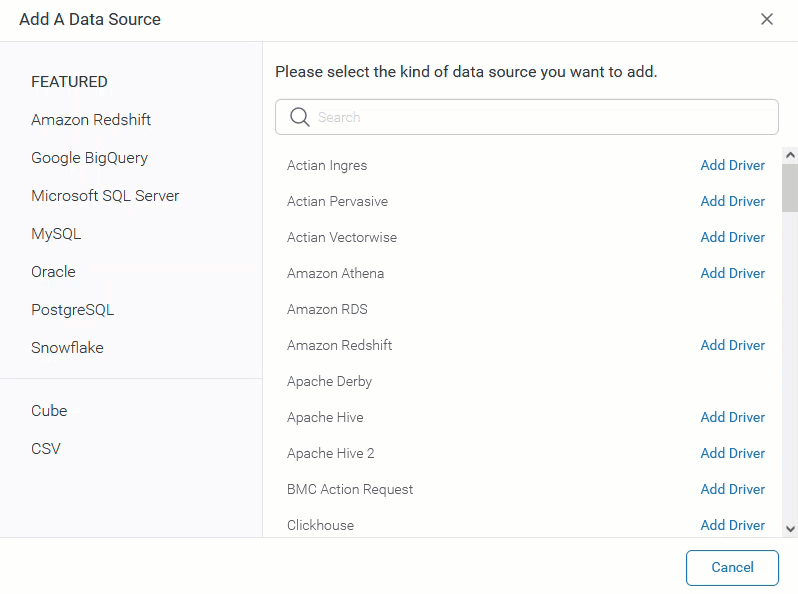
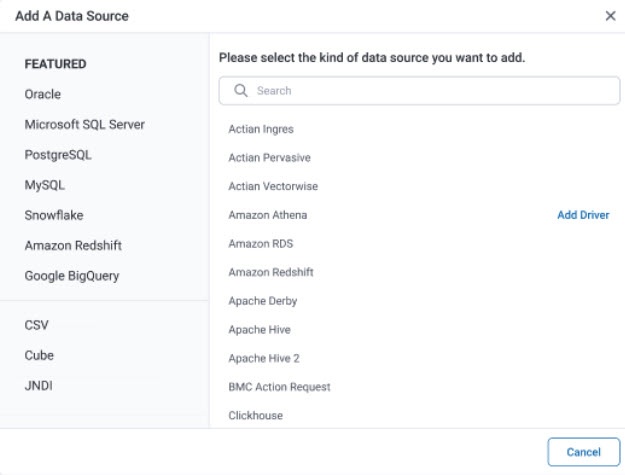
- Select your database from the Add a Data Source popup.
On the left side you will see a “Featured” list, with the most common database types and at the bottom, a list of other types of data sources, Cube, CSV, and JNDI.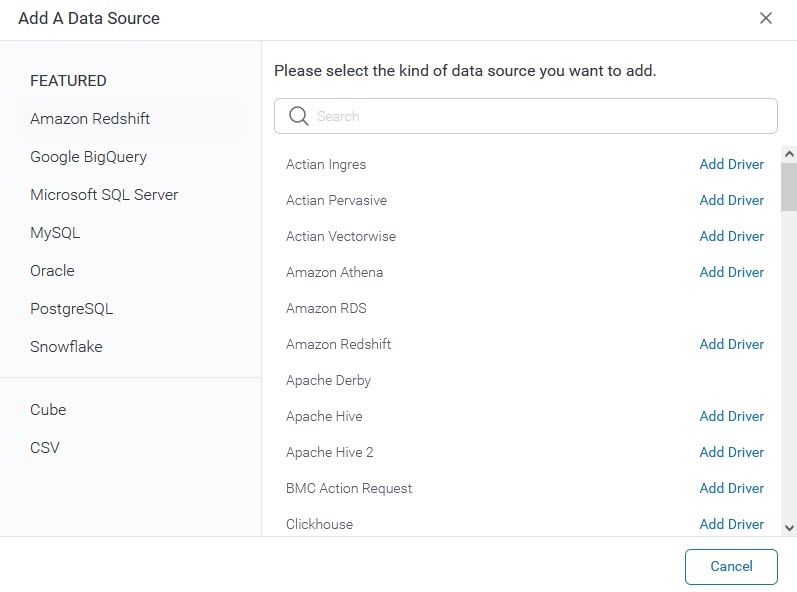
NOTE: To enable a JNDI connection, users needs to run the following SQL against the configuration database:
INSERT INTO Configuration(1, 'SYSTEM', 'JNDISOURCEENABLED', 'TRUE');
On the right side, you can search for a specific database, the list will get filtered as you start typing on the Search bar. You can also select from the list, the database you want to add.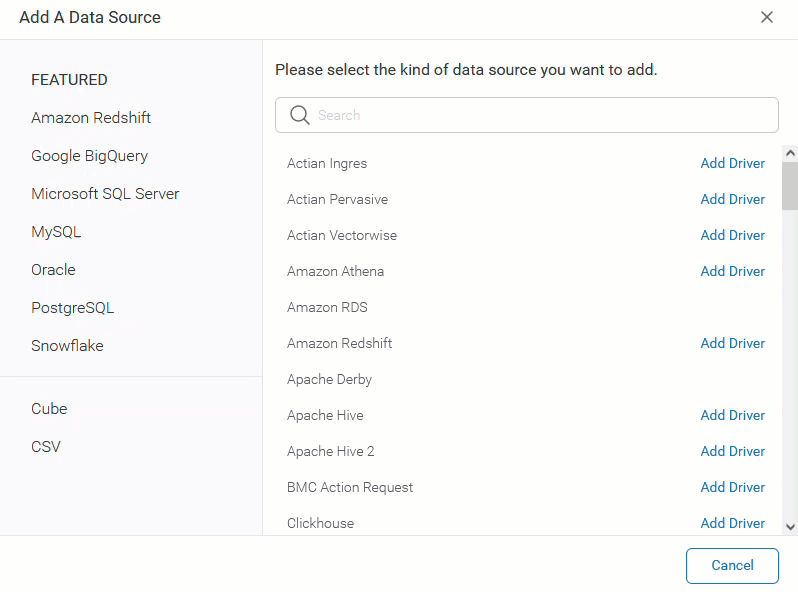
If a data source requires a Driver, click on the “Add Driver” on the right side of the Database name.
Add a Nickname, a Description (optional) and Drag & drop or browse the file to upload. Then, click Save.
NOTE: Only .jar and .yfp files are accepted.
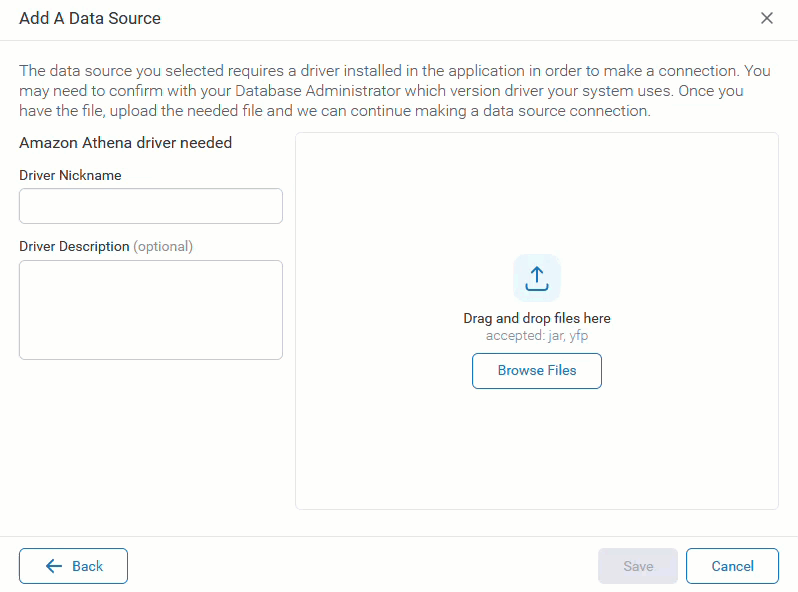
Once the Driver is successfully installed, you will be redirected to the Database Settings.
Please refer to our JDBC Connections page to check specific information for your database.Click on “Test Connection” to ensure a successful connection.
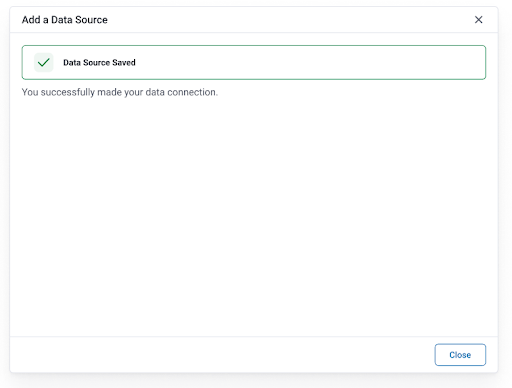
Once the connection is successful, the Test Connection button will turn green. Then, click Save.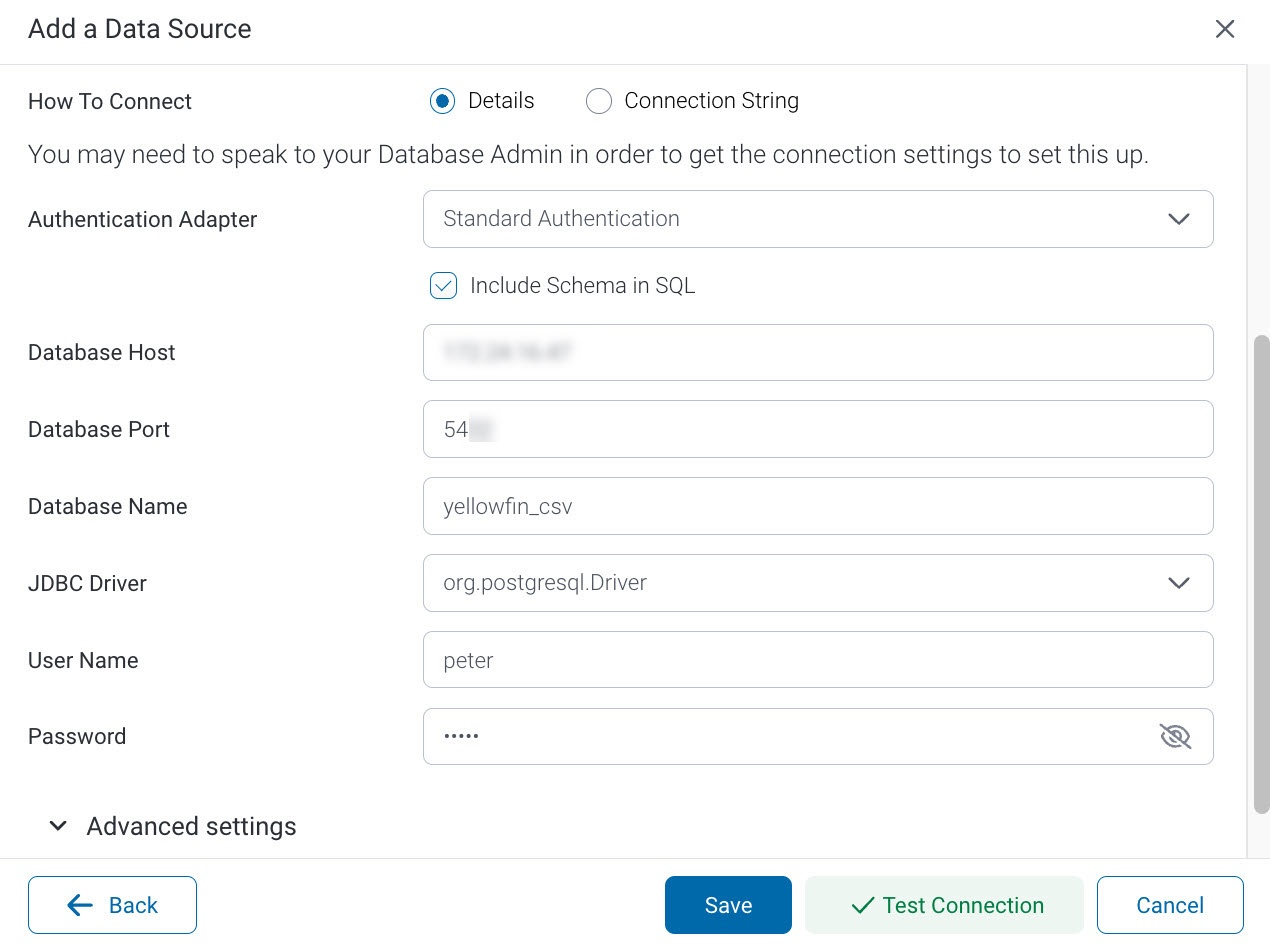
If the connection fails, you will see a "Failed Connection Test" message.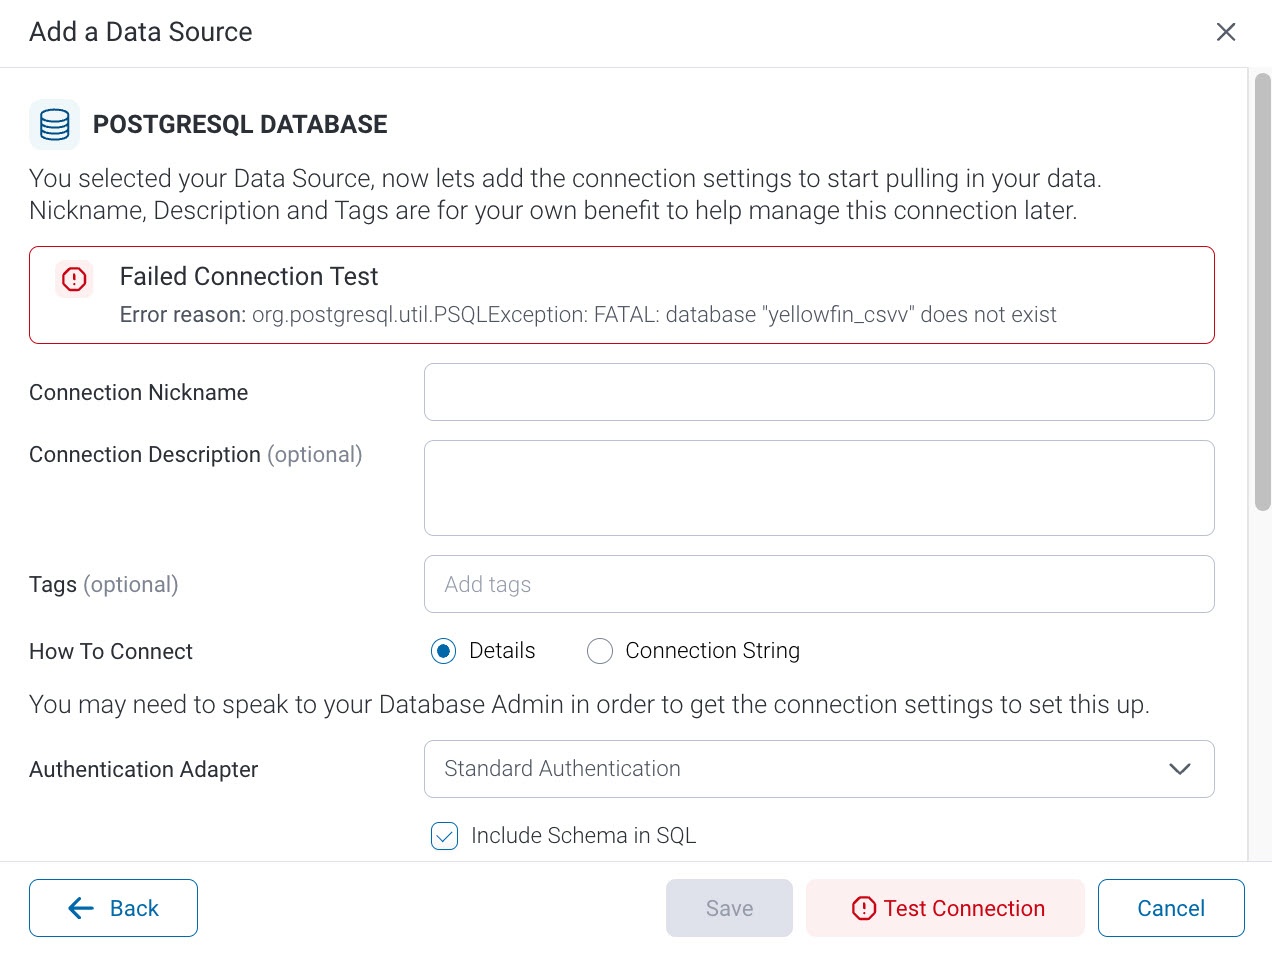
Cube
To add a Cube data source:
- Click on "Cube", at the bottom left side of the "Add a Data Source" popup.
- Fill in all the required fields in the Cube Settings.
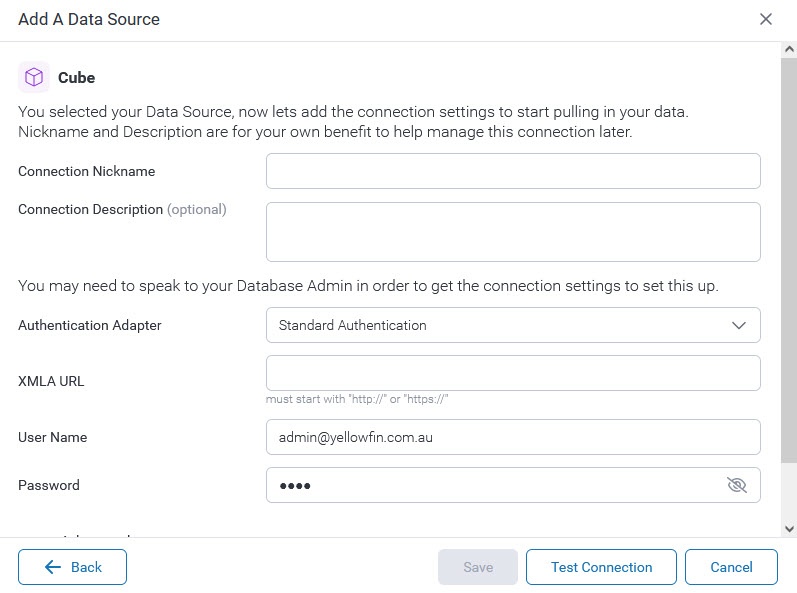
Name Description Connection Nickname Add a nickname to recognize your connection. Connection Description Add a description for your connection (optional). Authentication Adapter Choose between Standard Authentication, Pass-through Authentication, and Standard Authentication (No Pooling). XMLA URL The URL for the XMLA data source. User Name Enter or verify the Username for the database. Password Enter or verify the Password for the User Name.
Advanced Settings
Click on “Advanced” at the bottom of the Database settings screen and fill in all the required fields.
Connection Pool
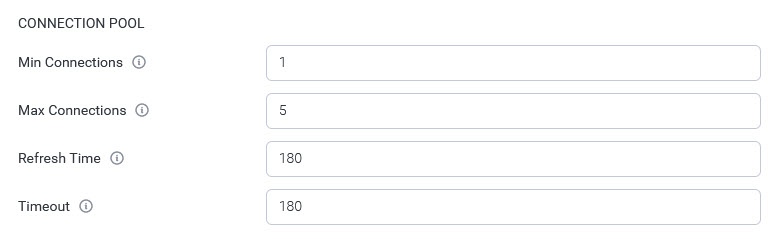
| Name | Description |
|---|---|
Min Connections | The minimum number of connections that can be opened simultaneously. |
Max Connections | The maximum number of connections to be opened simultaneously. |
Refresh Time | The number of minutes between connection resets. |
Timeout | The seconds a connection can remain open before it is closed. |
Usage Parameters
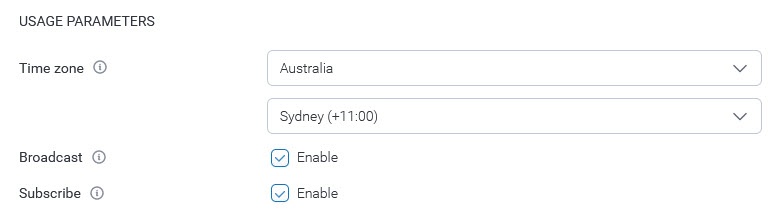
| Name | Description |
|---|---|
Time zone | Select a time zone for this data source connection. |
Broadcast | Specify if the content on the connection can be broadcasted or not. |
Subscribe | Specify if the content on the connection can be subscribed or not. |
3. Click on “Test Connection” to ensure a successful connection. Then, click Save.
Visit XMLA Data Source for more information.
CSV
To add a CSV data source:
- Click on "CSV", at the bottom left side of the "Add a Data Source" popup.
Note: You need a writable database to store your spreadsheets. Check our Writable Data Source section for more information on how to have a writable data source.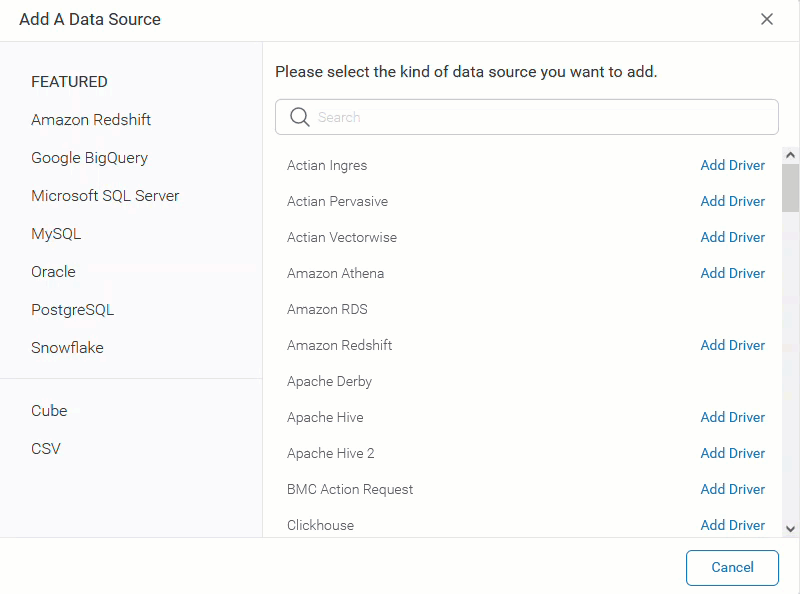
If the database is not writable, you will see an error message in the CSV Settings screen.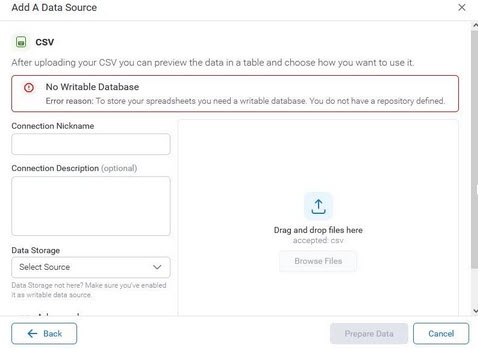
- Fill in all the required fields in the CSV Settings.
Add a Nickname, a Description (optional), select the data source, and Drag and drop or browse the file to install. Then, click Save.
Note: Only CSV files are accepted.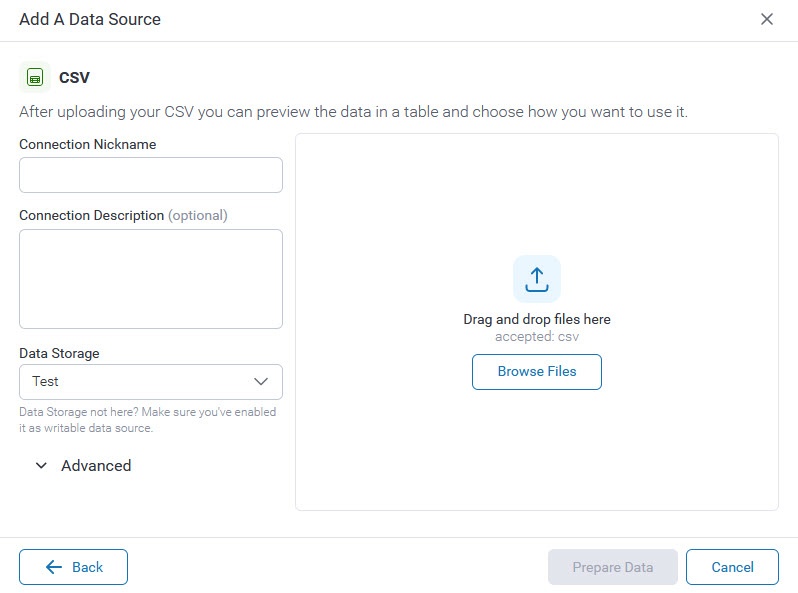
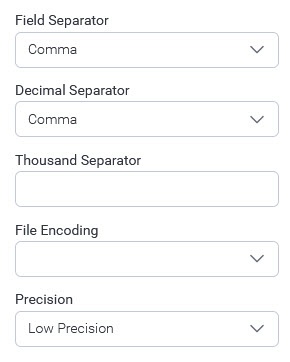
Advanced Settings
Click on “Advanced” at the bottom of the Database settings screen and fill in all the required fields.
3. Click on "Prepare Data" to see the data table.
Visit CSV Data Imports for more information.
JNDI
Remember the JNDI data source connection types is enabled by running the following SQL against your configuration database:
INSERT INTO Configuration(1, 'SYSTEM', 'JNDISOURCEENABLED', 'TRUE');
Visit Running Custom SQL for more information.
To add a JNDI data dource:
- Click on "JNDI", at the bottom left side of the "Add a Data Source" popup.
- Fill in all the required fields in the JNDI Settings.
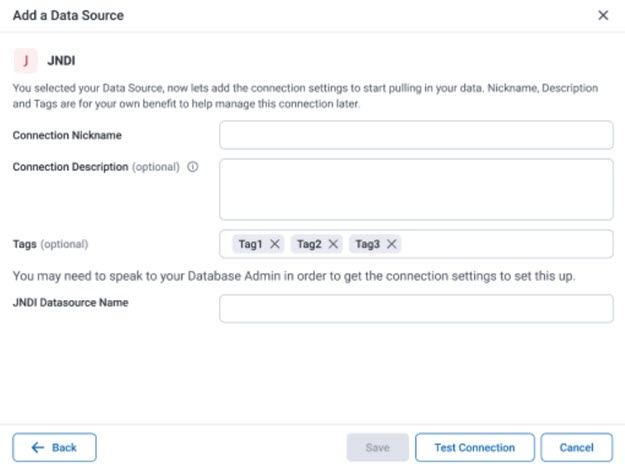
- Click on “Test Connection” to ensure a successful connection. Then, click Save.

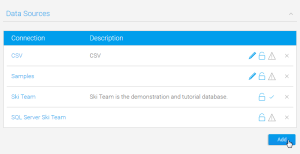
You've now created your first Data Source connection. To view the connection simply navigate to the Admin Console and open the Data Sources list.
Further Information
| Styleclass | ||
|---|---|---|
| ||
| horizontalrule |
|---|
...
| Class | topLink |
|---|
...