Overview
Allows you to add action buttons to your dashboard that trigger internal or external events, push and pull data (to and from enterprise apps), or perform custom workflows when clicked on. For example, you can add a button to move to the next sub tab on a dashboard using out-of-the-box Yellowfin actions, or push a lead record into Salesforce.
This widget offers multiple designs of action buttons to be used, but you can further customize or edit the look-and-feel using the properties panel for action buttons. Developers can also add custom code for an action button via Code Mode, allowing them to integrate seamless workflows on their dashboards.
Note: to see these in action, you will need to preview the dashboard.
Action Button functions
Yellowfin offers a range of out-of-the-box actions that can be assigned to a button. These include:
- Next sub tab: This functionality navigates the user to the next tab within the same dashboard.
- Previous sub tab: This functionality navigates the user to the previous tab within the same dashboard.
- Reset filters: This function allows users to clear filter selections, or in case default values are set, then reset filters to their default values.
- Reset dashboard: This function refreshes the dashboard by clearing any user interactivity performed on it, as well as removing all applied filters.
- Go to report: This function navigates users to a specified report. This report can be specified by providing its report UUID.
How to use Action Buttons
Note that this functionality only works on a canvas layout.
- Click on the Widgets button on the left.
- In the list that appear, expand the Buttons section. A selection of pre-designed buttons will appear.
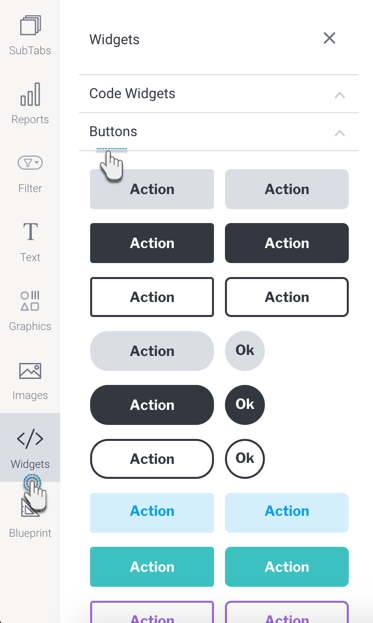
- Drag any design you prefer (you can further customize it) onto your canvas.
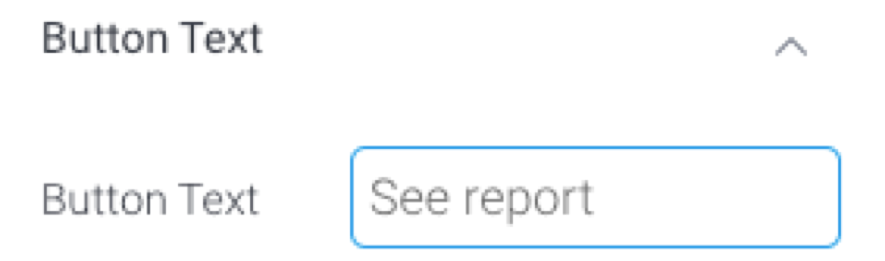
- Then in the button’s property panel, expand the Button Text section.
- Provide the text to appear on your button. Ensure this reflects the action you want your users to perform.
- Next select a function for this button. Yellowfin offers multiple types of actions a button can perform, however users may also define a custom function via Code Mode.
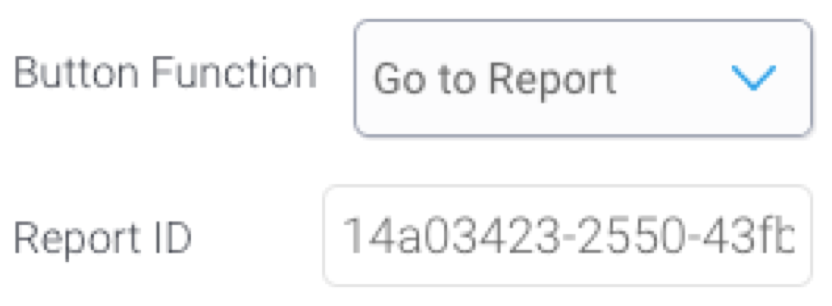
- Provide any additional information if your selected function requires it. For example, enter the UUID of the report to navigate to, if the Go To Report action is selected.
- You may also further customize the button, including rendering a different style for when a user hovers over the button. See the section on button properties for a description on all customization properties.
- To test your button’s functionality, enter the Preview mode and use the action button on it.
Action Button properties

Property name | Description |
|---|---|
Name | This allows you to update the name of this button widget. Note that this is not the text that appears on the button itself. |
Size & Location | |
X | Specify the x coordinates of the top left corner of the button widget, in order to position it exactly on your dashboard canvas. |
Y | Specify the y coordinates of the top left corner of the button widget, in order to position it exactly on your dashboard canvas. |
Width | Specify the width of the button widget, in pixels, in order to resize it exactly. Note that the button size will expand if the text on it exceeds the size specified here. |
Height | Specify the height of the button widget, in pixels, in order to resize it exactly. Note that the size of circular buttons will expand if the text on it exceeds the size specified here. |
Corners | This option allows you to define the roundness of the selected button corners. Tip: For maximum circular edges, enter half the value of the button height. For example, if the height is 130 pixels, then set the edge value to 65 pixels. Moreover, an edge value greater than 65, will have no further effect in this example. |
Rotation | Specify the amount to rotate the selected button widget, in degrees. Positive degrees rotate the widget in a clockwise motion, and negative values in anti-clockwise motion. |
Aspect ratio | Enable this toggle to maintain the aspect ratio. This means when increasing or decreasing the button’s size, it maintains its shape (i.e. the relationship between its width and height). If this is disabled, the button can be stretched out of shape either vertically or horizontally. |
Lock widget | Enable this toggle to lock the button at its location. This stops you from moving or resizing it. This holds true even when selecting multiple widgets on the canvas. Note that a locked button can still be customized. |
Button Text | |
Button text | Allows you to provide text that will be displayed on the button. This ideally references what function the button performs. |
Text alignment | Allows you to align the button text within the button. You can opt to align it to the left, or right, or centrally. |
Active - Hover toggle | This toggle allows you to specify the state of the button. Toggling it to Active refers to the general state that the button will be in (i.e. when not being hovered or clicked on); whereas Hover species the button’s state when the cursor hovers it. The chosen state affects some of the remaining button properties, so you can style the button differently for the different states. |
Opacity | Allows you to specify the transparency of the button in the currently selected state. |
Font | Allows you to specify the font type and size of the button. (Consistent for both the states). |
Text color/Color | Allows you to select a color for the button text in the currently selected state. |
Style | Allows you to apply a formatting style, such as bold, italic or underline, to the button text. (Consistent for both the states.) |
Button function | Allows you to specify a function to perform when the button is clicked. See section on button function for an explanation on each. |
Fill | |
Color | Allows you to specify the color to fill the button for the currently selected state. |
Border | |
Width | Allows you to specify a width for the button’s border. If you do not prefer a border, set the slider to 0. (consistent for both the states). |
Color | Allows you to specify a color for the button border for the currently selected state. |
Style | Allows you to specify a border style to be applied to the button for the selected state. |
Shadow | |
Spread X | Allows you to cast a horizontal shadow on the button by defining its size in pixels. |
Spread Y | Allows you to cast a vertical shadow on the button by defining its size in pixels. |
Shadow blur | Allows you to define the sharpness of the button shadow. The smaller the value, the sharper and more defined the shadow will be. For a blurry or softer shadow, provide a bigger value. |
Shadow color | Allows you to set a color for the shadow. This must be specified to make the shadow visible. |