Overview
Yellowfin 9.6 shipped with a new SAML interface to make secure connections simpler to set up and maintain for identity provider-initiated flows (such as Okta or Auth0). The new setup is slightly different to that of the old SAML bridge application, which is still available and functioning if you wish to implement additional features that the new, simplified interface does not provide (such as service provider-initiated flows).
SAML is an acronym for Security Assertion Markup Language. It’s an XML-based open standard for the secure transfer of identity data between two entities — an identity provider (IdP) and a service provider (SP). The role of an identity provider is to authenticate and, if valid, pass a user's identity and authorization level to a service provider. The role of a service provider is to trust the identity provider and authorize a user’s access to the requested resource.
Signed Requests
Yellowfin can manage signed requests from the identity provider to increase security. This feature is turned on by default, but requires some configuration. You must provide the signing certificate of the identity provider as well as the signing algorithm so that Yellowfin can decrypt the incoming signed requests. The identity provider should make these values obvious in their configuration.
Encrypted Requests
Yellowfin can also be configured to manage encrypted requests from the identity provider to further increase security. This can be toggled independently from the signed requests settings. You must generate an SSL key pair to give to Yellowfin (see onelogin.saml2.sp.x509cert and onelogin.saml2.sp.privatekey in the table on this wiki page). This is not provided by the system. Once you have those, you must then provide the private key and the certificate to Yellowfin in their respective configuration fields, as well as configure this setting in your identity provider and setup the SSL encryption certificate in their configuration.
Please note that this setting requires PKCS#8 BEGIN PRIVATE KEY format. If you have a different format, it will need to be converted.
Prepare for SAML implementation
Before setting up SAML within Yellowfin, make sure you have a good understanding of the fields you’ll be required to address. The tables below provide further details for each of the fields.
Your IdP will require the following fields.
Parameter | Description | Required? | Default |
|---|---|---|---|
Service Provider SSO URL | The SSO endpoint URL that your IdP will use to reach the Yellowfin login page. This is typically your external base URL followed by /SAMLLogin.i4 | Required | ext_base_url/SAMLLogin.i4 |
Audience Restriction | This is sometimes referred to as the ‘Service Provider Entity Id’ or ‘Issuer Id’. It's the identifier of the Yellowfin SAML service. This is typically your external base URL followed by | Required | ext_base_url/SAMLMetadata.i4 |
Encryption Certificate | This certificate is used by the IdP to encrypt traffic going to Yellowfin. As mentioned earlier on this page, you must generate your own SSL key pair and provide the encryption certificate here. | Required if the toggle for Incoming Requests Encrypted is enabled | None |
Yellowfin requires the following fields.
Parameter | Description | Required? | Default |
|---|---|---|---|
Identity Provider EntityId | Sometimes referred to as the ‘audience URI’ or ‘audience restriction’, this identifies the entity of the service provider. This is typically in the format of <your_idp_domain>/<sp_id> For example, www.okta.com/ekti172b2ac0843Xf | Required | None |
Identity Provider SSO URL | The SSO endpoint URL of the SAML identity provider, which your IdP should display clearly within their own configuration page. This is in the format of: <your_sso_domain>/<path_to_sp_sso_login> For example, login.mybusiness.com/app/yellowfin1/ekti172b2ac0843Xf/sso | Required | None |
Identity Provider Certificate | This certificate decrypts requests from the identity provider. Your identity provider should make this certificate obvious in their configuration. | Required | None |
Incoming Certificate Verification Algorithm | This algorithm verifies the incoming identity provider certificate. Choose from three different hash lengths to match whatever your incoming certificate uses:
| Required | SHA256 |
Incoming Requests Encrypted | This toggle dictates whether incoming SAML requests will be encrypted by the identity provider. Switch on for higher security. | Toggle | Off |
Encryption Private Key | This private key decrypts incoming encrypted SAML requests from the identity provider. As mentioned earlier on this page, you must generate your own SSL key pair and provide the private key here. | Required if the toggle for Incoming Requests Encrypted is enabled | None |
Encryption Certificate | This certificate verifies incoming encrypted SAML requests from the identity provider. As mentioned earlier on this page, you must generate your own SSL key pair and provide the encryption certificate here. | Required if the toggle for Incoming Requests Encrypted is enabled | None |
UserId Attribute | This field holds the Yellowfin user ID (typically a username or an email field, depending on your system configuration). | Required | None |
Client Reference Id Attribute | This parameter provides the location of the Client Reference Id of the client org that the user belongs to. Normally, this is either left blank or set to ‘1’ for Yellowfin instances that have no related client orgs. | Not required | None |
SSO Entry Options | This is a comma-separated list of session parameters if you wish to automatically direct the user to a particular page or login. Leave blank to direct the user to their default entry page. | Not required | None |
Custom Session Parameter Attribute | This field holds the value of a custom variable to pass to the session created by SAML SSO. Leave blank if there is no custom data to pass. | Not required | None |
Onboard New Users | Enabling this toggle will allow SAML to provision new users automatically. If you don’t wish to provision new users, do not enable the toggle. | Not required | Off |
This page does not cover how to set up an identity provider, as there are many providers, each with different configuration processes. The page covers the basics that you will need to implement SAML for your Yellowfin users.
Setup SAML
To configure a SAML provider, follow the steps below.- From the Yellowfin burger bun menu
 in the top left corner, click on Administration, then Configuration
 - Click on the Authentication tool (the lock), then on Authentication Method
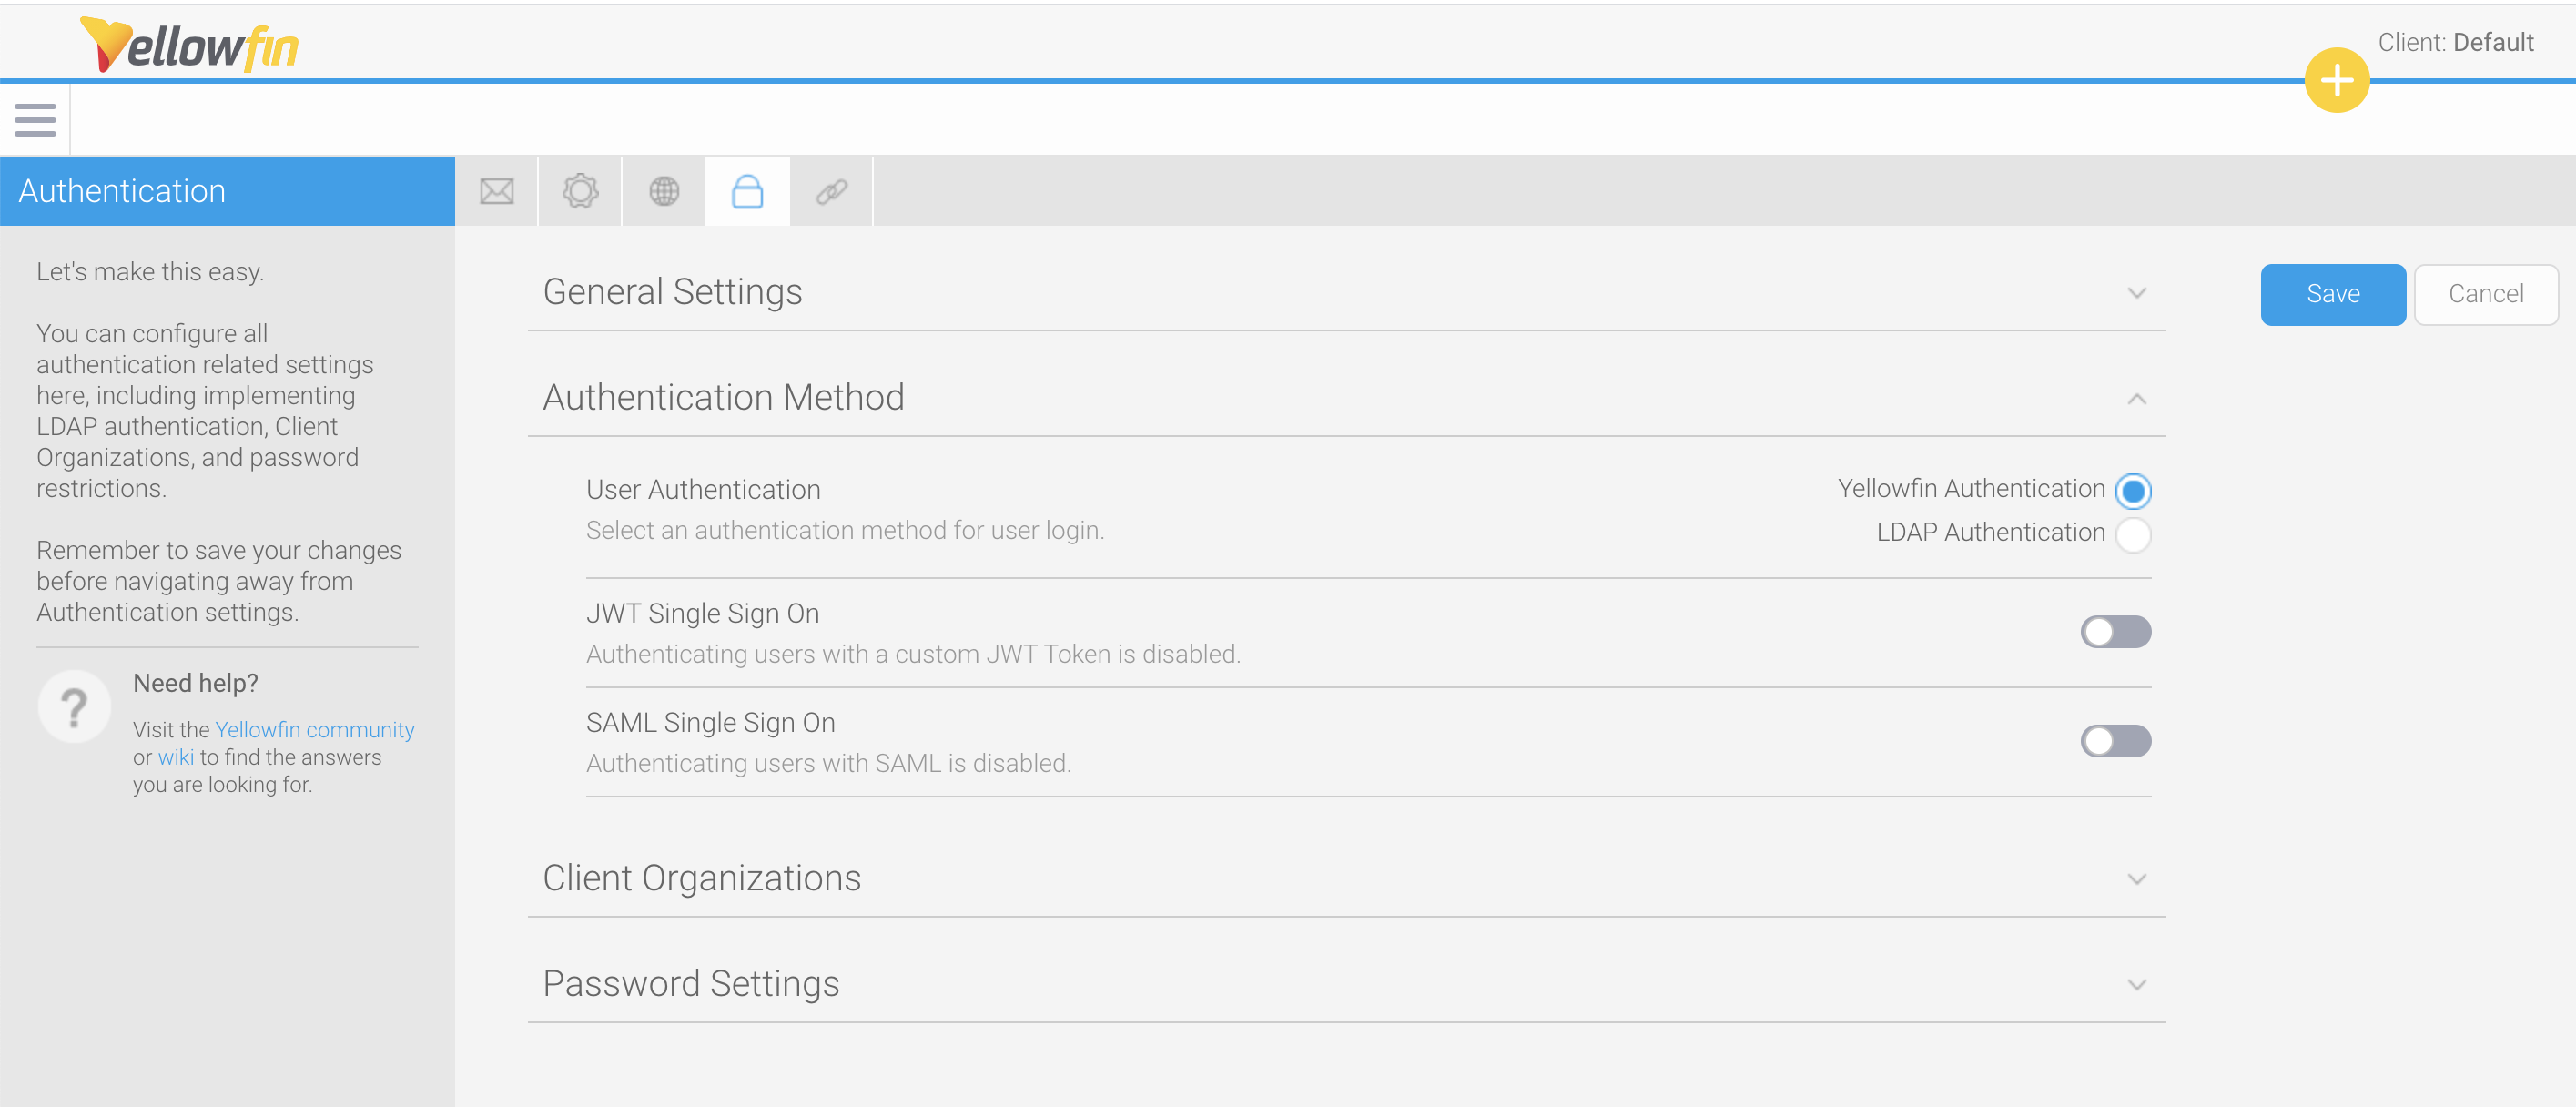
- Click on the toggle for SAML Single Sign On to enable it
A new section called SAML Configuration will appear. This is where everything related to SAML SSO is configured: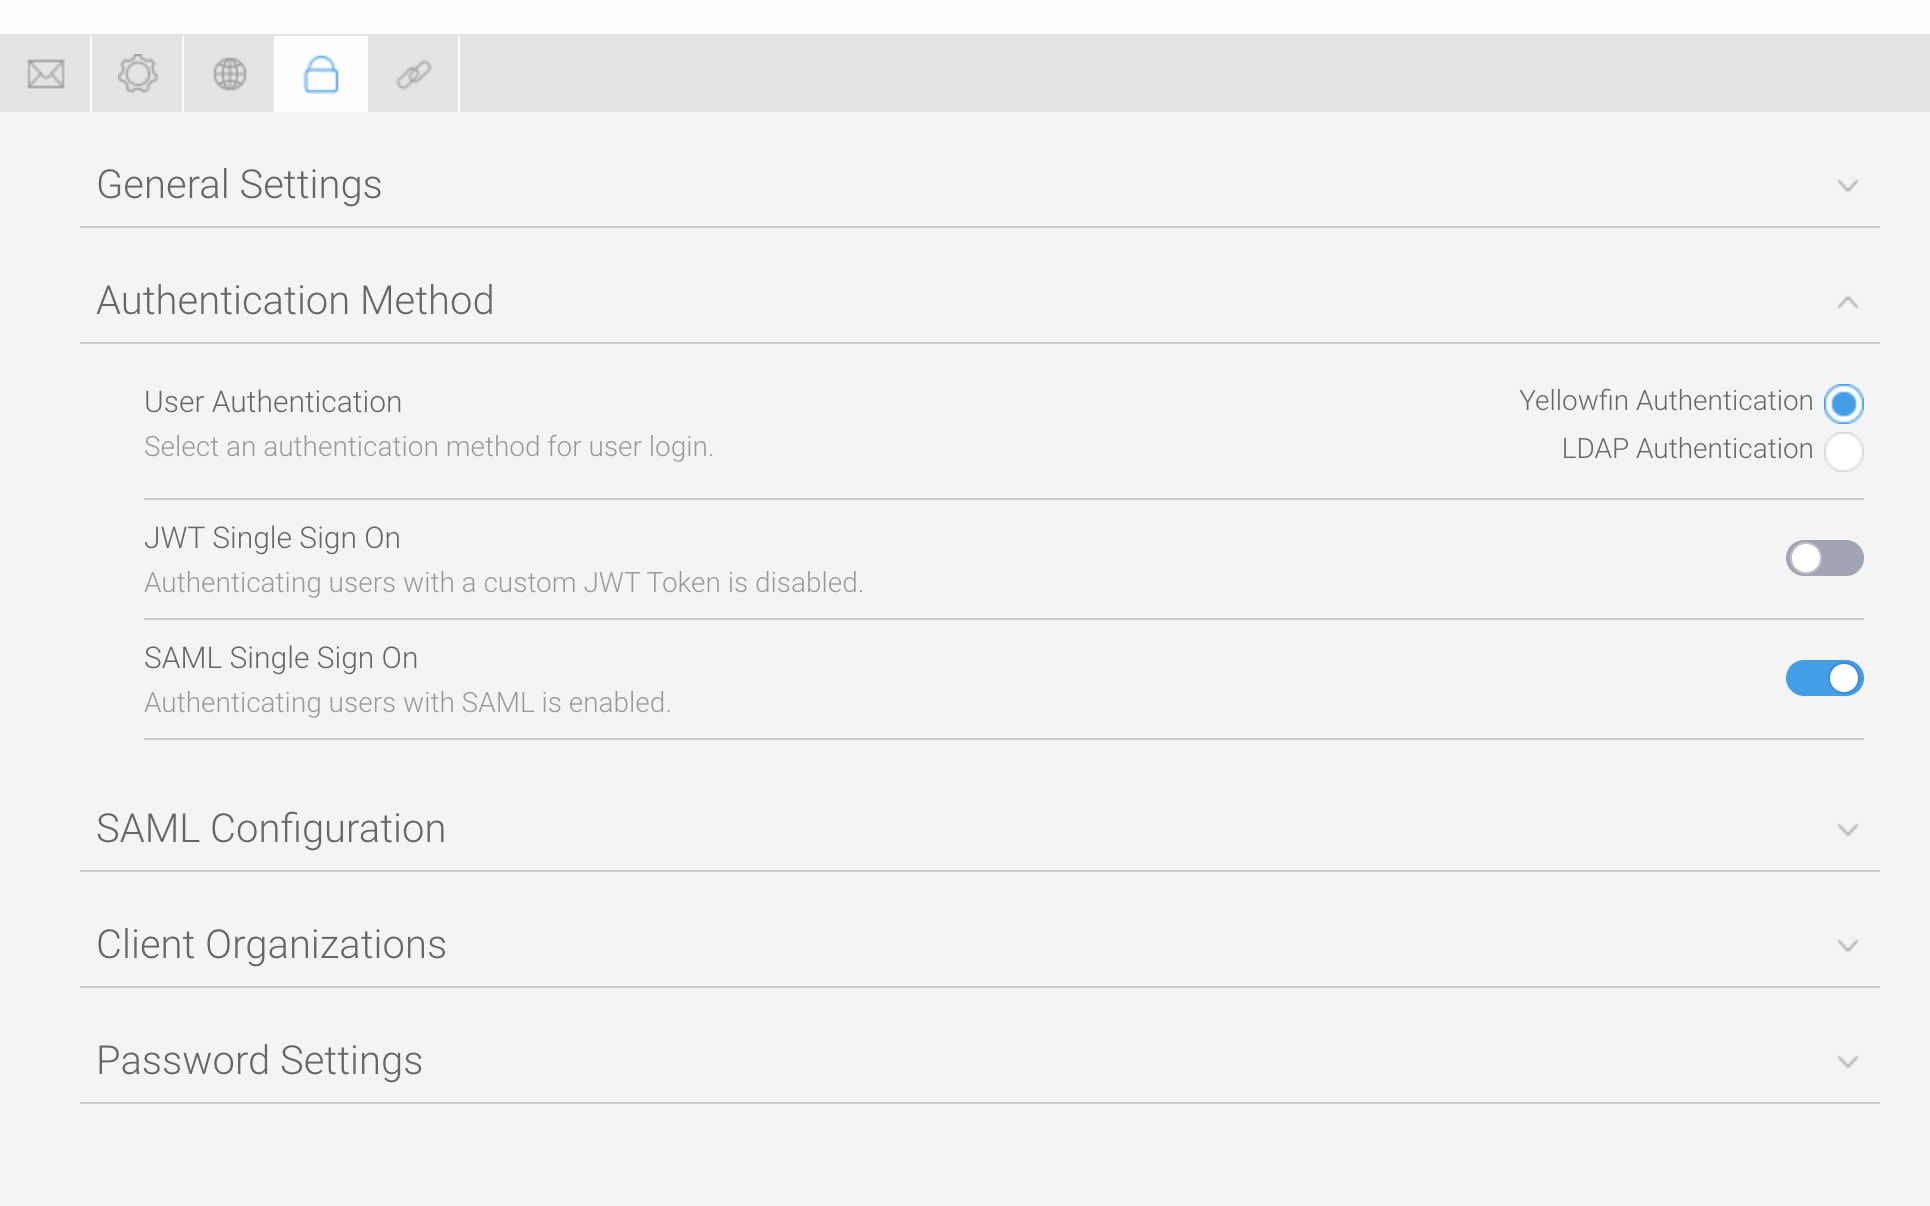
Click on SAML Configuration to expand the section - Refer to the preceding table to enter values for the required fields: Identity Provider EntityId, Identity Provider SSO URL and Identity Provider Certificate
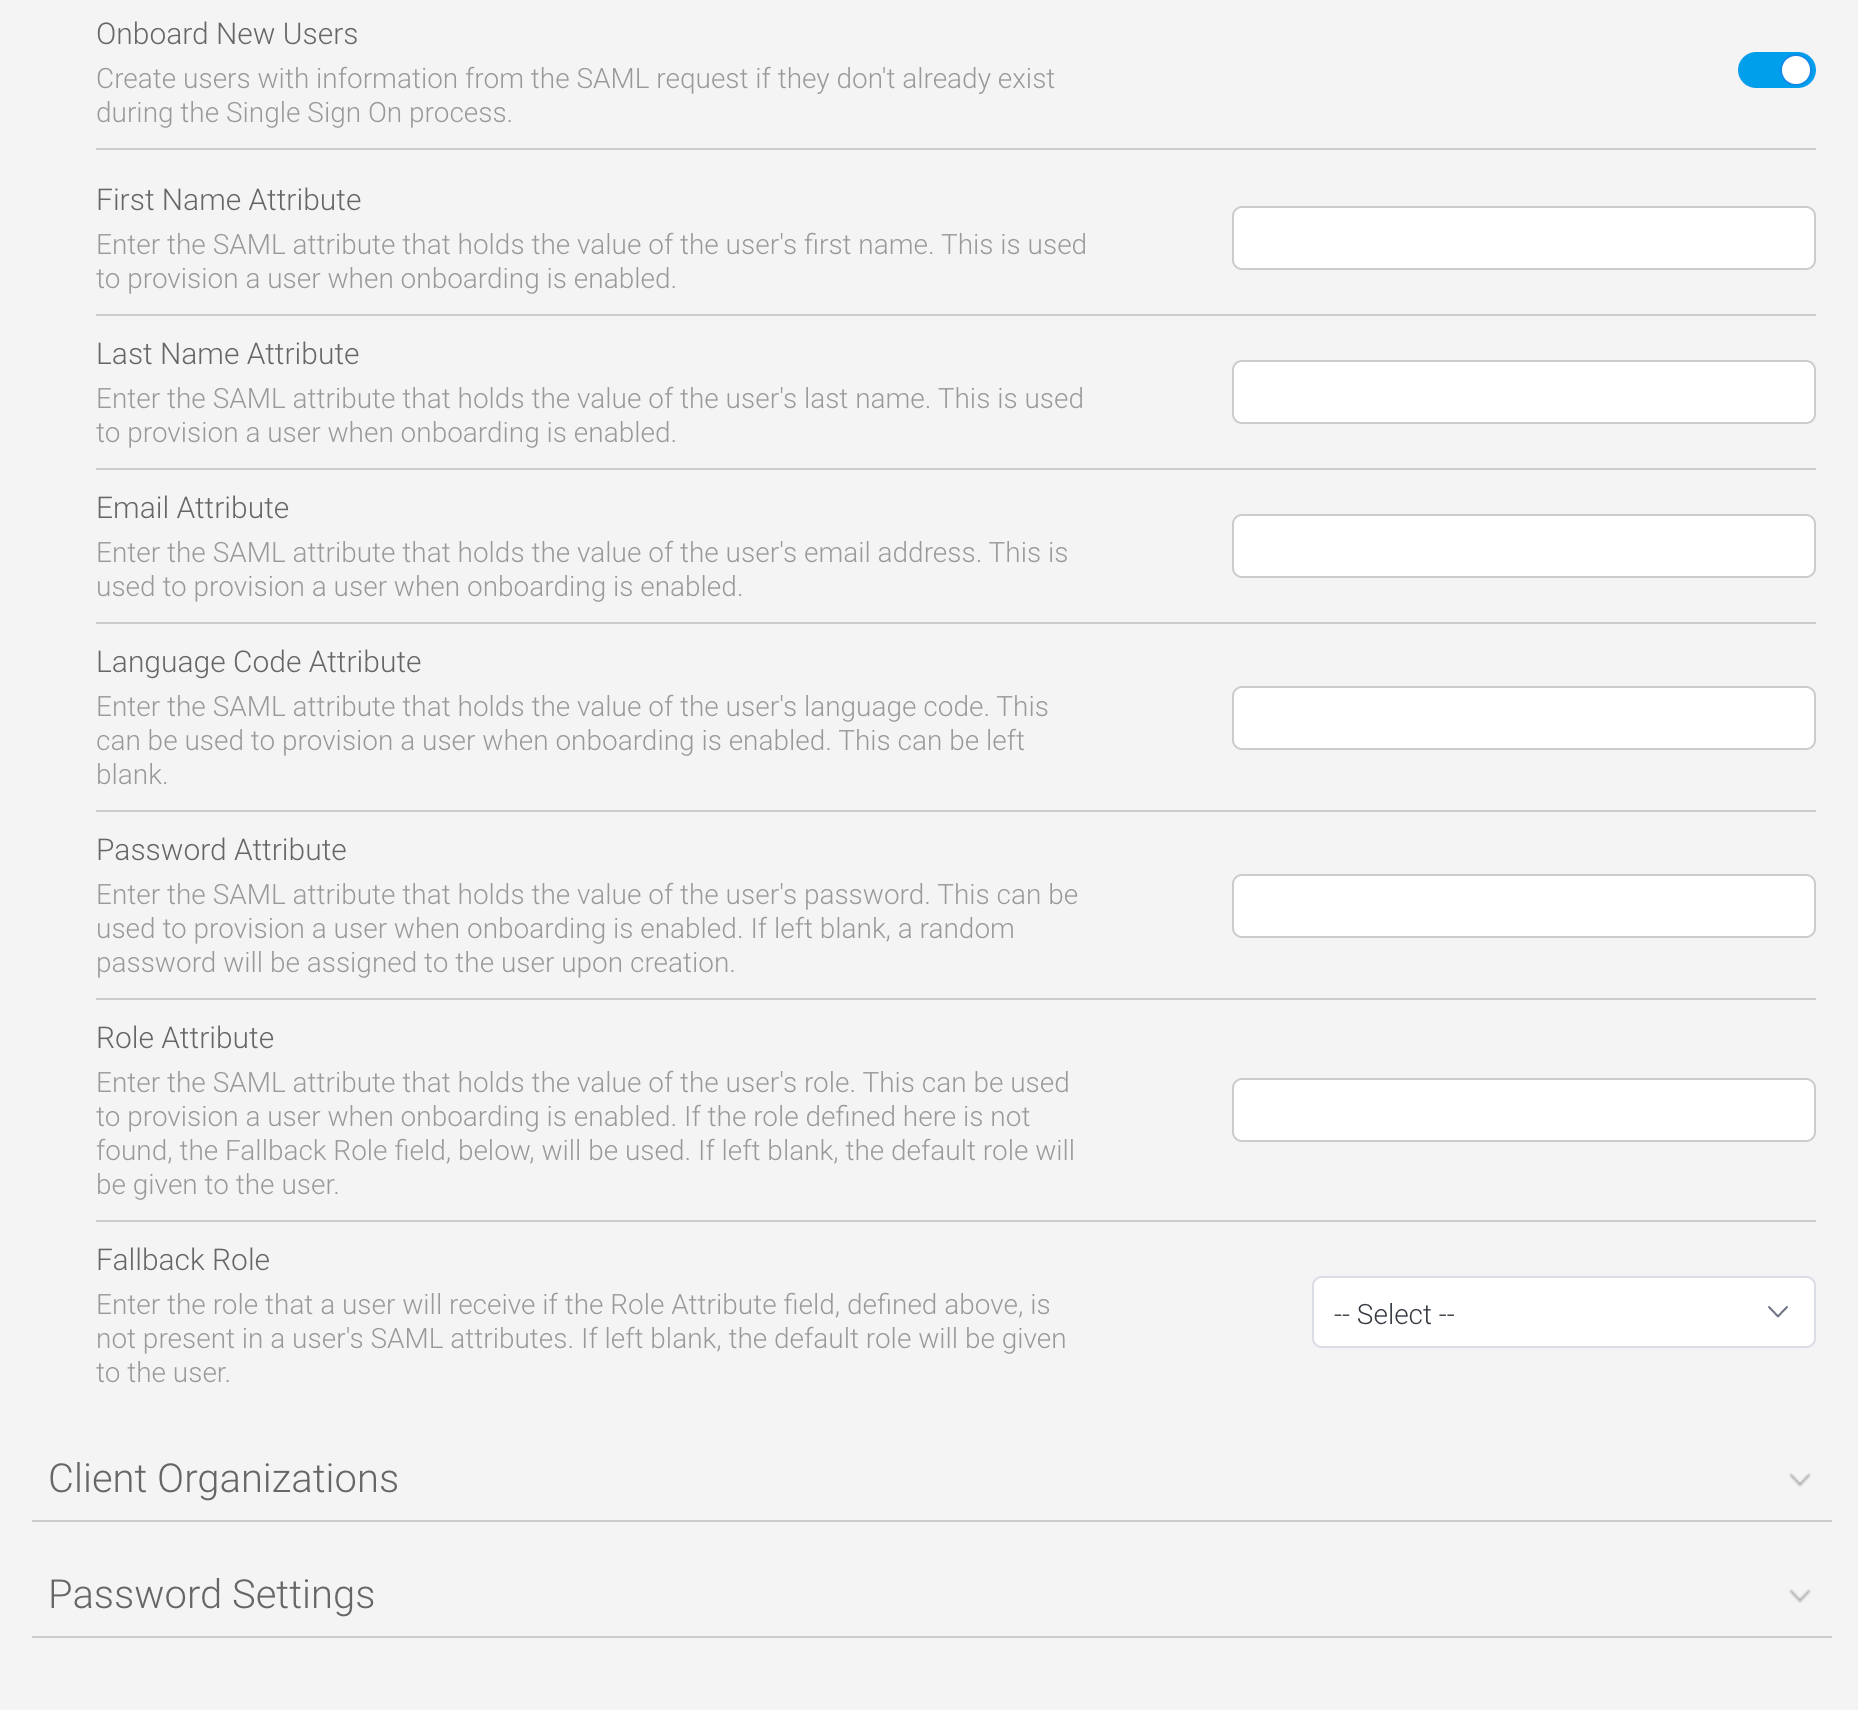
- Refer to the preceding table and the following content to enter any other values for the other, non-mandatory fields described (see the image below for an example)

Enable SAML onboarding
Yellowfin can be configured to create new user accounts for any user who does not already exist in the system. This feature is called “onboarding”, and requires some additional configuration to provide Yellowfin with the information required to create new users from a SAML request. All of the following parameters must be set up and configured in the identity provider and Yellowfin to match the other attribute mapping parameters above.Parameter | Description | Required? | Default |
|---|---|---|---|
First Name Attribute | This parameter defines the name of the SAML attribute for fetching the first name for a new user. | Required | None |
Last Name Attribute | This parameter defines the name of the SAML attribute for fetching the last name for a new user. | Required | None |
Email Attribute | This parameter defines the name of the SAML attribute for fetching the email address for a new user. | Required | None |
Language Code Attribute | The parameter defines the name of the SAML attribute for fetching the language code for a new user. The content of the SAML response should match an existing language code that has already been configured in the regional settings of the admin console. Language codes are the standard ISO format, with two characters for the language, and if required, an underscore and two more characters for the country (for example, nl for Dutch, or fr_ch for Swiss French). | Not required | System default |
Password Attribute | The parameter defines the name of the SAML attribute for fetching the password for a new user. If left blank, a random password will be created for the user. | Not required | Random password (32 alphanumeric string) |
Role Attribute | This parameter defines the name of the SAML attribute for fetching the role for a new user. If omitted, the default role will be given to the new user. The content of the SAML response should match an existing role code that has already been configured in the admin console. | Not required | Default role |
Fallback Role | This dropdown list provides the means of selecting a fallback role if the role entered in the Role Attribute field is not available at the time of provisioning a new user. If omitted, the default role will be given to the new user. | Not required | Default role |
To configure SAML onboarding, follow the steps below.
- Ensure you’re in the same configuration screen described in the preceding steps
- Click on the Onboard New Users toggle to enable it
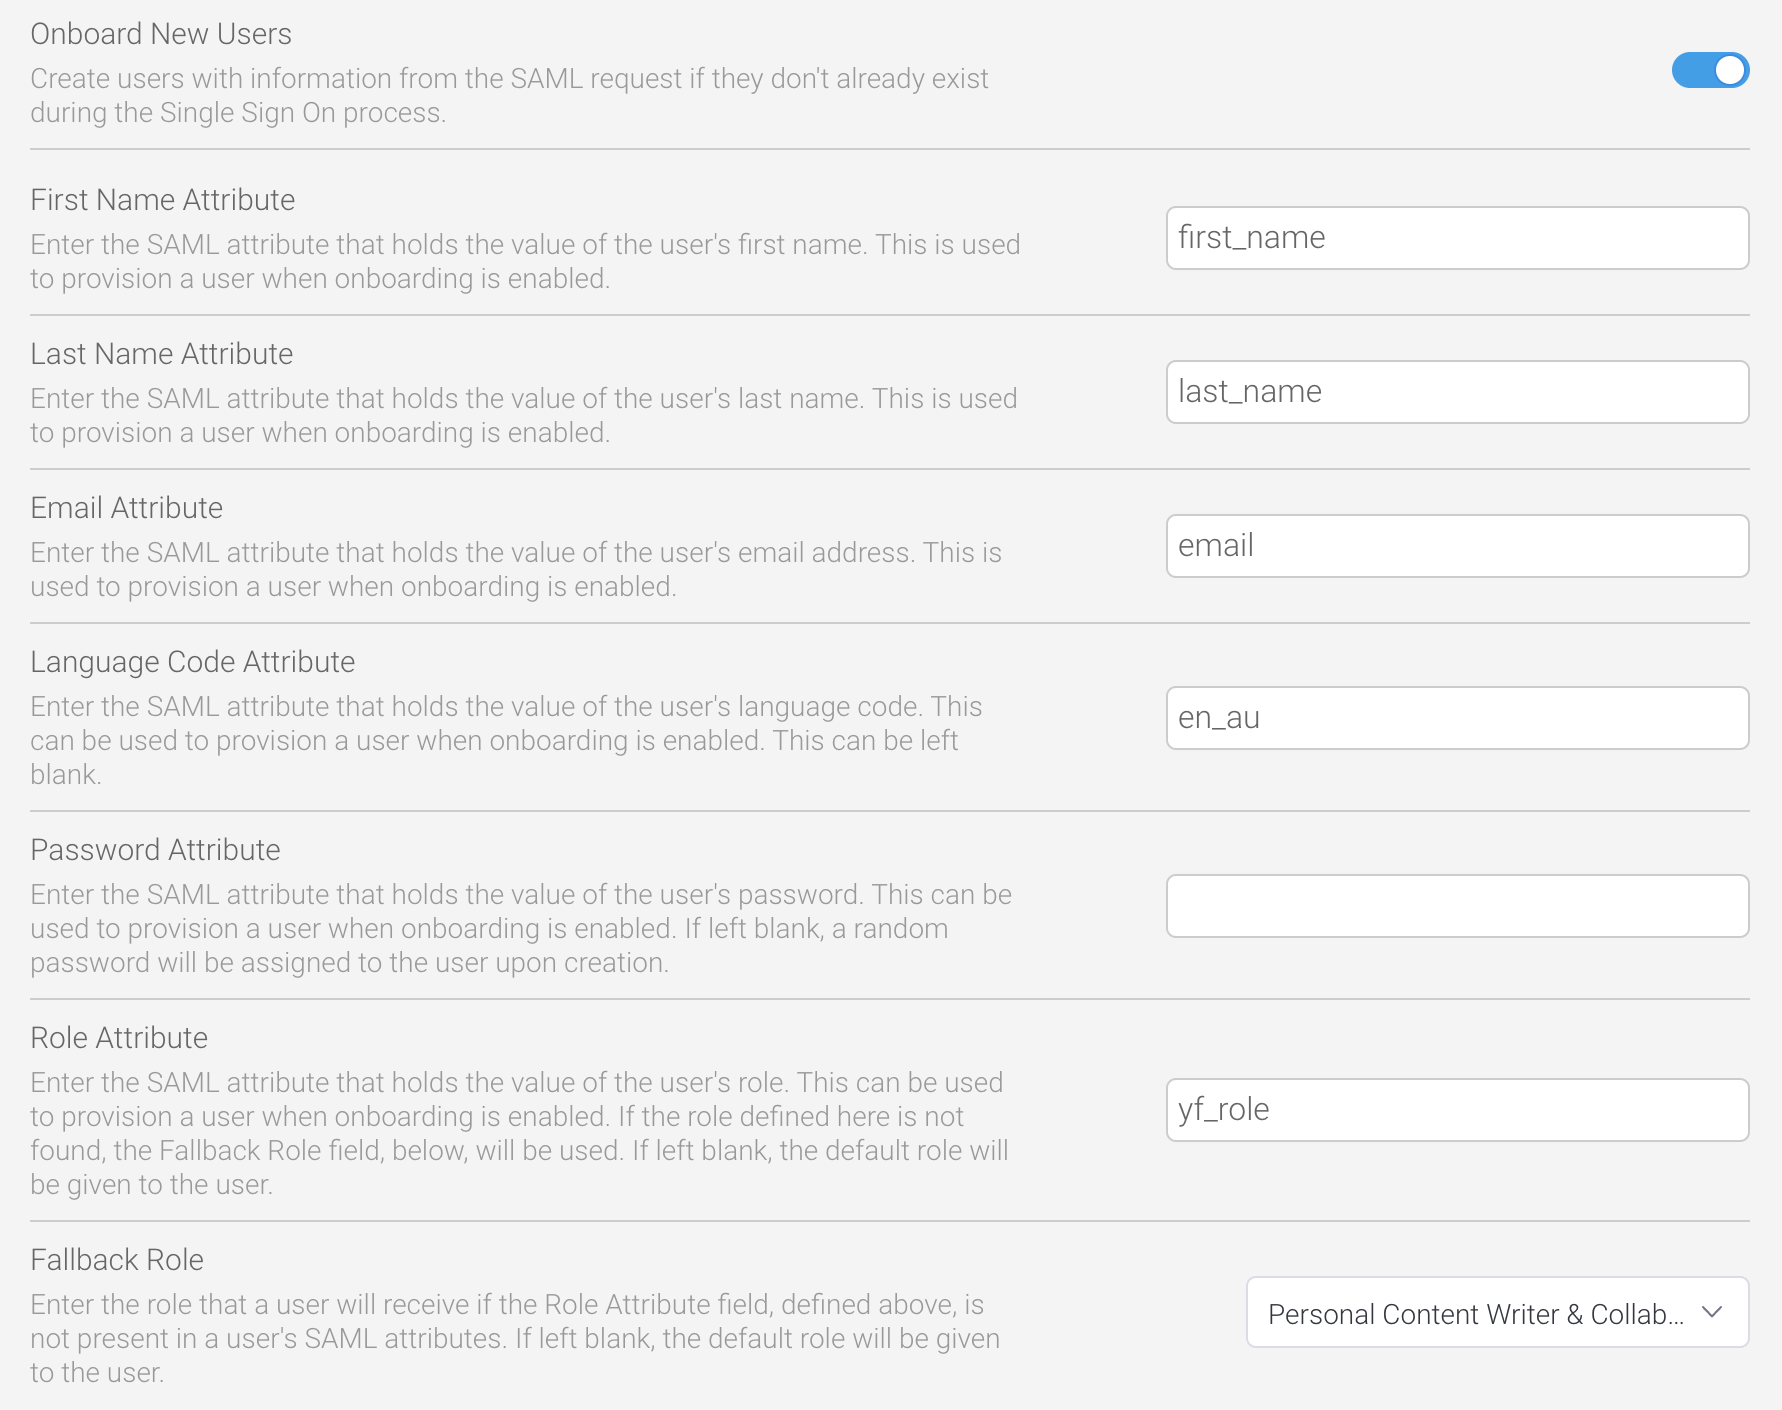
- Refer to the preceding table to enter values for the required fields: First Name Attribute, Last Name Attribute and Email Attribute
- Refer to the preceding table to enter any other values for the other, non-mandatory fields described (see the image below for an example)
Customize data with CustomParameters and Parameters
If you already take advantage of theCustomParameters and Parameters options on an SSO web services call, these can also be added to SAML by using the fields SSO Entry Options and SSO Custom Session Variable Attribute. SSO Entry Options
The SSO Entry Options field allows configuration of the available features in the resulting Yellowfin session after users log in via SAML. These are the same options that can be set on a web service SSO login using the ‘CustomParameters’ option. This is not attribute-based, so it applies to all users.
For example, if you want all your users to see their favourite reports, dashboards, stories etc. when they login, you could use the TIMELINE and DISABLEHEADER parameters (or any others listed on the Defining Login Session Options wiki page). We’ll use these for our example below.
- In the SAML Configuration area of Yellowfin, locate the SSO Entry Options field
- Enter any parameters, separated by commas, that you wish to use
In our example below, we’ve used ENTRY=TIMELINE,DISABLEHEADER=TRUE
- Click on the Save button to save your changes
You can test that your changes worked by logging in using your JWT token and checking that the login options you’ve specified are displayed.
Custom Session Parameter Attribute
The Custom Session Parameter Attribute field allows passing custom values to the resulting Yellowfin session when a user logs in via SAML. This is the same parameter that can be passed through via the ‘Parameters’ option on an SSO web service login. This is attribute based, so it can be applied to individual users.
To use this field, you will need to write your own Java plugin. Any number of variables can be passed to the Yellowfin session, so this can provide additional flexibility for custom requirements.
For example, if you wish to implement a custom header to replace the generic Yellowfin header, you could put a JSON array in this field that the header could extract information from to display at the top of the page. This could include user-specific details, such as their role, their photo or even links to the three most recent reports they’ve worked on.
In Yellowfin, the only requirement is to add those details to the Custom Session Parameter Attribute field.