You can download the Facebook ads connector from Yellowfin's Marketplace to connect to your Facebook account and stream advertisement data. This section shows you how to download this connector and install it to your instance of Yellowfin.
The user performing these steps must possess administrative rights that allow them to create a new data source connection.
Download the Facebook Ads Connector
You can download the connector for Facebook ads from Yellowfin’s marketplace:
- Log in to Yellowfin’s Marketplace
- Click on the option for Connectors

- Choose Facebook Ads from the selection of connectors available on Yellowfin. (Note: Be careful not to confuse this ads plugin with the Facebook connector.)
- When this connector option expands, click on the Download button. (If you see the Login to Download button instead, you will first need to log into the Marketplace to continue)

- The connector file will be saved to your computer as per your web browser's settings
Import the Facebook Ads Connector
Here's how to upload the Facebook ads connector to Yellowfin:
Ensure that you have an active Facebook account for advertisements. It is recommended that you log into this account before initiating this process.
- Click on the Create icon after logging in to Yellowfin
- Select the Data Source option

At the bottom of the new connection screen, click on the upload new link

You can also upload a new connector by following this Yellowfin path: Administration > Admin Console > Data Sources > Add
- In the new connection popup, either drag and drop the Facebook ads connector file you downloaded from the marketplace, or click on the Browse Files link to browse and select the file
- Once the file has been successfully uploaded, click on the Connect Platform button

- Now you can create an Facebook ads connection, as explained in the following section
Create a Facebook Ads Connection
Now we will continue by providing details of our Facebook ads account.
- Either continue on from the previous step, or navigate through to Create New menu > Data Source to use the Facebook ads connector
- Then click on the new Facebook ads connector

- The following new connection setting screen will appear

- Give your connection a name
- You can also provide a brief description, if required
- Press the Authorize Facebook button; you will get redirected to a Facebook popup with an access token. (Note: Ensure that you are logged into your Facebook ads account to generate this code.)
- Copy this access token

- Return to your Yellowfin settings screen and paste the key into the authentication token field
- Then click on Validate Token to get this access token validated
- If successfully validated, you will notice your Facebook ads username show up in a field

- Now you may perform the following additional tasks on this connection, although you are not required to: (Click on the menu button besides the Launch Pre-Built Content button to make a list of actions appear)

- Advanced Connection Editor: This will take you to the Data Source page in the Admin Console and allow you to edit all the advanced options available for your data source.
- Test Connection: This option lets you test out your Facebook ads connection settings to ensure that you can connect to your data source

- Create View: This re-directs you to the view creation screen.
- Launch Pre-Built Content button: This allows you to install any pre-built content that may come with the connector.
- Save & Close: Use this action to save your connection details and return to the previous screen, closing the connection popup.
- Cancel: This closes the connection window without saving any details.
- After performing any of these other activities, click on the Launch Pre-Built Content button
- You will get redirected to Yellowfin's browse screen with the new Facebook ads dashboard present there (Note: You might need to search for this dashboard, if its thumbnail cannot be seen right away)

If you access this dashboard, you will be able to view your Facebook ads account data directly in Yellowfin (as shown in the example below)
The Facebook ads data might take some time to load and appear in Yellowfin. Access main menu > Administration > Schedule Management > your Facebook ads connection, to view the data being downloaded.

Delete the Facebook Ads Connector
You can delete the Facebook ads connector from your Yellowfin instance.
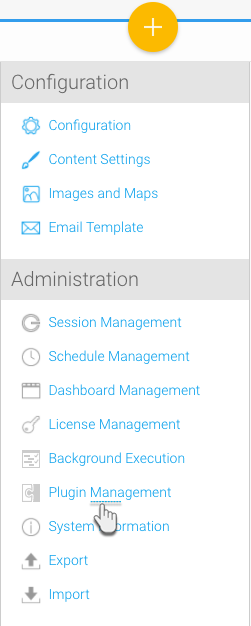
- Navigate to left side menu > Administration > Admin Console
- From the options listed on the right side, click on Plugin Management under Administration
- At the Plugin Management page, select the checkbox for the Facebook ads plugin
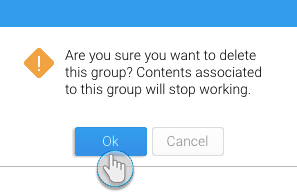
- Then click on the delete button on the bottom right

- Choose OK when the confirmation dialogue box appears
- Your Facebook ads connector would be removed from the system