Overview
The following sections outline sample dashboard content developed with DashXML and Yellowfin content. It will explore each of the avilalbe widget types, how they were set up in the XML, and how they were styled through custom CSS.
Note: this is merely a guide in order to walk you through using the DashXML framework for your own dashboard requirements.
The main XML widget types consist of the following:
<application-definition>
	<sourcefilter></sourcefilter>
	<dashboard>
		<text></text>
		<exportlist>
			<export><export>
		</exportlist>
		<filter>
			<options>
				<summary><summary>
			</options>
		</filter>
		<report>
			<modal>
				<subcontent></subcontent>
			</modal>
			<filterMap></filterMap>
		</report>
		<modal>
			<subcontent></subcontent>
		</modal>
		<customhtml>
			<replacements></replacements>
		</customhtml>
		<subtab>
			<options>
				<subcontent></subcontent>
				<summary></summary>
			</options>
		<subtab>
	</dashboard>
</application-definition>
The full XML structure is outlined on the Widget XML page.
Dashboard Widget
Sub Tab Widget
Text Widget
Export Button Widget
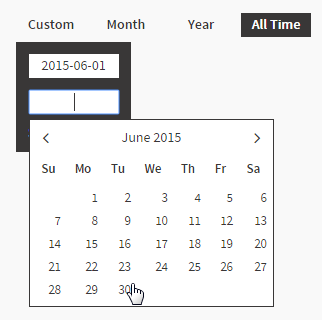
Filter Widget - Dates
These can be implemented using the<filter> XML widget. Each filter widget requires at least one option to be defined, allowing the user to select a value to apply. This particular filter has four options; Custom, Year, Month, and All Time. The Year, Month, and All Time filters have been set up using pre-defined date ranges, while the Custom option was specified as user prompt in order to allow users to specify a custom range.Example Output
Example Elements
<filter>
| Child | Value | Description |
|---|---|---|
| true | Setting this to true allows the values of this filter to be passed to other dashboards. |
datatype | DATE | This specifies that the filter options need to return a date type in order to be applied. |
name | dateFilter | This contains the name of the filter, to be used to identify it for the <filterMap> node used on reports receiving the values. |
operator | BETWEEN | This specifies the operator for the filter, and must be compatible with the operators used in reports you wish to pass the filter values to. BETWEEN means two values are expected. This option should be used for operators defined in the report including, but not limited to; Between, Not Between. |
styleClass | topFilter | This contains a CSS class name used to apply styling to the component. |
options | This contains nodes to define the contents of the display and possible values. Each option to be presented to the user will need to have its own <option> node. In this example we’ve used a Year, Month, and Custom option. See <options> node description. |
<options> (Custom)
| Child | Value | Description |
|---|---|---|
title | Custom | This is the label displayed on the filter. A text name describing the value that will be applied. |
| prompt | true | This specifies that the option doesn’t have a value predefined, but rather will ask the user to provide it. In this example, as we are using a prompt, there is no need for a <value> node. As the filter is defined as a date, the user will be presented with a calendar picker (which can be styled using css). |
<options> (Year)
| Child | Value | Description |
|---|---|---|
title | Year | This is the label displayed on the filter. A text name describing the value that will be applied. |
typecode | PREDEF | This defines that the option will use a predefined filter, such as a predefined date range. You will then have to specify which definition to use in the <value> node. |
value | YEARTODATE | YEARTODATE uses the predefined date range that is the first date of the current year, to the current date. |
<options> (Month)
| Child | Value | Description |
|---|---|---|
title | Month | This is the label displayed on the filter. A text name describing the value that will be applied. |
typecode | PREDEF | This defines that the option will use a predefined filter, such as a predefined date range. You will then have to specify which definition to use in the <value> node. |
value | MONTHTODATE | MONTHTODATE uses the predefined date range that is the first date of the current month, to the current date. |
<options> (All Time)
| Child | Value | Description |
|---|---|---|
title | All Time | This is the label displayed on the filter. A text name describing the value that will be applied. |
value | 1900-01-01\|2100-01-01 | This defines that the date range will be from 1st Jan 1900 to 1st Jan 2100, effectively covering all the data in this dataset. |
defaultOption | true | This specifies this option as the default selection for the dashboard. Only one <option> node can be the default, the rest should be false or omit this node. |
Example XML
<!-- Year Filters -->
<filter>
	<sync>true</sync>
	<datatype>DATE</datatype>
	<name>dateFilter</name>
	<operator>BETWEEN</operator>
	<styleClass>topFilter</styleClass>
	<options>
		<title>All Time</title>
		<value>1900-01-01\|2100-01-01</value>
		<defaultOption>true</defaultOption>
	</options>
	<options>
		<title>Year</title>
		<typeCode>PREDEF</typeCode>
		<value>YEARTODATE</value>
	</options>
	<options>
		<title>Month</title>
		<typeCode>PREDEF</typeCode>
		<value>MONTHTODATE</value>
	</options>
	<options>
		<title>Custom</title>
		<prompt>true</prompt>
	</options>
</filter>
Example CSS
/* Date Filters */
.topFilter {
    height: 24px;
    line-height: 24px;
    padding-top: 14px;
}

.topFilter .filterOption {
    text-align: center;
    float: right;
    color: #393737;
    cursor: pointer;
    width: 70px;
    margin-left: 5px;
    font-weight: bold;
}

.topFilter .selected {
    background-color: #393737;
    color: #FFFFFF;
}

.topFilter .filterOption .customEntry {
    background-color : #393737;
    color: #FFFFFF;
    position: absolute;
    overflow: hidden;
    z-index: 100;
    margin-top: 5px;
    width: 115px;
}

.topFilter .filterOption .customEntry  input{
    background-color : #FFFFFF;
    border: 0px;
    font-family: sourceSansPro, sans-serif;
    font-size: 14px;
    color: #393737;
    height: 24px;
    width: 70px;
    line-height: 24px;
    margin: 12px 12px 0px 12px;
    padding: 0px 10px;
    text-align: center;
}


/* Date Entry */
.submitCustom {
    float: left;
    line-height: normal;
    margin: 10px 3px 10px 12px;
}

.cancelCustom {
    float: right;
    line-height: normal;
    margin: 10px 12px 10px 3px;
}

/* Date Picker */
.ui-datepicker {
    background-color : #FFFFFF;
    border: 1px solid #393737;
    color: #393737;
    font-family: sourceSansPro, sans-serif;
    font-size: 14px;
    margin-top: 5px;
}

.ui-datepicker a{
    color: #393737;
}

.ui-datepicker .ui-datepicker-prev {
    left: 10px;
    top: 6px;
}

.ui-datepicker .ui-datepicker-next {
    right: 10px;
    top: 6px;
}

.ui-datepicker .ui-datepicker-prev:before {
    content: "\f104";
    color: #393737;
    display: inline-flex;
    font-family: FontAwesome;
    font-style: normal;
    font-weight: normal;
    -webkit-font-smoothing: antialiased;
    -moz-osx-font-smoothing: grayscale;
    font-size: 18px;
    cursor: pointer;
}

.ui-datepicker .ui-datepicker-next:before {
    content: "\f105";
    color: #393737;
    display: inline-flex;
    font-family: FontAwesome;
    font-style: normal;
    font-weight: normal;
    -webkit-font-smoothing: antialiased;
    -moz-osx-font-smoothing: grayscale;
    font-size: 18px;
    cursor: pointer;
}

.ui-datepicker .ui-datepicker-prev-hover:before {
    content: "\f104";
    color: #393737;
    display: inline-flex;
    font-family: FontAwesome;
    font-style: normal;
    font-weight: normal;
    -webkit-font-smoothing: antialiased;
    -moz-osx-font-smoothing: grayscale;
    font-size: 18px;
    cursor: pointer;
}
.ui-datepicker .ui-datepicker-next-hover:before {
    content: "\f105";
    color: #393737;
    display: inline-flex;
    font-family: FontAwesome;
    font-style: normal;
    font-weight: normal;
    -webkit-font-smoothing: antialiased;
    -moz-osx-font-smoothing: grayscale;
    font-size: 18px;
    cursor: pointer;
    text-align: right;
}

.ui-datepicker .ui-datepicker-prev-hover {
    left: 10px;
    top: 6px;
}

.ui-datepicker .ui-datepicker-next {
    text-align: right;
}

.ui-datepicker .ui-datepicker-next-hover {
    right: 10px;
    top: 6px;
    text-align: right;
}
Filter Widget - Buttons
The filter widget displays possible filter value options that the user can select from. Each option has the capacity to display a title, description, icon, and summary value – all except the title are optional.Example Output

Example Elements
<report>
| Child | Value | Description |
|---|---|---|
| HIDDEN | HIDDEN allows the results of the report to be used in other components of the page, rather than in its native tabular format. In this case, the report is a dual column report returning a list of filter options, and the matching summary value. |
uuid | 73f732e8-7961-4925-9319-740dc4991de8 | This contains the Yellowfin UUID of the report in order to call it. |
name | skiTeamFilterList | This names the report for use elsewhere in the XML. The <summary> node will call the report by this name, rather than having to call it by UUID, but either would work. |
filterMap | This contains nodes to define any filters that need to be passed to the report from elsewhere on the dashboard tab. See <filterMap> node description. |
<filterMap>
| Child | Value | Description |
|---|---|---|
| 73f732e8-7961-4925-9319-740dc4991de8 | This is the UUID of the filter in the hidden report that will receive the <mapToFilter> value. In this case, it’s the date filter applied to the Position Improvement report. |
mapToFilter | skiTeamFilter | This is the name of the filter applied elsewhere on the dashboard tab. In this example, we’re linking to the skiTeamFilter filters. |
<filter>
| Child | Value | Description |
|---|---|---|
| true | Setting this to true allows the values of this filter to be passed to other dashboards. |
datatype | TEXT | This specifies that the filter options need to return a text type in order to be applied. |
name | skiTeamFilter | This contains the name of the filter, to be used to identify it for the <filterMap> node used on reports receiving the values. |
operator | EQUAL | This specifies the operator for the filter, and must be compatible with the operators used in reports you wish to pass the filter values to. EQUAL means only one value is expected. This option should be used for operators including, but not limited to; Equal to, Greater than, Less than, Contains. |
styleClass | quickStatFilter | This contains a CSS class name used to apply styling to the component. |
options | This contains nodes to define the contents of the display and possible values. Each option to be presented to the user will need to have its own <option> node. In this example we’ve used a Booking Stats, Athletes, and Ski Camps options. See <options> node description. |
<options> (Booking Stats)
| Child | Value | Description |
|---|---|---|
title | Booking Stats | This is the label displayed on the filter. A text name describing the value that will be applied. |
description | Email, Phone, and Website | This is a descriptive label to be displayed on the filter. This is optional. |
summary | This specifies how to retrieve a value from a report in order to display it as a summary value on the filter button. See <summary> node description. | |
icon | <![CDATA[<div class="filterIconBooking"></div>]]> | This contains the HTML required to display a specific icon on the filter button. |
value | Booking | This specifies the value of the filter. |
defaultOption | false | This specifies this option as the default selection for the dashboard. Only one <option> node can be the default, the rest should be false or omit this node. |
<summary> (Booking Stats)
| Child | Value | Description |
|---|---|---|
reportId | skiTeamFilterList | This is the report name, specified where the report is included in the XML that you will use to retrieve and display the summary value. In this case, the report is a dual column report returning a list of filter options, and the matching summary value. |
matchColumn | 0 | This is the number placement of the column in the tabular report you wish to match a value to in order to locate a specific row. In this case, the column that contains the descriptive labels is the first column in the report, and as we count from zero, use 0. |
matchValue | Booking | This is the value you wish to locate in the <matchColumn> column in order to locate a specific row. In this case, you need to locate the Booking value. |
valueColumn | 1 | This is the column you wish to retrieve data from, in the row located using |
<options> (Athletes)
| Child | Value | Description |
|---|---|---|
title | Athletes | This is the label displayed on the filter. A text name describing the value that will be applied. |
description | Demographic & Sales | This is a descriptive label to be displayed on the filter. This is optional. |
summary | This specifies how to retrieve a value from a report in order to display it as a summary value on the filter button. See <summary> node description. | |
icon | <![CDATA[<div class="filterIconAthletes"></div>]]> | This contains the HTML required to display a specific icon on the filter button. |
value | Athletes | This specifies the value of the filter. |
defaultOption | false | This specifies this option as the default selection for the dashboard. Only one <option> node can be the default, the rest should be false or omit this node. |
<summary> (Athletes)
| Child | Value | Description |
|---|---|---|
reportId | skiTeamFilterList | This is the report name, specified where the report is included in the XML that you will use to retrieve and display the summary value. In this case, the report is a dual column report returning a list of filter options, and the matching summary value. |
matchColumn | 0 | This is the number placement of the column in the tabular report you wish to match a value to in order to locate a specific row. In this case, the column that contains the descriptive labels is the first column in the report, and as we count from zero, use 0. |
matchValue | Athletes | This is the value you wish to locate in the <matchColumn> column in order to locate a specific row. In this case, you need to locate the Athletes value. |
valueColumn | 1 | This is the column you wish to retrieve data from, in the row located using |
<options>
| Child | Value | Description |
|---|---|---|
title | Ski Camps | This is the label displayed on the filter. A text name describing the value that will be applied. |
description | Stats for each Site | This is a descriptive label to be displayed on the filter. This is optional. |
summary | This specifies how to retrieve a value from a report in order to display it as a summary value on the filter button. See <summary> node description. | |
icon | <![CDATA[<div class="filterIconCamps"></div>]]> | This contains the HTML required to display a specific icon on the filter button. |
value | Camps | This specifies the value of the filter. |
defaultOption | true | This specifies this option as the default selection for the dashboard. Only one <option> node can be the default, the rest should be false or omit this node. |
<summary> (Camps)
| Child | Value | Description |
|---|---|---|
reportId | skiTeamFilterList | This is the report name, specified where the report is included in the XML that you will use to retrieve and display the summary value. In this case, the report is a dual column report returning a list of filter options, and the matching summary value. |
matchColumn | 0 | This is the number placement of the column in the tabular report you wish to match a value to in order to locate a specific row. In this case, the column that contains the descriptive labels is the first column in the report, and as we count from zero, use 0. |
matchValue | Camps | This is the value you wish to locate in the <matchColumn> column in order to locate a specific row. In this case, you need to locate the Camps value. |
valueColumn | 1 | This is the column you wish to retrieve data from, in the row located using |
Example XML
<!-- Ski Team Filter List Summary Report -->
<report>
    <display>HIDDEN</display>
    <uuid>73f732e8-7961-4925-9319-740dc4991de8</uuid>
    <name>skiTeamFilterList</name>
    <filterMap>
        <filterUUID>682f856b-09b8-49d8-bf33-6e9bba9d895a</filterUUID>
        <mapToFilter>skiTeamFilter</mapToFilter>
    </filterMap>
</report>

<!-- Ski Team Filters -->
<filter>
    <sync>true</sync>
    <datatype>TEXT</datatype>
    <name>skiTeamFilter</name>
    <operator>EQUAL</operator>
    <styleClass>quickStatFilter</styleClass>
    <options>
        <title>Booking Stats</title>
        <description>Email, Phone, and Website</description>
        <summary>
            <reportId>skiTeamFilterList</reportId>
            <matchColumn>0</matchColumn>
            <matchValue>Booking</matchValue>
            <valueColumn>1</valueColumn>
        </summary>
        <icon><![CDATA[<div class="filterIconBooking"></div>]]></icon>
        <value>Booking</value>
        <defaultOption>false</defaultOption>
    </options>
    <options>
        <title>Athletes</title>
        <description>Demographic & Sales</description>
        <summary>
            <reportId>skiTeamFilterList</reportId>
            <matchColumn>0</matchColumn>
            <matchValue>Athletes</matchValue>
            <valueColumn>1</valueColumn>
        </summary>
        <icon><![CDATA[<div class="filterIconAthletes"></div>]]></icon>
        <value>Athletes</value>
        <defaultOption>false</defaultOption>
    </options>
    <options>
        <title>Ski Camps</title>
        <description>Stats for each Site</description>
        <summary>
            <reportId>skiTeamFilterList</reportId>
            <matchColumn>0</matchColumn>
            <matchValue>Camps</matchValue>
            <valueColumn>1</valueColumn>
        </summary>
        <icon><![CDATA[<div class="filterIconCamps"></div>]]></icon>
        <value>Camps</value
        <defaultOption>true</defaultOption>
    </options>
</filter>
Example CSS
.quickStatFilter {
    width: 100%;
    display: table;
    border-collapse: separate;
    border-spacing: 15px 0px;
    z-index: 1000;
}
.quickStatFilter .filterOption {
    display: table-cell;
    background: #EDECED;
    padding: 10px;
    text-align: left;
    cursor: pointer;
    table-layout: fixed;
    overflow: hidden;
}
.quickStatFilter .filterOptionMain {
    width: 100%;
    height: 80px;
    overflow: hidden;
    position: relative;
}
.quickStatFilter .filterTitle {
    color: #4C5965;
    font-size: 16px;
    z-index: 1000;
    font-weight: bold;
}
.quickStatFilter .filterDesc {
    color: #909FAC;
    font-size: 12px;
    margin-top: 2px;
}
.quickStatFilter .filterOptionSummary {
    color: #4C5965;
    font-size: 18px;
    position: absolute;
    font-weight: bold;
    margin-top: 15px;
}
.quickStatFilter .filterIcon {
    position: relative;
    float: right;
    bottom: 30px;
    color: #D3D1D3;
}
.quickStatFilter .filterIconBooking {
    background-image: url("../images/booking.png");
}
.quickStatFilter .filterIconAthletes {
    background-image: url("../images/athlete.png");
}
.quickStatFilter .filterIconCamps {
    background-image: url("../images/camp.png");
}
.quickStatFilter  .selected {
    background: #477DB3;
}
.quickStatFilter  .selected  div{
    color: #FFFFFF;
}
.selected .quickStatFilter .filterIconBooking {
    background-image: url("../images/booking.png");
}
.selected .quickStatFilter .filterIconAthletes {
    background-image: url("../images/athlete.png");
}
.selected .quickStatFilter .filterIconCamps {
    background-image: url("../images/camp.png");
}