Overview
Views within Yellowfin provide the link between users, their reports, and the database. The purpose of the view is to simplify the knowledge required by end users of the source database. This section describes some of the basic view management options available to you.To explore a basic introduction to creating views, visit the Creating a View page.
View Builders
When building a view, you have several methods available to you, including;
- Single Table View
- Multiple Table View (Drag & Drop Builder)
- Freehand SQL View
- OLAP Cube
- Stored Procedure
Single Table View
This option allow you to automatically create a view based on single table in the selected database. Yellowfin will automatically group metrics together, made up of numeric and date fields, and dimensions of text fields.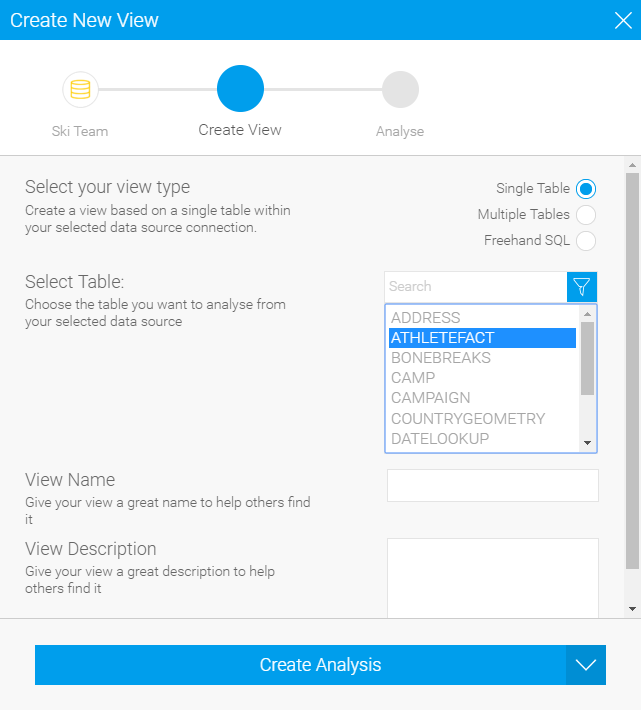
From here you can proceed directly to the Report Builder.
Multiple Table View (Drag and Drop Builder)
This option allows you to use Yellowfin to simply join multiple tables from a single selected database through a web interface.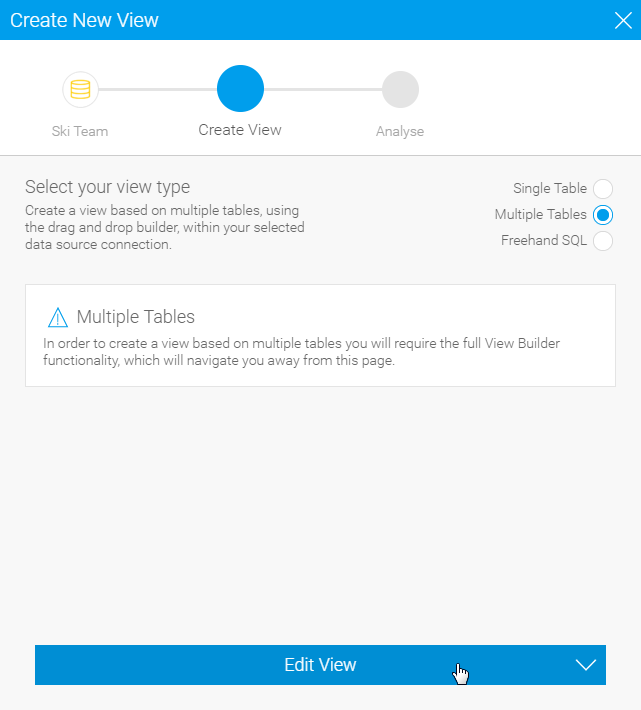
See Drag & Drop View Builder for more information.
Freehand SQL View
The freehand SQL option allows you to write your own query to generate a view. From here Yellowfin will automatically create the view, grouping metrics and dimensions together, much the same as the Single Table View.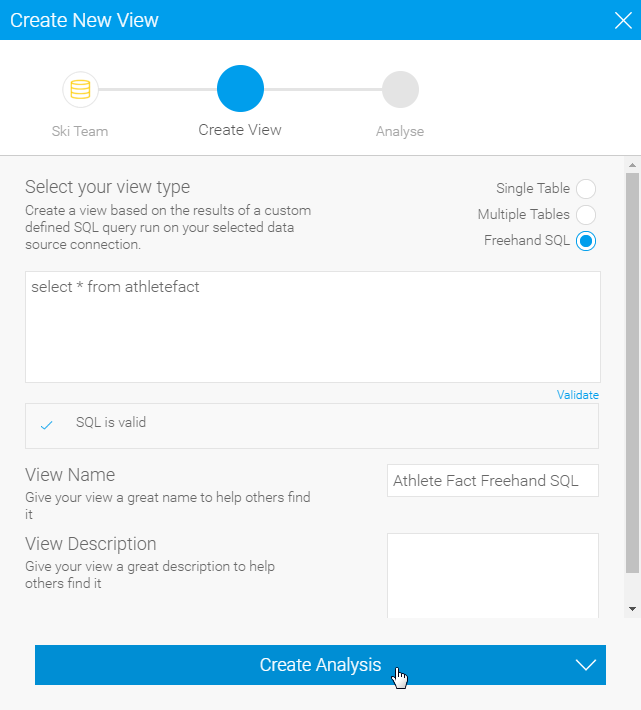
From here you can proceed directly to the Report Builder.
Note: When writing an SQL view it is very important that you do not include an order by – since results are sorted by the Java application not the database. The order by will cause your view to fail.
Composite View
A composite view allows you to create a view which joins multiple data sources together. This allows users to create a report which includes data from these multiple databases.The view builder for a composite view differs in that rather than displaying tables from a selected database it allows you to join existing Yellowfin views together and create virtual tables from any defined database.
- To create a composite view select the composite view option from the author drop down.
- You will also need to select a database in which you wish to store the view results. This is needed since composite views can be highly complex and result in slow query performance by your users. As a result Yellowfin schedules a query to generate the view and all its data on a regular basis to be stored in a specific warehouse database.
Note
We strongly recommend the use of Advanced Sub Queries over Composite Views as the functionality is more flexible and robust.
OLAP Cube View
An OLAP cube is a pre-aggregated structure on your database. Like a data mart it already contains a set of dimensions and measures which have been pre-aggregated to support rapid reporting.- To create an OLAP cube view select OLAP cube from the author drop down menu.
- Choose the source connection – Yellowfin will only provide OLAP source connections for you to choose from.
If no source exists you will have to create a specific OLAP source connection record. - Choose the cube from a list of available cubes.
Note: When creating an OLAP cube as a view you will have limited options for updating field information. This is because most of the metadata is already contained in the cube itself.
Stored Procedure
With Yellowfin you can connect to stored procedures running on your application database.- To connect to a stored procedure select the stored procedure options from the create view drop down list.
- Select the Database and then the stored procedure you wish to connect to.
- Click the next arrow to continue to the stores procedure parameters page. Yellowfin will automatically detect parameters which exist in your stored procedure and display this list on the page.
- You must fill in a value for each parameter. The value is only used to return column at this stage of the view builder. (The non-return fields will become automatic filters on the reports created from this stored procedure).
- When you have completed the parameter section click accept to return the list of fields in the result set.
- Complete the metadata as you would for a standard view. Note that the non-return parameters exist as filter fields.
- Filters will be added into each report created from the stored procedure automatically. They will not be visible on the report data page but will be displayed on the report filter page.