Adding objects to a presentation
A variety of objects can be added to the presentation from the left side widget navigation.
Object | Description |
|---|---|
Add reports in the form of charts or tables to your presentation. You can provide interactive reports, report bookmarks, snapshots, or entire report canvas. | |
Add report filters to filter data directly on the presentation. | |
Add headlines or descriptive text. Customize it to match any text styling. | |
Add shapes, icons, or lines to further enhance your presentation’s design. | |
Incorporate static images to your presentation. | |
Add chart placeholders or quickly create simple charts directly on the presentation. | |
Add custom or Yellowfin packaged code widgets. | |
| Action Buttons | Add action buttons that trigger events upon clicking. |
Managing presentation objects
This section covers multiple options to manage objects on a presentation.
Object actions
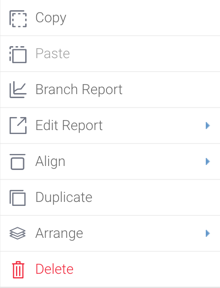
Right-click on any object to display a menu of actions you can perform on it. Alternatively, you can click on the 
Option | Description |
|---|---|
Copy | Copy the selected object, or multiple objects to the clipboard. |
Paste | Paste the copied object(s) onto the presentation. |
| Branch Report | This option creates a copy of the selected report, along with any filters applied to it. However the SQL query is only run once. You can then display a different chart of the same report, or even a chart and a table. |
| Edit Report | Allows you to edit the selected report in the Report Builder, by navigating to the selected report step. Options include:
|
Duplicate | Creates a duplicate copy of selected object(s) and displays it onto the presentation. |
Transform | Apply quick rotation options to the selected widget. Options include:
|
Align | Aligns the selected object(s) on the slide according to the following options:
|
Arrange | Change the arrangement of the selected object by moving it to the foreground or background. Options are:
|
| Delete | Deletes the selected object(s). |