Overview
This transformation step allows data science models created in an H2O cloud instance to be used within Yellowfin, in order to generate predictions or other results. This is done via a transformation step in the data transformation module.
Prerequisites
Before using this step, ensure that you have access to an instance of H2O with at least one model created in it. You will also need to have the H2O plug-in installed in Yellowfin.
It would be ideal to get a better understanding of the data transformation module before continuing with this guide.
Supported Models
The following types of models are currently supported:
- Deep Learning
- Distributed Random Forest
- Gradient Boosting Machine
- Generalized Linear Models
- Generalized Low Rank Modeling
- K-Means
- XGBoost (available if H2O is running on Linux)
General Workflow
Here is a quick overview of the process. This guide will cover most of these steps in detail.
- You either need access to an instance of H2O or set one up yourself. Then build your data science model in it.
- Install the H2O plug-in in your instance of Yellowfin.
- Use Yellowfin’s data transformation module to create a transformation flow. This involves importing data into the module, and if required applying other transformations to it.
- Use the H2O transformation step in your flow and configure it. Refer to the information below on configuring this step.
- Execute the step to view the output generated by the model using your data.
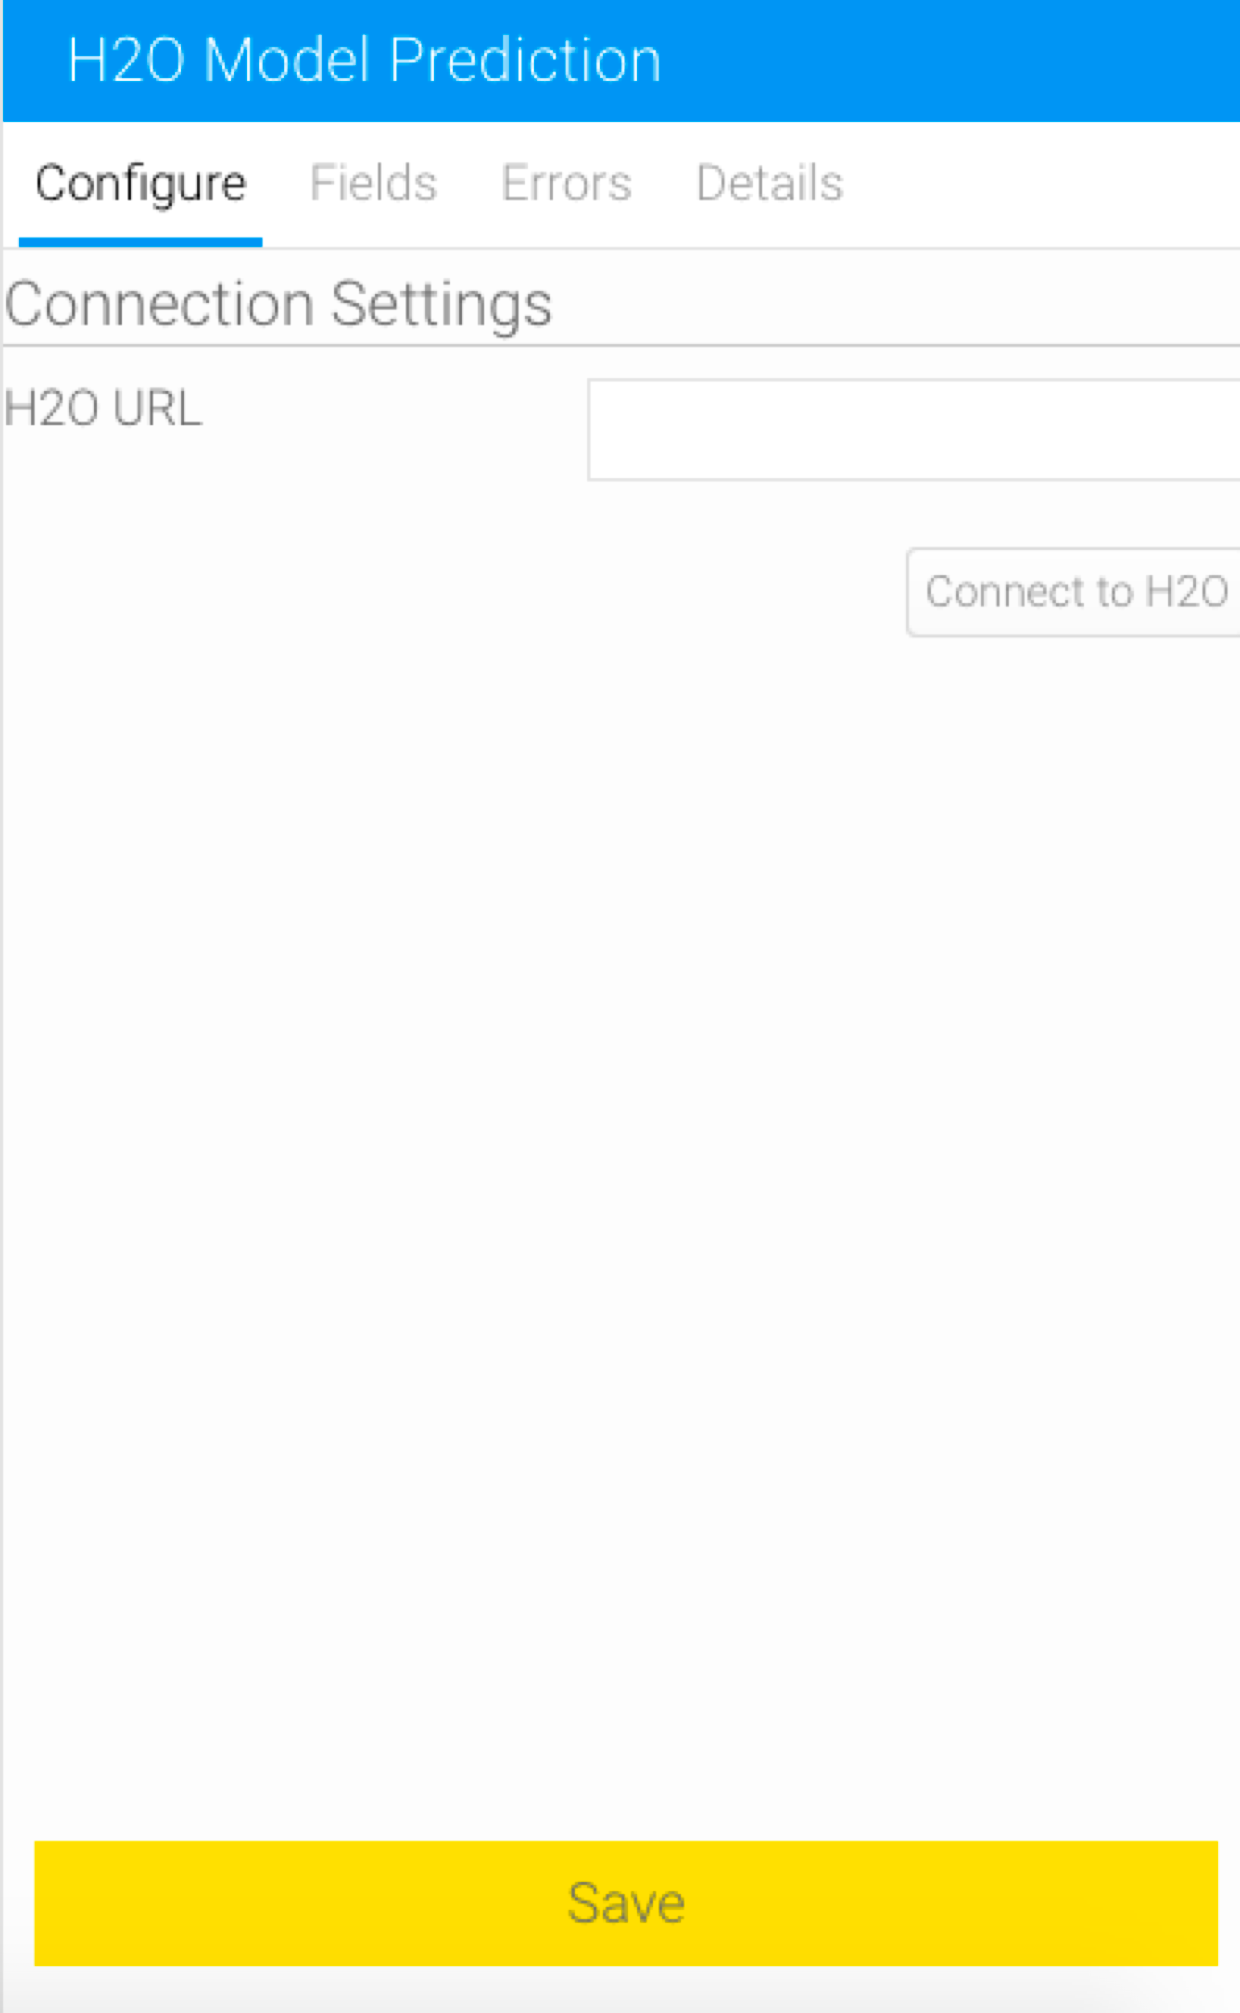
Step Configuration Details
In order to configure the H2O step, you will need to connect to an instance of H2O by providing a valid URL, then choose a data science model. Next, the input fields of the model will need to be set up. This is done by mapping them with the data from the transformation flow. Unlike configuration with other outputs of data science models (such as PMML), there is no need to configure an output field. The generated result is defined during the creation of the model.
Supported Model Categories
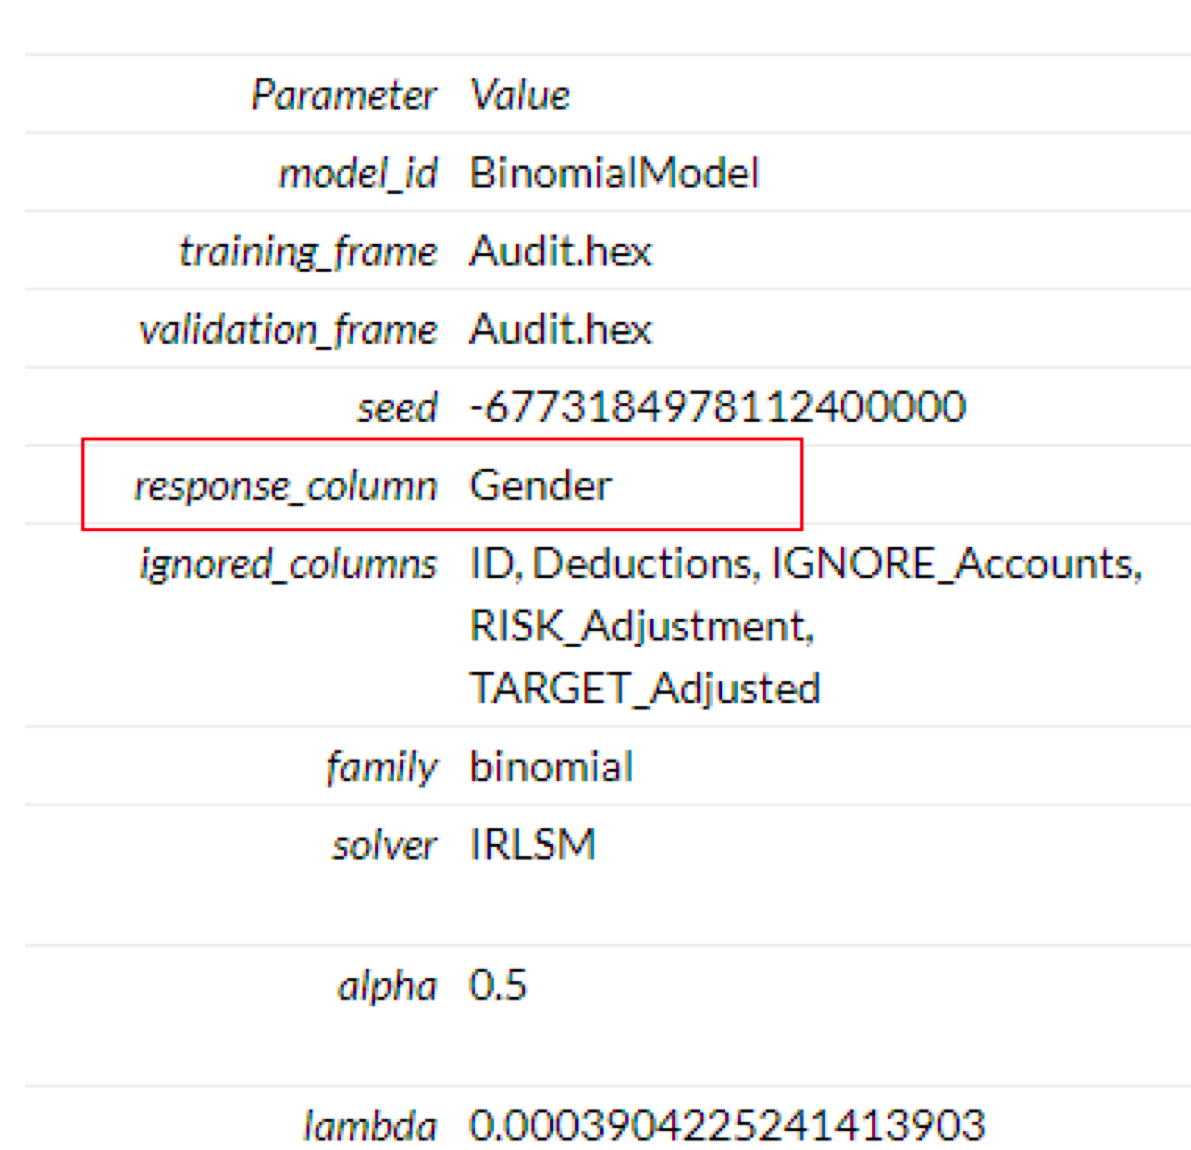
The types of models that Yellowfin supports can be generalized into four categories, listed below. Note: To check the category of a model, refer to the model’s Output section in H2O.
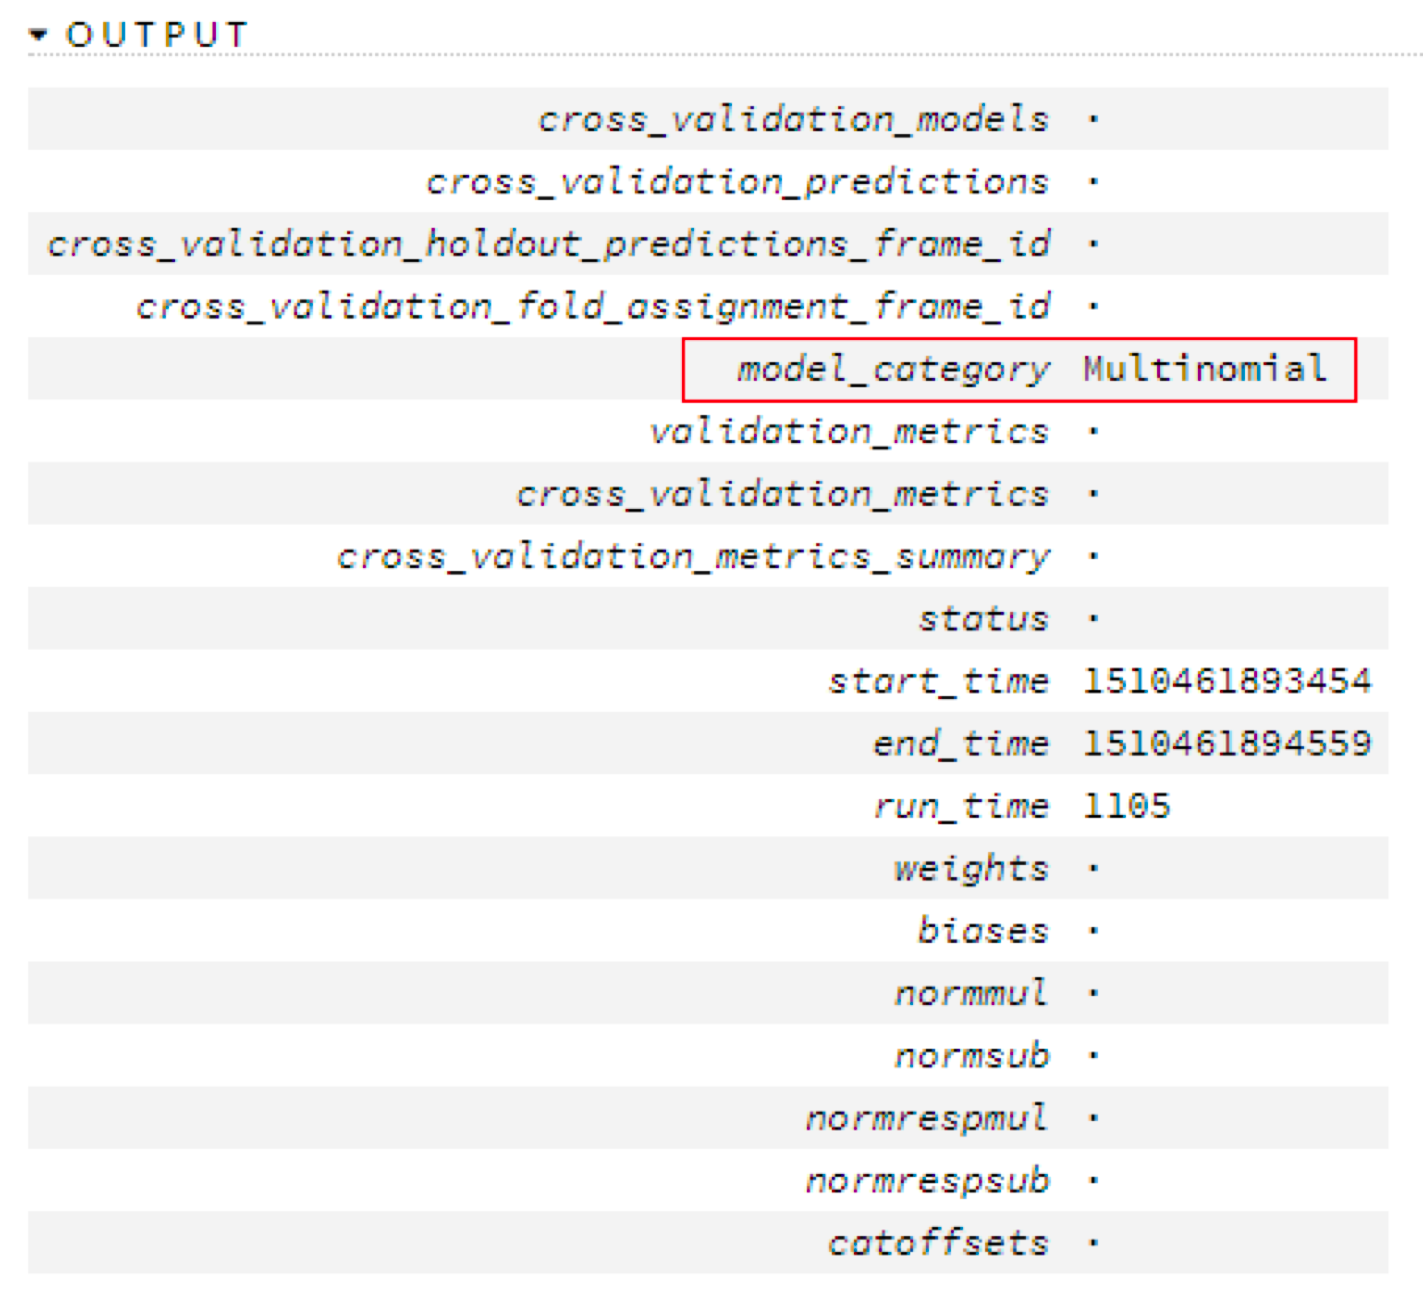
Following describes the type of output each of these categories generate:
- Regression: Models belonging to this category will generate actual predicted value for every row of data.
- Binomial: These types of models will output the text label of the class that was predicted for every row.
- Multinomial: (Same as above.)
- Clustering: Such models will result in the index number of the cluster to which every row belongs.
Checking Your Model’s Output
In most cases, the user would know the output of the model. But you can still determine the output by selecting the model from your instance of H2O and checking the output settings. For example, for a binary model, the output can be checked in the model’s parameters.
Datatype of Your Model Output
The datatype of the output column will also depend on what has been configured in the model. It will be NUMERIC for models belonging to the “Clustering” and “Regression” categories. For other cases it will be TEXT.
Using H2O.ai in Yellowfin
Part 1: Setting up H2O.ai
H2O is a modern open source AI platform that allows users to work with predictive models. You can download the latest version of H2O from here: http://h2o-release.s3.amazonaws.com/h2o/rel-weierstrass/7/index.html
You can use H2O either locally by starting it and using it on your machine, or by using a publicly available space accessible through a URL.
Use the following procedure to run H2O locally:
- Download H2O.ai
- Unzip the file into a directory.
- Open a terminal (Apple terminal or MSDOS) and go to the extracted folder.
- Run the jar via “java –jar h2o.jar”. This will start the H2O.ai server.
- By default, H2O.ai server will run at http://localhost:54321/ (once set up correctly). Note: You can even customize the URL and other settings of your H2O instance.
H2O URL
To establish a connection to an instance of H2O, you would need to provide the instance’s URL. This can be done by either giving the default one if set up locally (e.g. http://localhost:54321) or including the IP address (such as, http://127.0.0.1:54321) for both, a local setup or remote access (ensure that you have a stable internet connection if trying to access it remotely).
Note: You need to include http:// as part of the URL for it to be recognized correctly. The transformation step will not function if an incorrect URL is provided.
Part 2: Using an H2O model in the transformation flow
This guide shows you how to integrate your data science model using the H2O transformation step into Yellowfin.
- Build a model in H2O and save it.
- Navigate to Yellowfin’s Data Transformation model. (Create button > Transformation Flow)
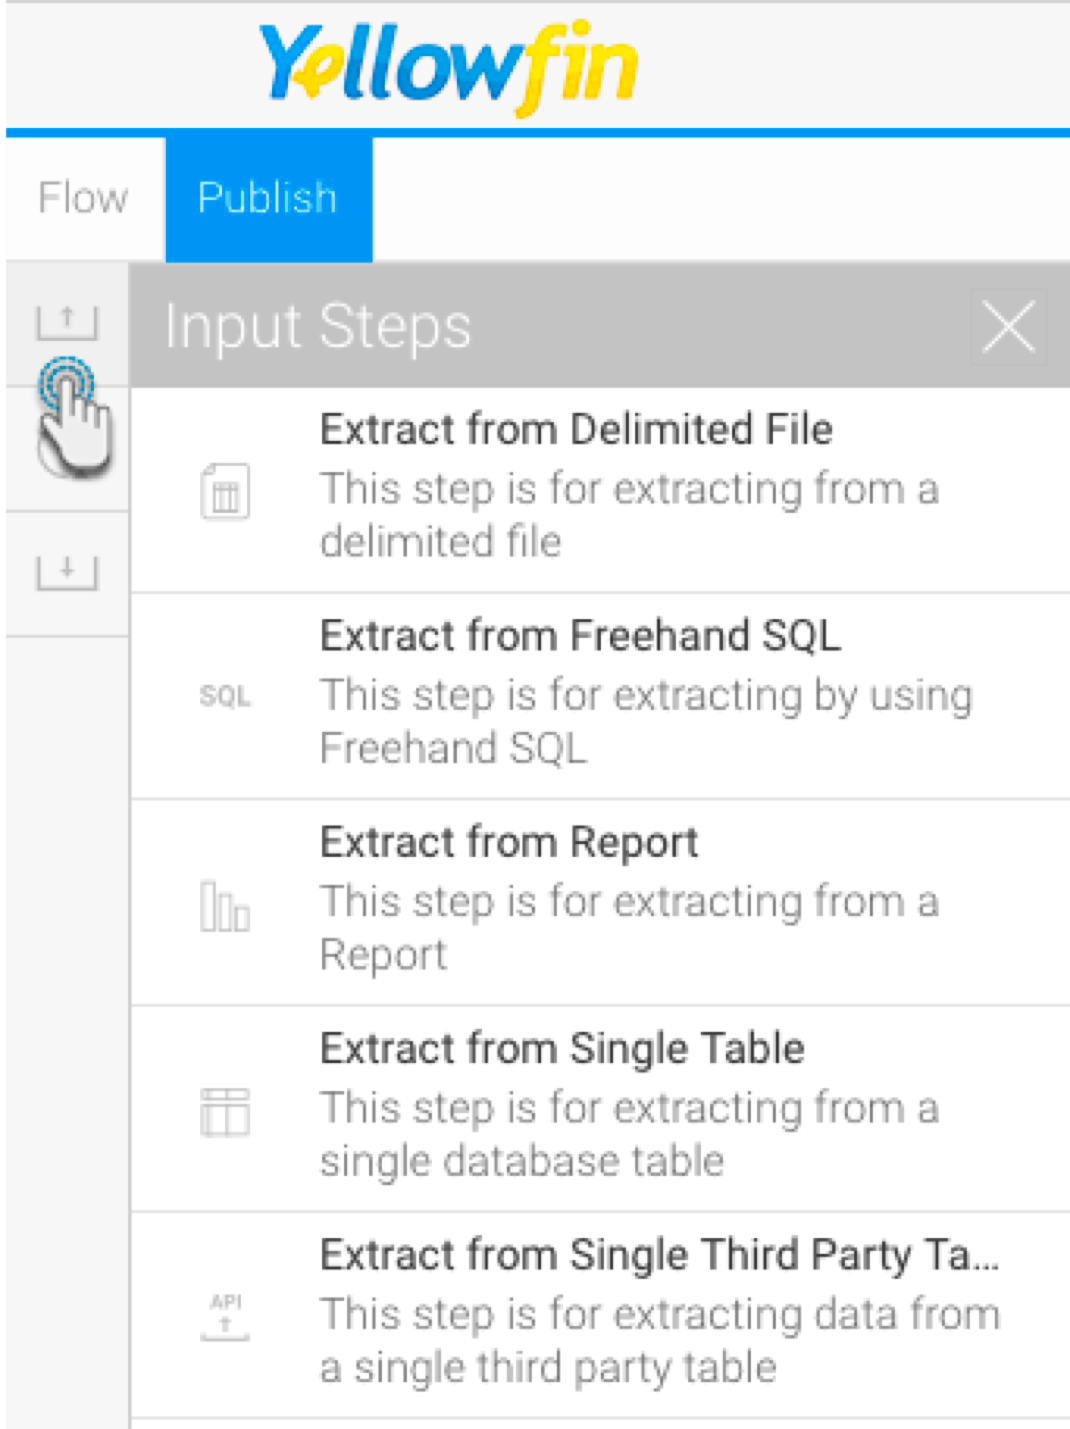
- Create a transformation flow beginning with an input step to extract data. (Click here if you want to learn how to create a basic flow, or here to learn about the different ways data can be extracted).
- The extracted data will appear in the data preview panel. You can add more steps to further transform the data.
- Once you are ready to use the data science model from your H2O instance, follow the procedure below.
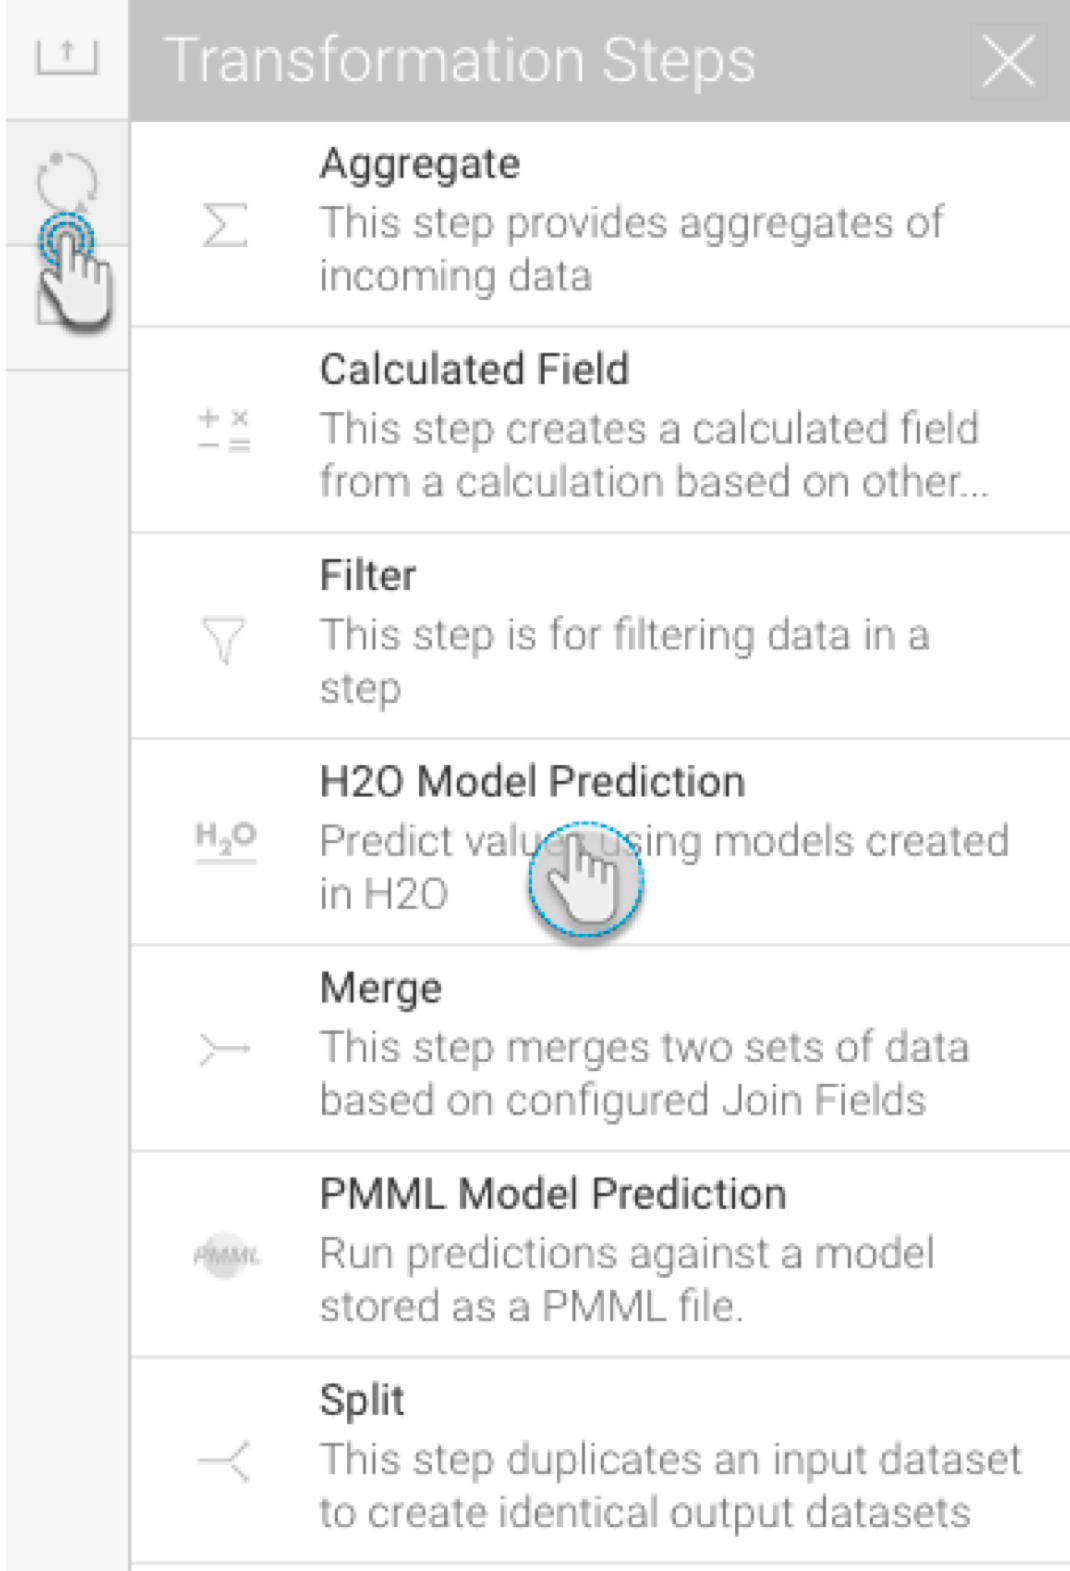
- Drag the H2O Model Prediction step from the transformation step list onto the canvas. (Note: If you don’t see this step, ensure that you have installed the H2O plug-in.)
- Using a connection point, create a connection from the last step to the H2O transformation step.
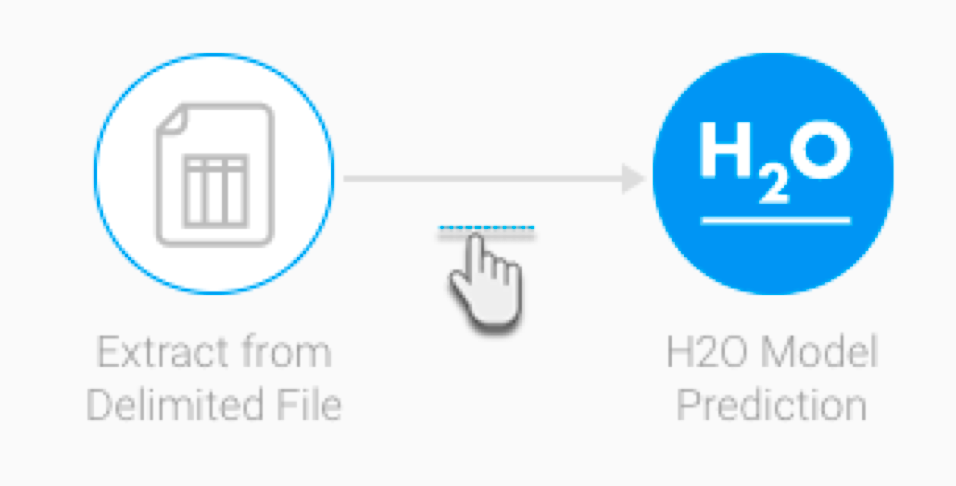
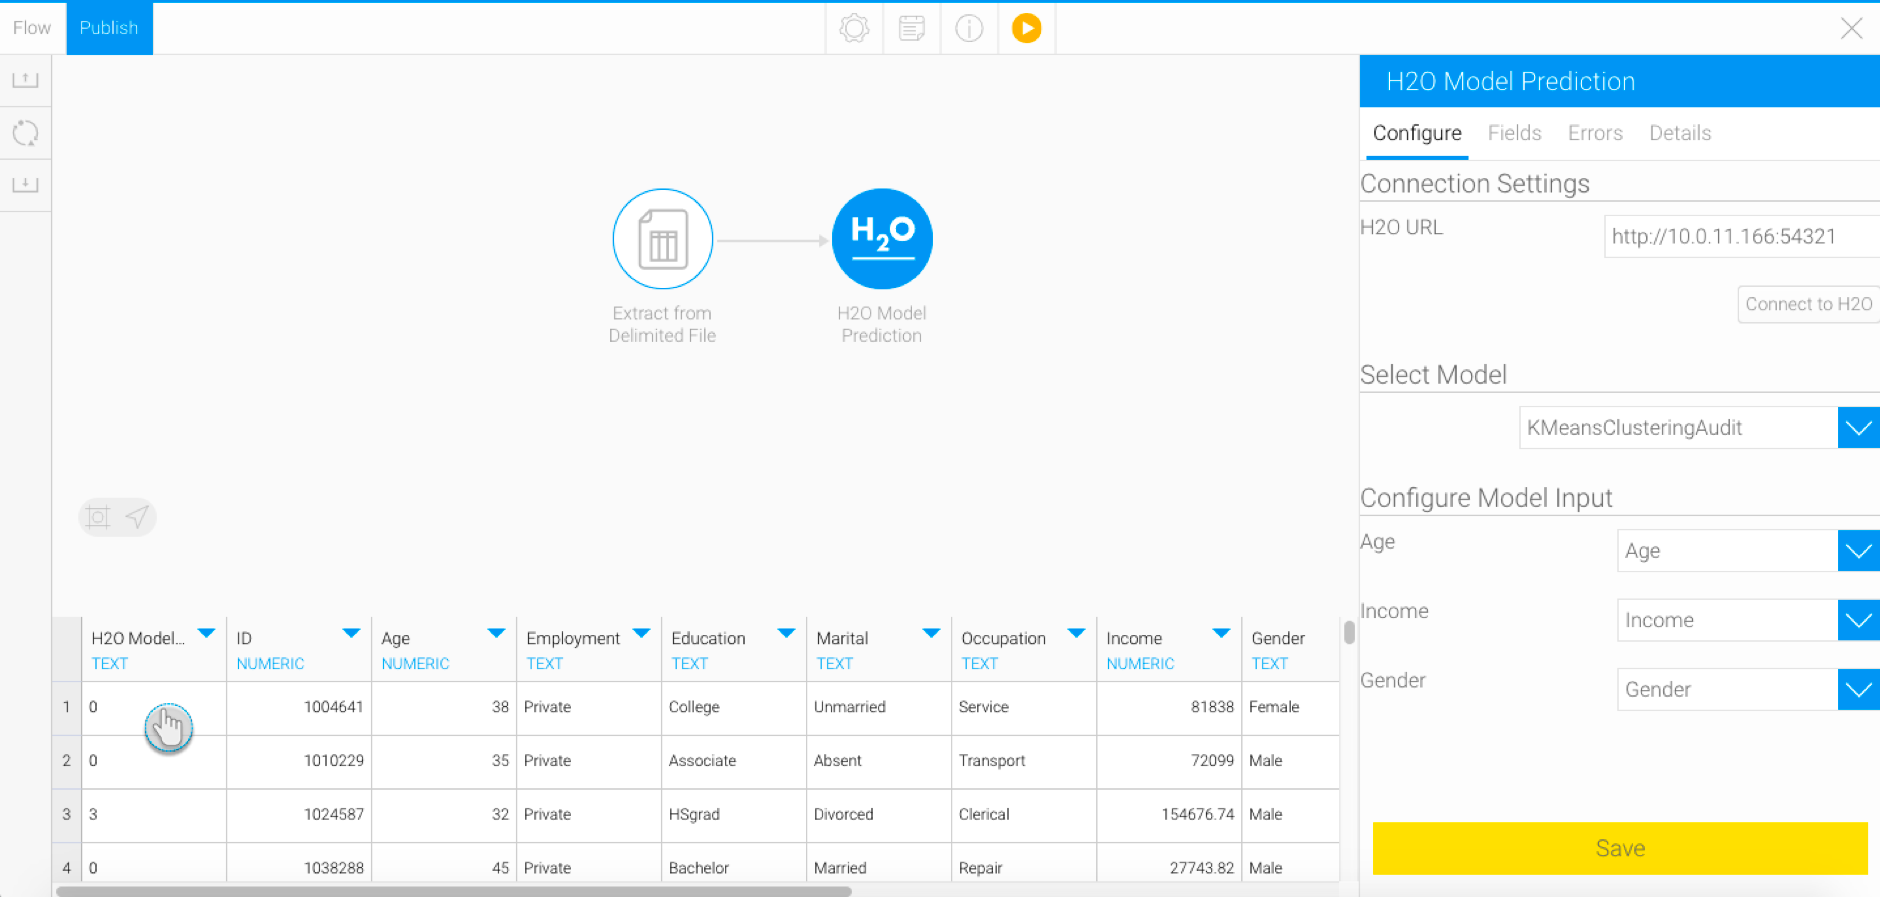
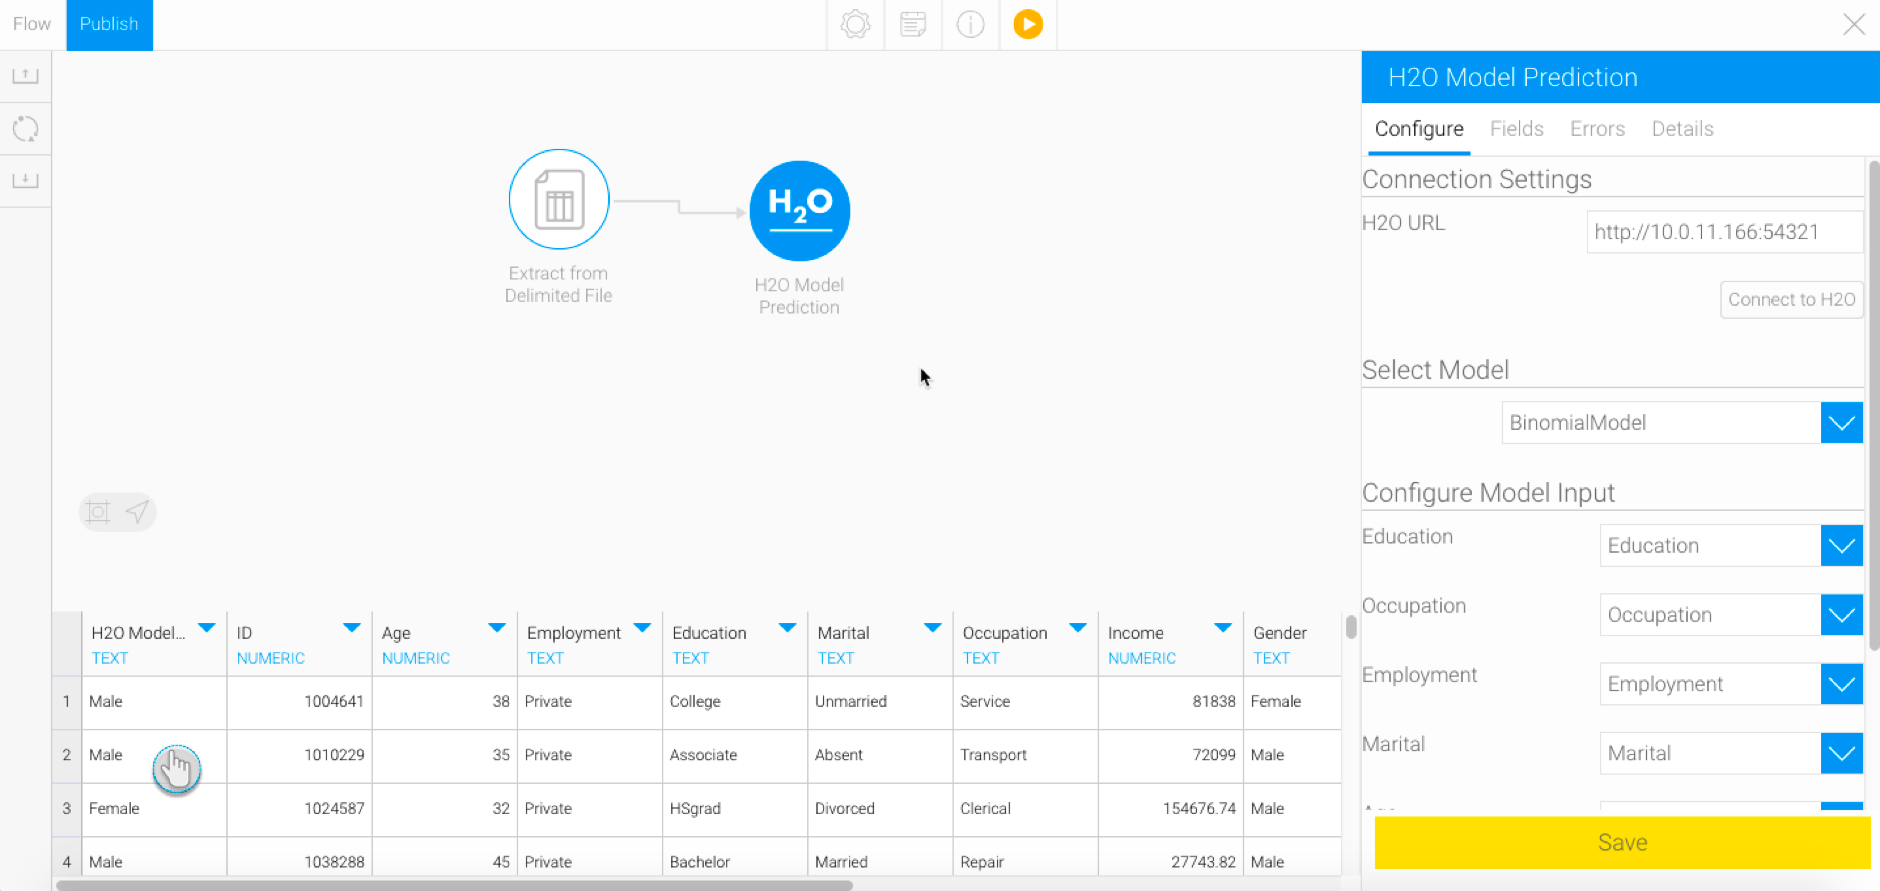
- Next, you need to configure the H2O step. (Make sure it is selected to bring up its configurable details.)
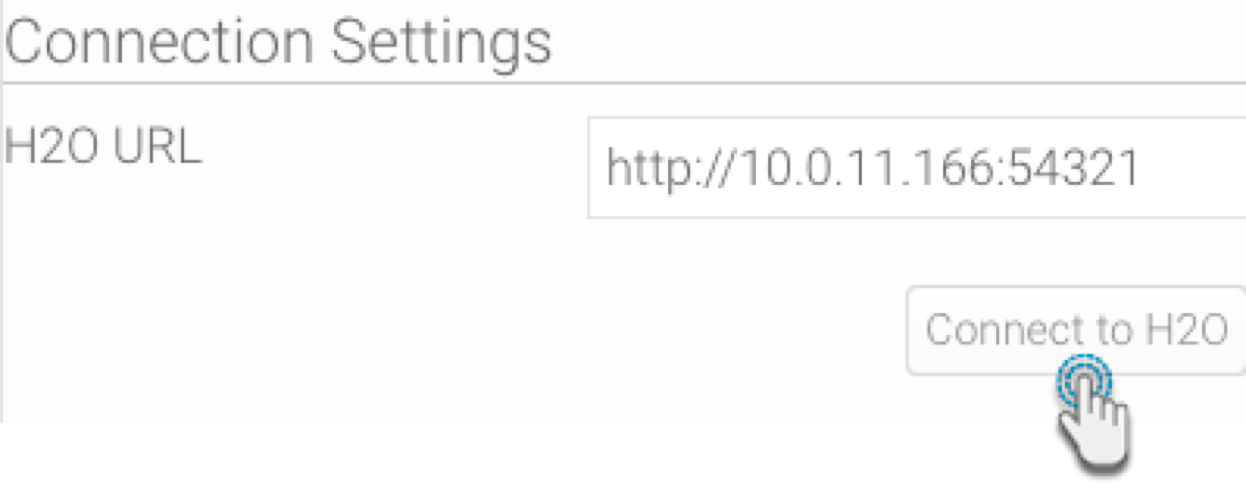
- Copy the path to your instance of H2O. (Note: You only need to provide the IP and port number.) For instance, we will provide http://10.0.11.166:54321 as the H2O URL based on our example below:

- Click on Connect to H2O.
Note: If the provided URL is incorrect, or if no actively running H2O instance was found, then error messages will appear. Such as: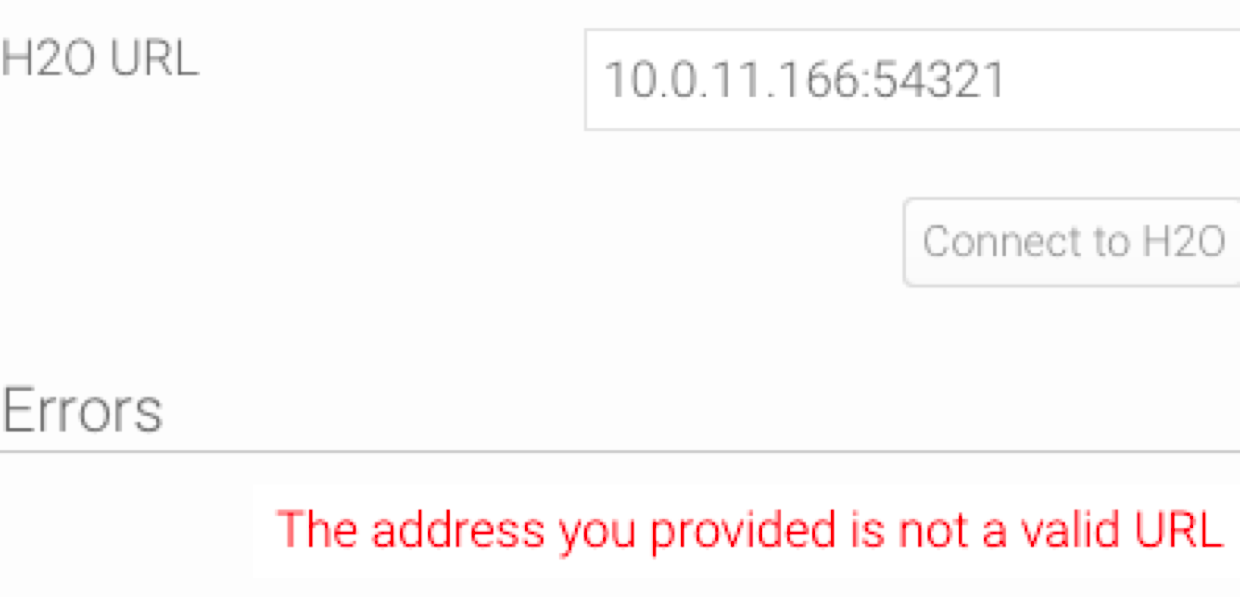
- Once you have successfully connected to your H2O instance, a new section will appear with a list of all the models on the linked H2O instance. (Note: It could take some time for any changes to appear in the step configuration panel on the use of the connect button.)
Choose the model that you want to use.
If no models appear in the list, then ensure that the instance has models created in it, and that they are supported by Yellowfin.
If a model you have selected, or are trying to select, gets deleted from the H2O instance, then an error will appear. You will then need to manually update the model list in the step configuration panel, e.g. by clicking Connect to H2O again.
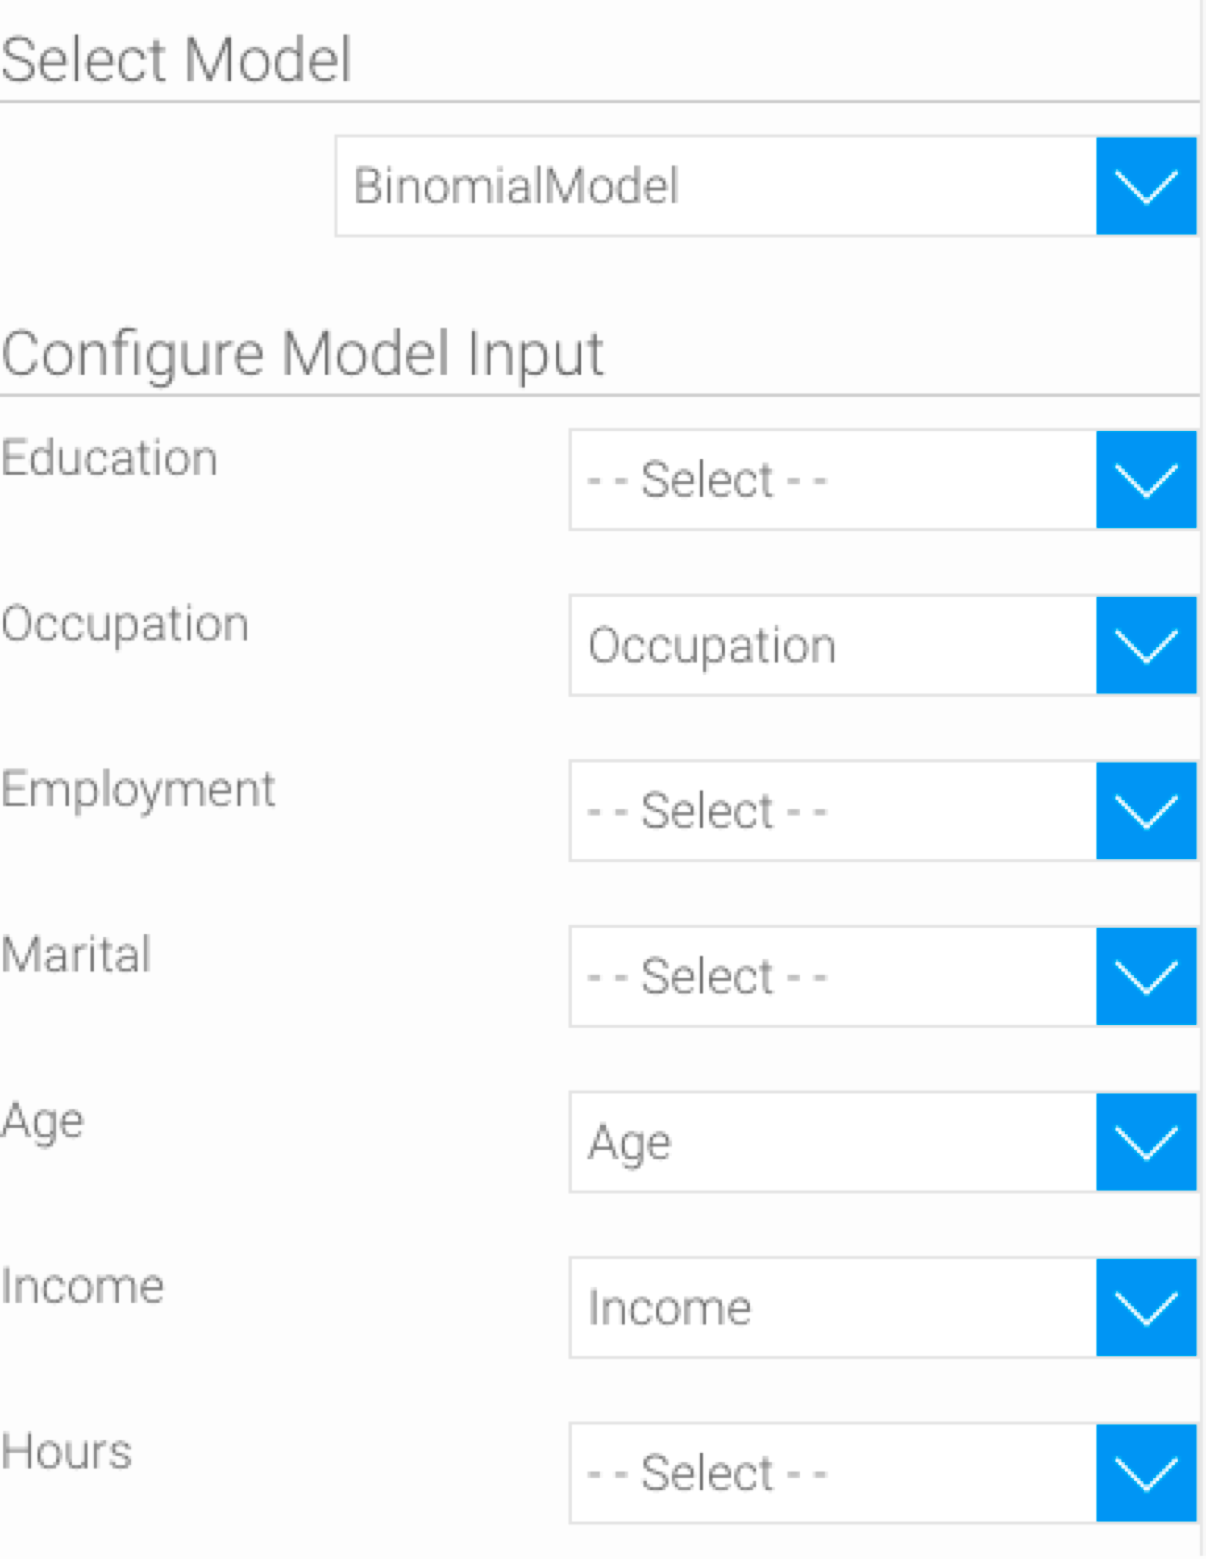
- Next, further configuration options will appear to map the input fields. These will be specific to the model.
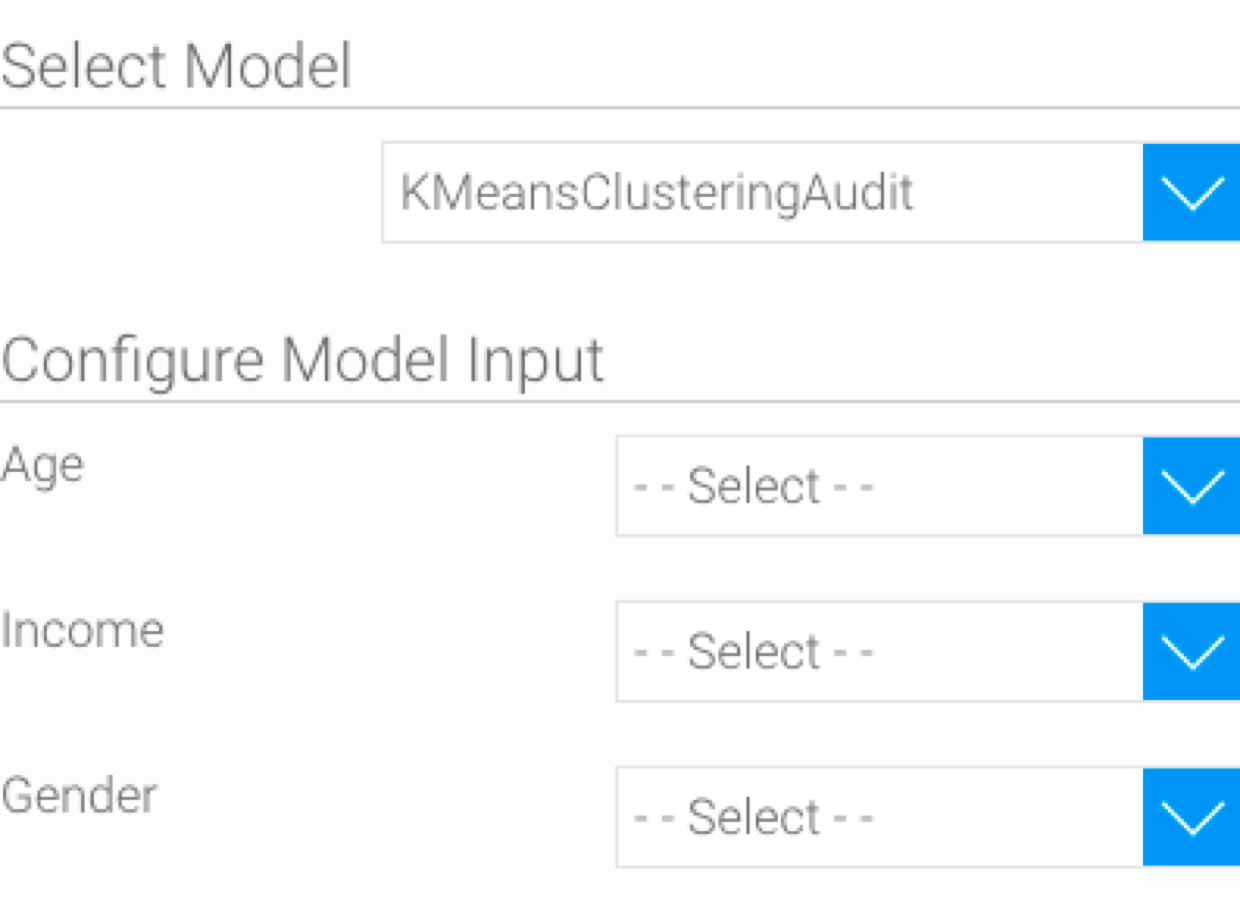
Match the data to the input columns required by the model. For example, our model requires input in the form of age, income, and gender.
It is mandatory to match all the fields for this step to run and generate a result. You must also match the data correctly, ensuring the right values with the same datatypes are mapped. (If an incorrect mapping is made, the Errors field will generate errors for each of the data values.)
- Then click Save.
- On successful execution of the step, a new column called “H2O Model Result” will appear in the data preview panel with the model output. The result generated here will depend on the type of model.
- You can perform further transformations or save your result in a database.
Editing the H2O step
Changes to the H2O model: What happens if the configured H2O model changes?
Models created in H2O can be edited and saved again using the same ID. This entails minor changes or even completely changing the entire model. If the model that you’re using in your transformation flow changes, then depending on the nature of the change, you might need to reconfigure the H2O transformation step. This will be relative to the fact that the new model has new fields that will need to be mapped.
- No new fields: If no new input fields have been added or existing ones changed in the new model, (even if some of the fields have been removed), then there will be no need to match any fields or carry out any type of configuration. The step will continue to work without breaking.
Additional new fields: However, if changes to the model include addition of new input fields, then these will need to be configured manually, otherwise the step will break. Note: Even though the new model has additional fields included in it, they will not automatically appear in the step configuration panel. Some sort of action has to be manually carried out by the user to make these fields visible. For example, clicking the Save button in the step configuration panel, or selecting another model from the list, and then the new model again, will bring up the new input fields.
For instance, the H2O model used in this example has been changed to include an additional input field (say, Education). On running this model without configuring this field, the step will break.
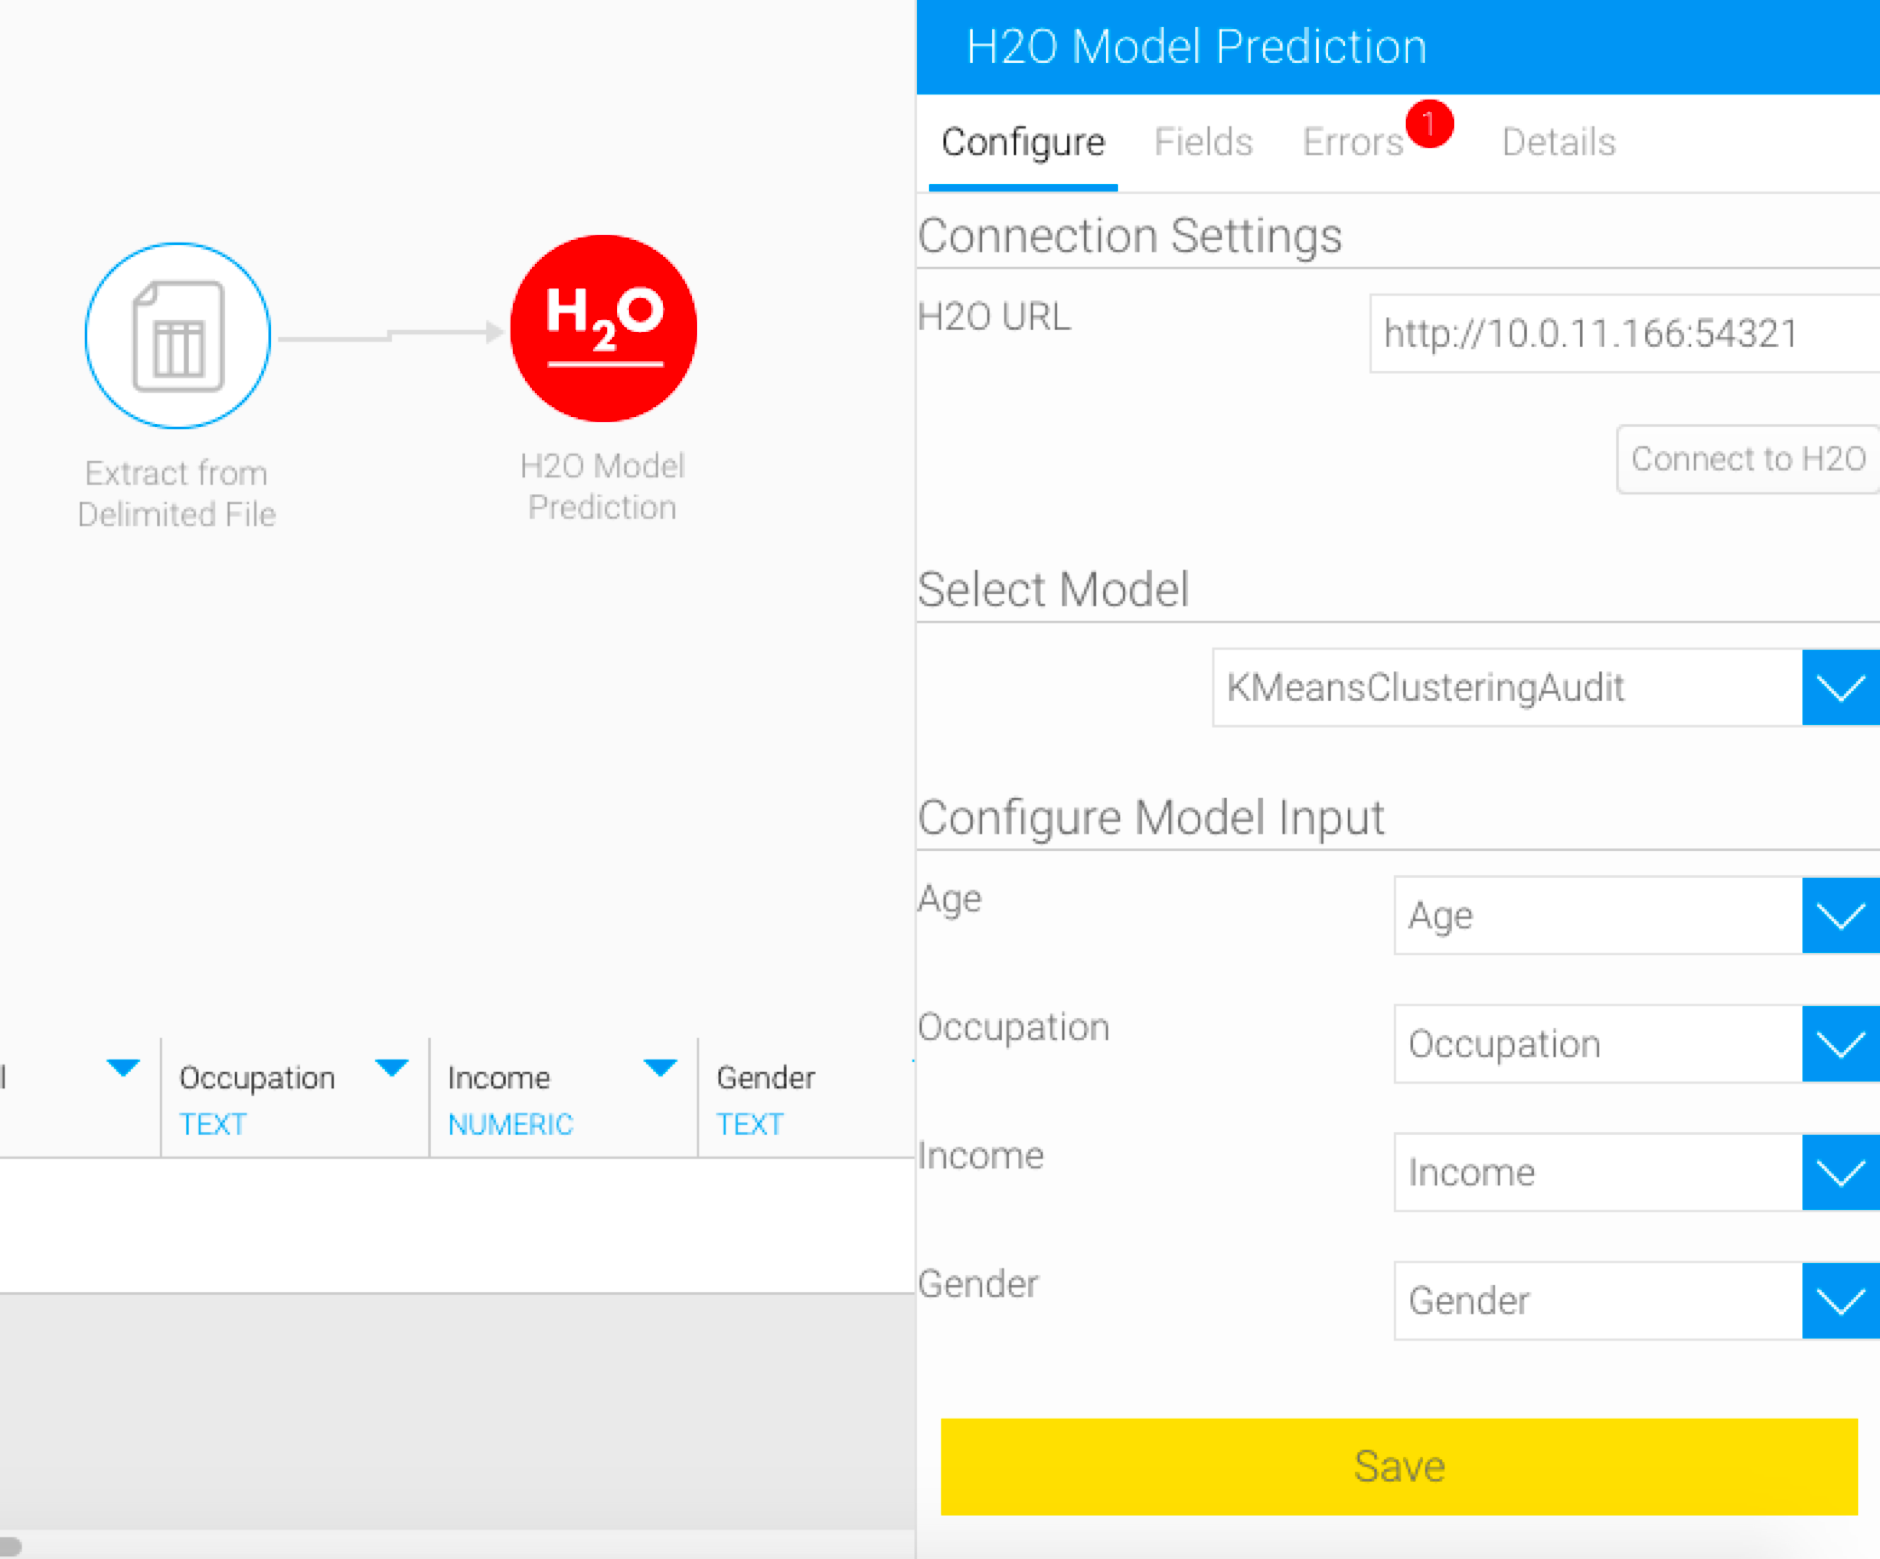
As seen, the configure panel does not display any changes in the input form.
Click on the Save button. The form will get updated to display the input required by the new model (in this example, it’s the addition of a new field).

Map this field and then save it to execute the flow properly.- For example, here is a simple flow we’ve created displaying the result of a model that requires 3 input fields to be configured (age, occupation, and income).
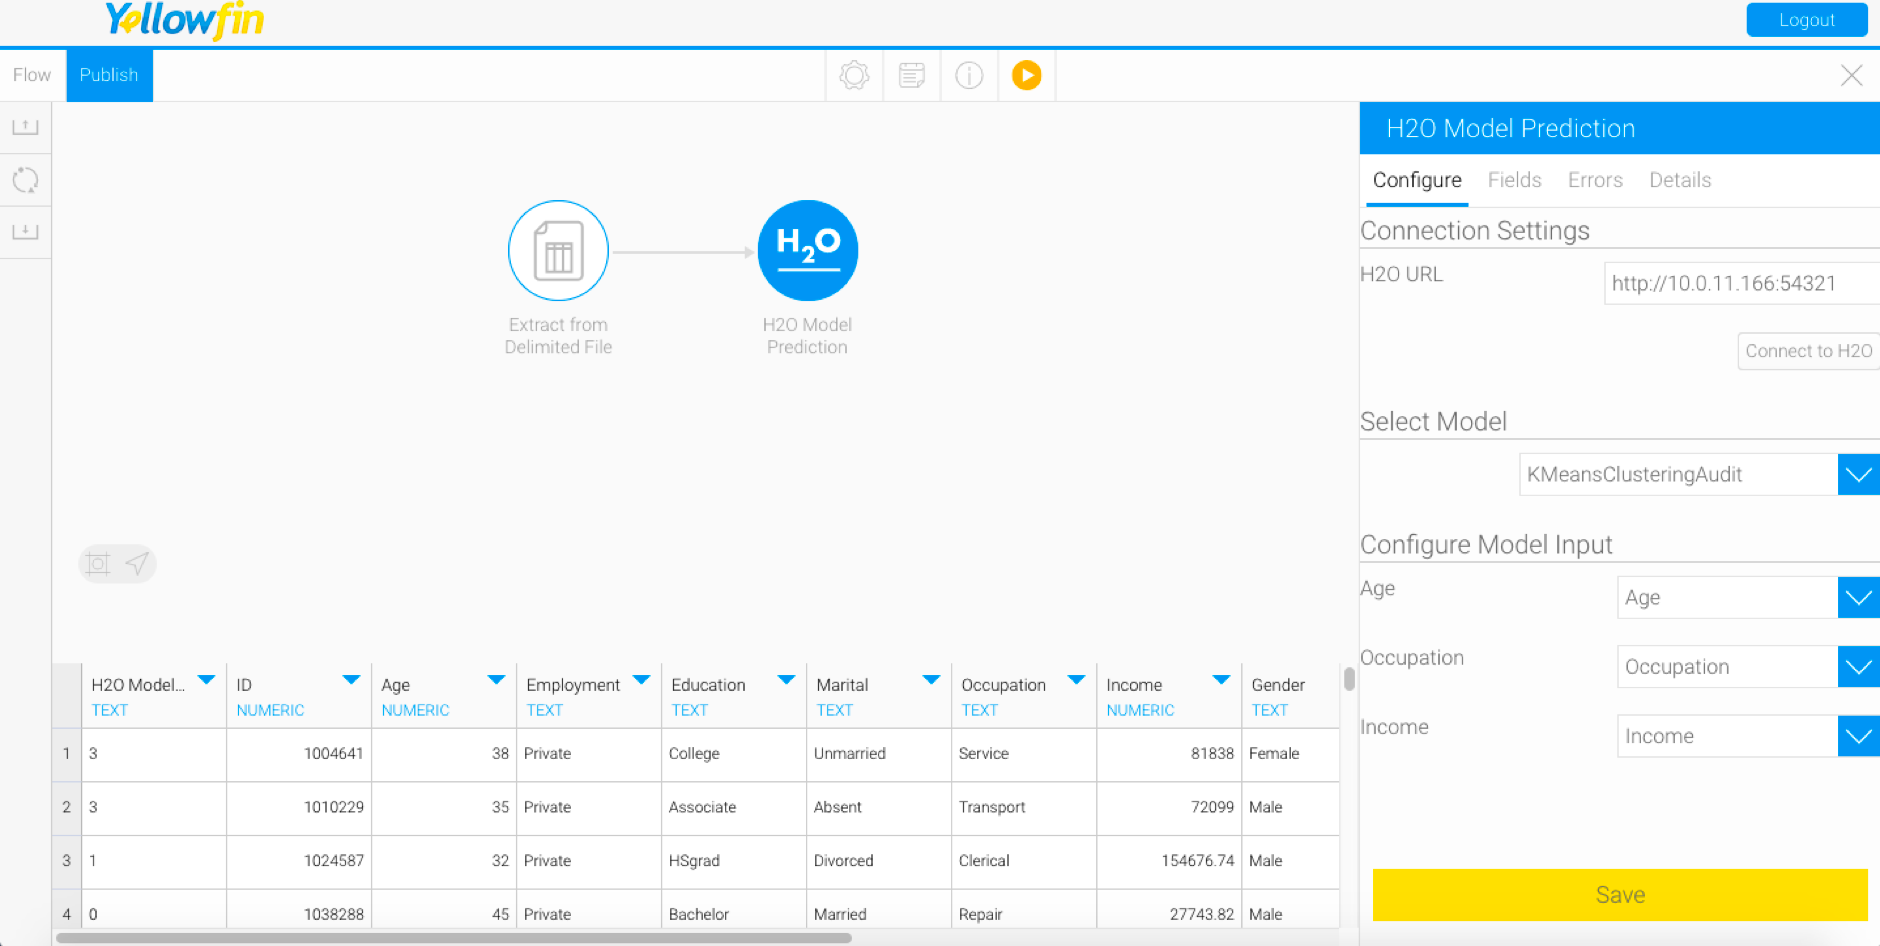
- Click on the Select Model list and choose a different model from it.

- New input fields specified in this model will appear. However any previously mapped fields with the same name are automatically matched for this model as well.
- Make mappings between the new input fields with the data from the flow. And click Save.
- The output column will be updated to display the results of the new model.
- For example, here is a simple flow we’ve created displaying the result of a model that requires 3 input fields to be configured (age, occupation, and income).
Changes made to the output
As discussed in our workflow, the output generated by the model will appear in a new column named “H2O Model Result” in the data preview panel. If changes to the H2O step are made, then it will affect the proceeding steps in the flow. This could even result in these steps failing.
Changed output type: If the model in the H2O step gets changed, then it is possible that it’s output type might get changed as well. If the next connected step was expecting, say, a numeric value, but due to the changes receives a text value, then it will fail.
For example: Here is a flow in which the H2O step transforms data from an input step using a model. It is designed to produce a numeric result, which is used by the next step, that is, Aggregate to calculate the sum of this result. This result is then sent to a Calculated Field step.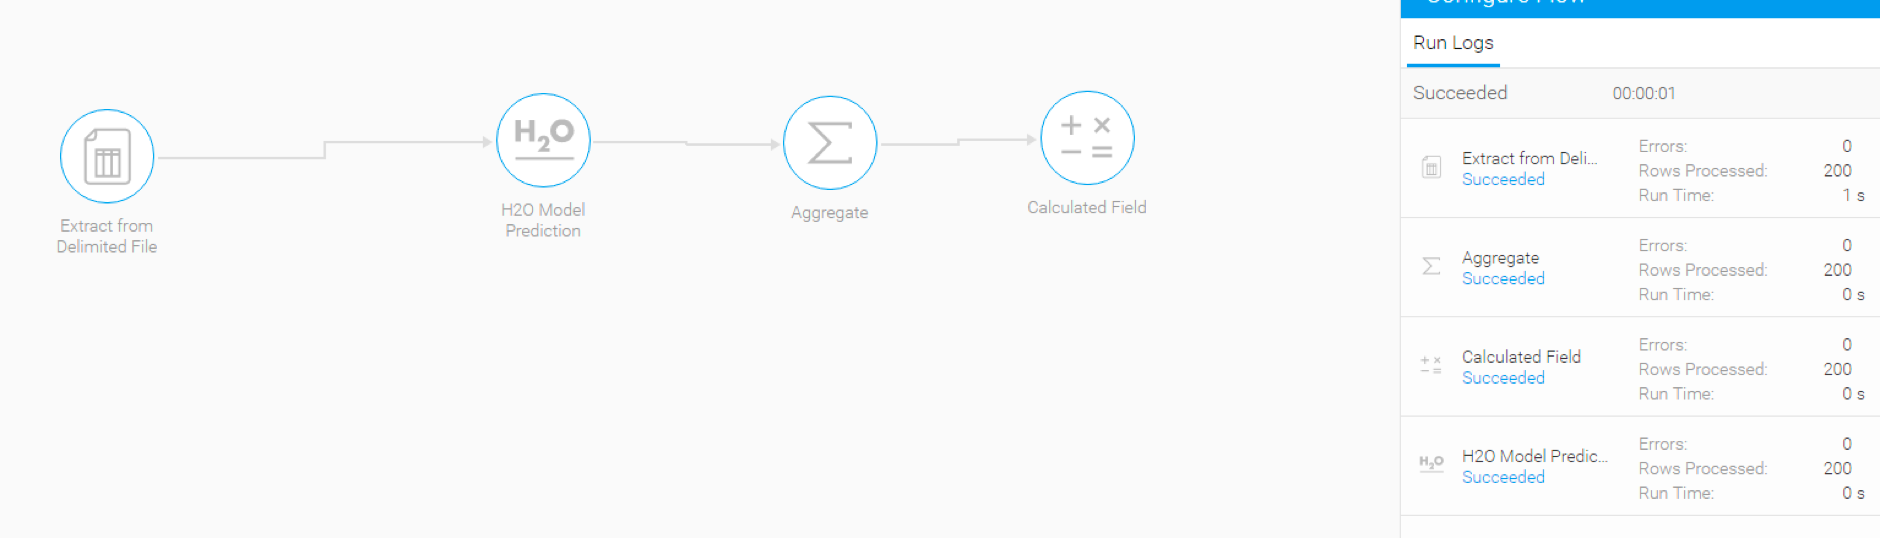
But if the output of the model is changed to generate a text result, then the aggregate step will fail (or get broken), as it requires a numeric value to run properly. All steps proceeding the failed step will get cancelled.
